![]()

Hisense display modes for calibration: SDR and HDR by using the Autocal workflow. Most of the settings are automatically set. However, calibrating HDR requires a couple settings to be manually set and is noted in the workflow.
Calman and display requirements
Calman Required Version
- Calman Studio, Video Pro, or Ultimate
- Calman 2023 v5.15.5 or newer for Hisense models
Calman Required Workflows
AutoCal-Hisense Workflow
Required Hardware
- HDR Compatible Pattern Generator
- HDR Compatible Meter (testing was completed using a VideoForgePro)
- For information see Calman Compatible Meters
- Calman Compatible Hisense TV
- 2024
- U7NQ
- U8NQ
- UXNQ
- A85N
- 2025
- U7Q
- U7Q Pro
- E8Q
- UXQ
- U8Q
- A85Q
- 2024
- TV setup:
- Complete TV network setup and ensure TV connected to the same local area network (e.g. router) as the computer running Calman software
- Connect the Calman-supported pattern generator to TV’s HDMI port 1 with a certified (at least HDMI 2.0 grade) cable.
- To select Calman Service Option (currently hidden) using the remote select
- Settings-Picture-Picture Mode Settings-Advanced Settings- and enter enter 0000 (note, do not select Advanced Settings, but hover over)
- Calman Service will be displayed, select enter to enable (check the box)
- Additional options in this menu will be displayed
- Calman Service Information, includes the IP address, port number
- Clear All Calman AutoCal Data
Connecting to workflow AutoCal Calibration
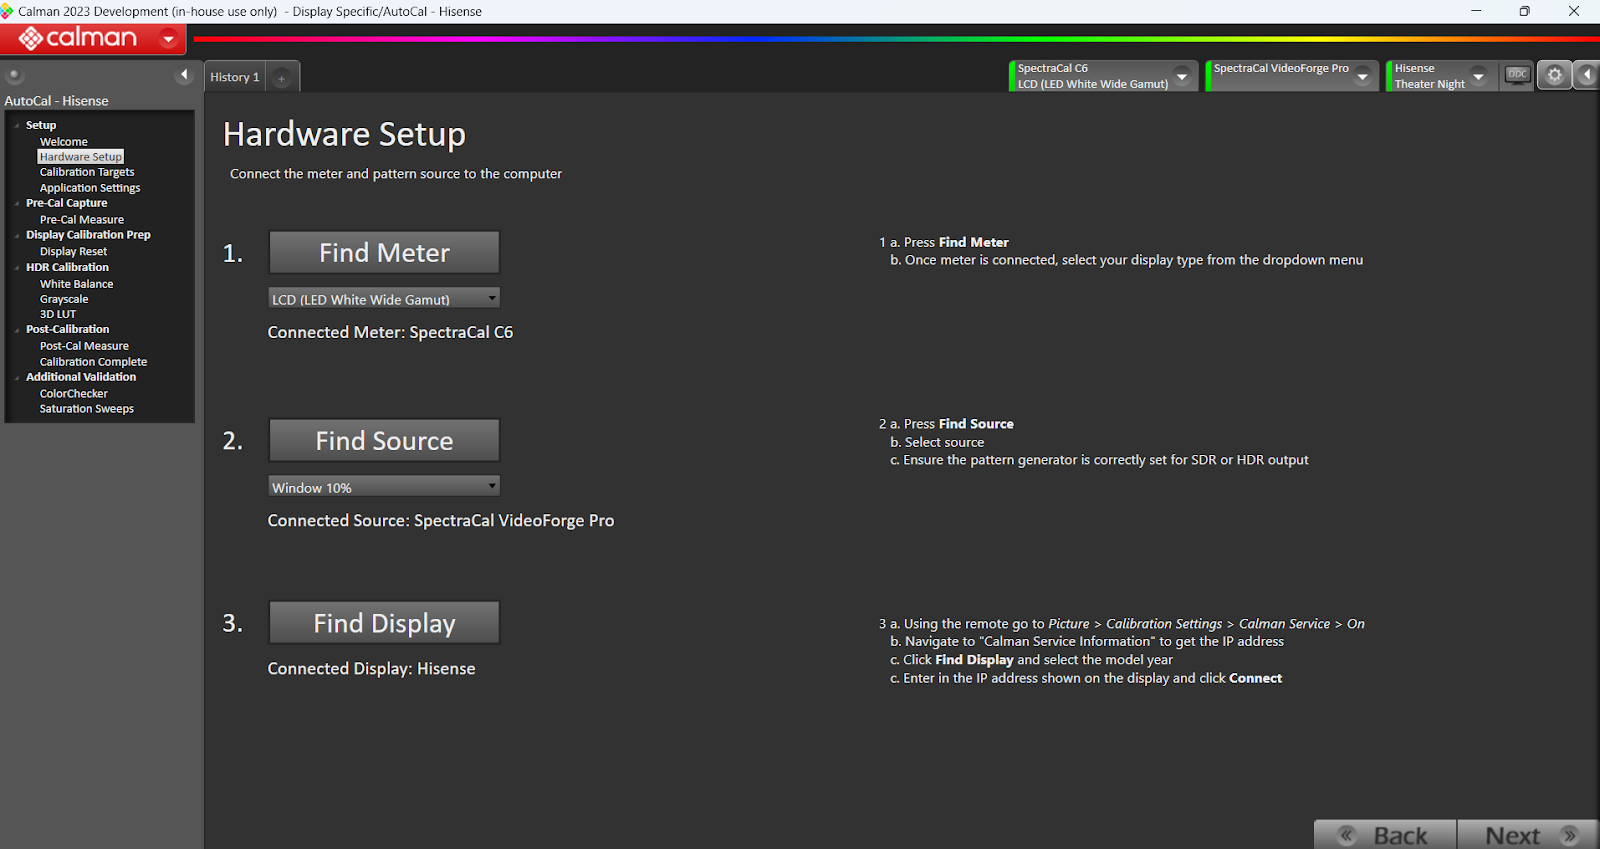
From the Calman Menu in the top-left, choose Open Workflow Template > Display Specific and then AutoCal – Hisense
Most of the functions have been automated when using the Hisense workflow
Note: Tone mapping is enabled during pre and post calibration, however in the workflow there is an option toggle on and off tone mapping to visually review differences in a pattern
Connect to the AutoCal-Hisense Workflow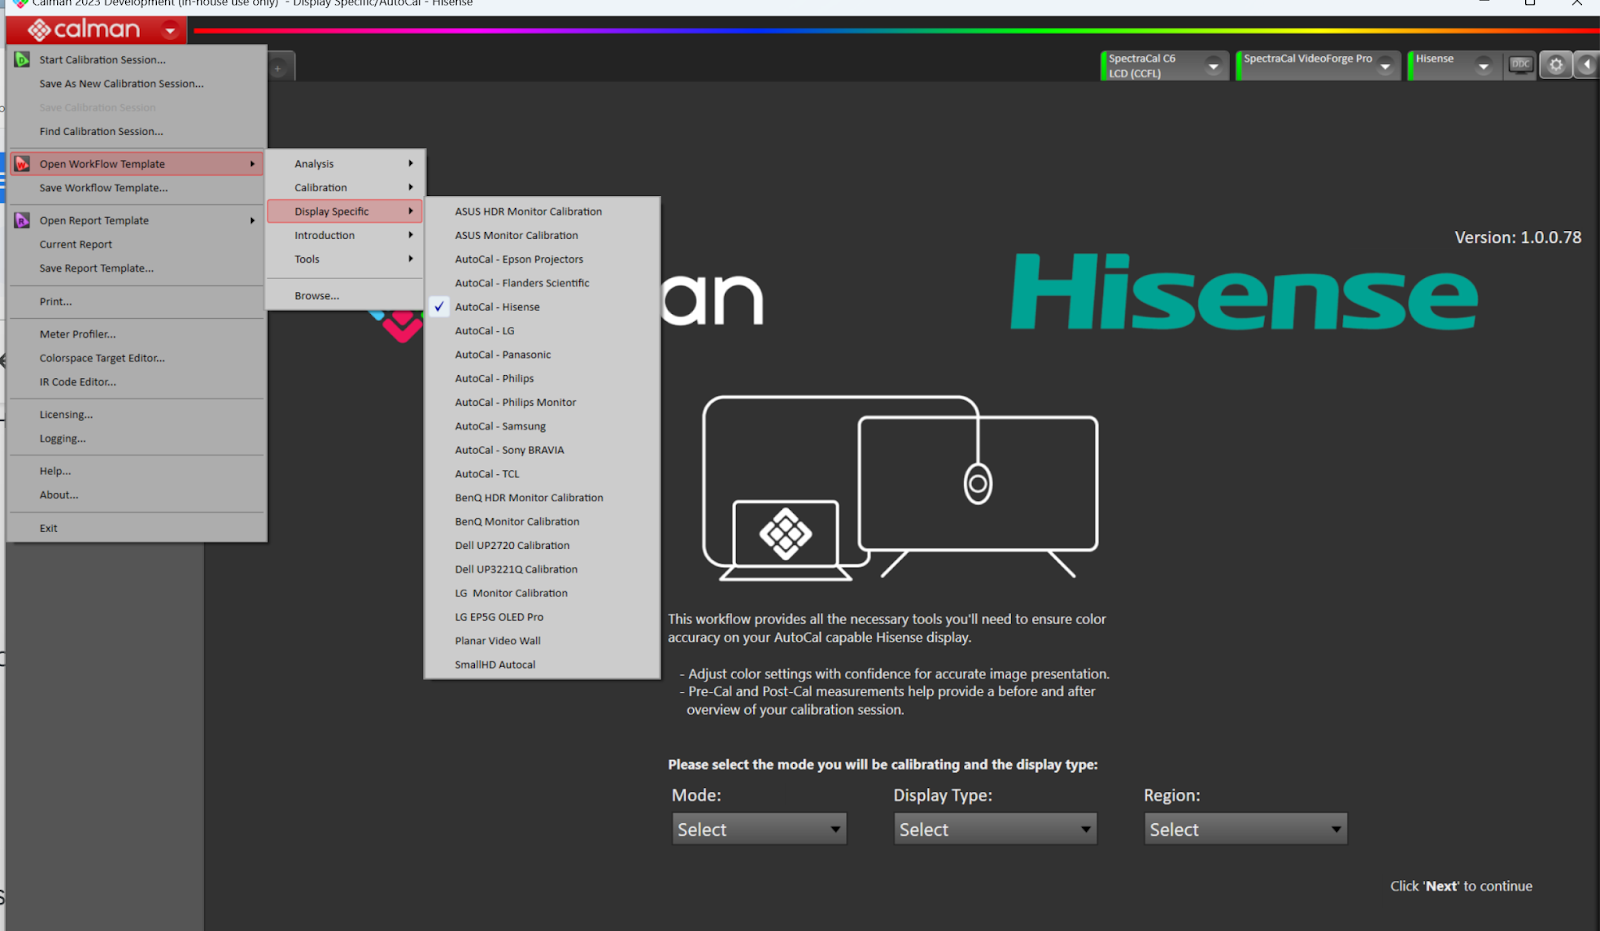
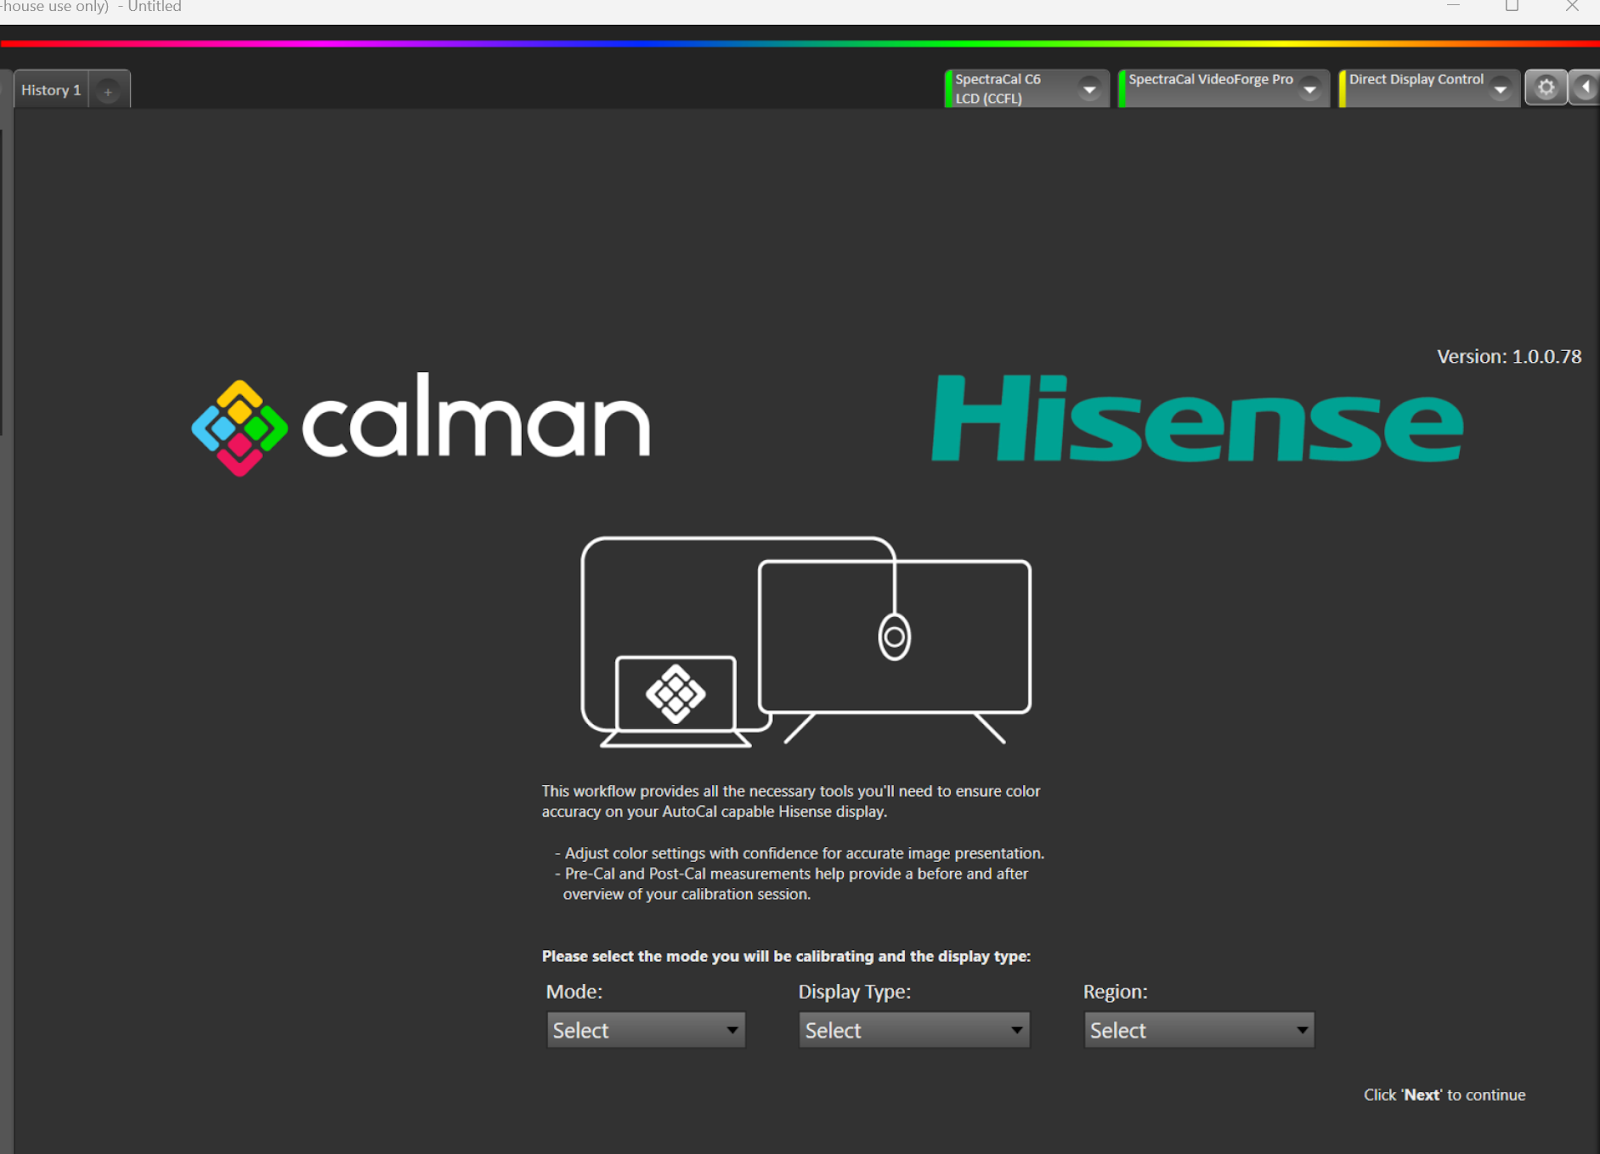
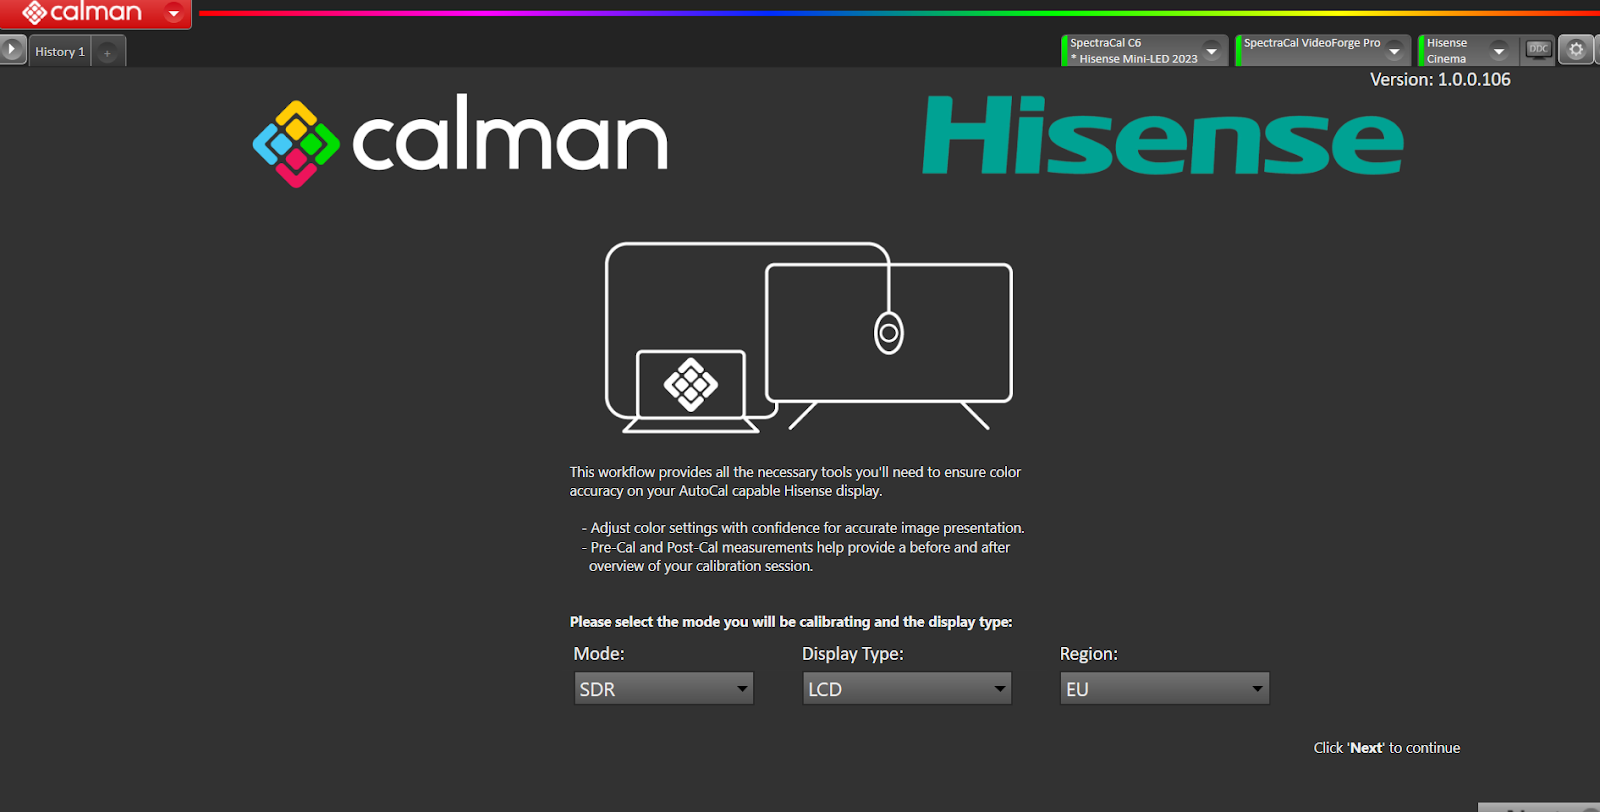
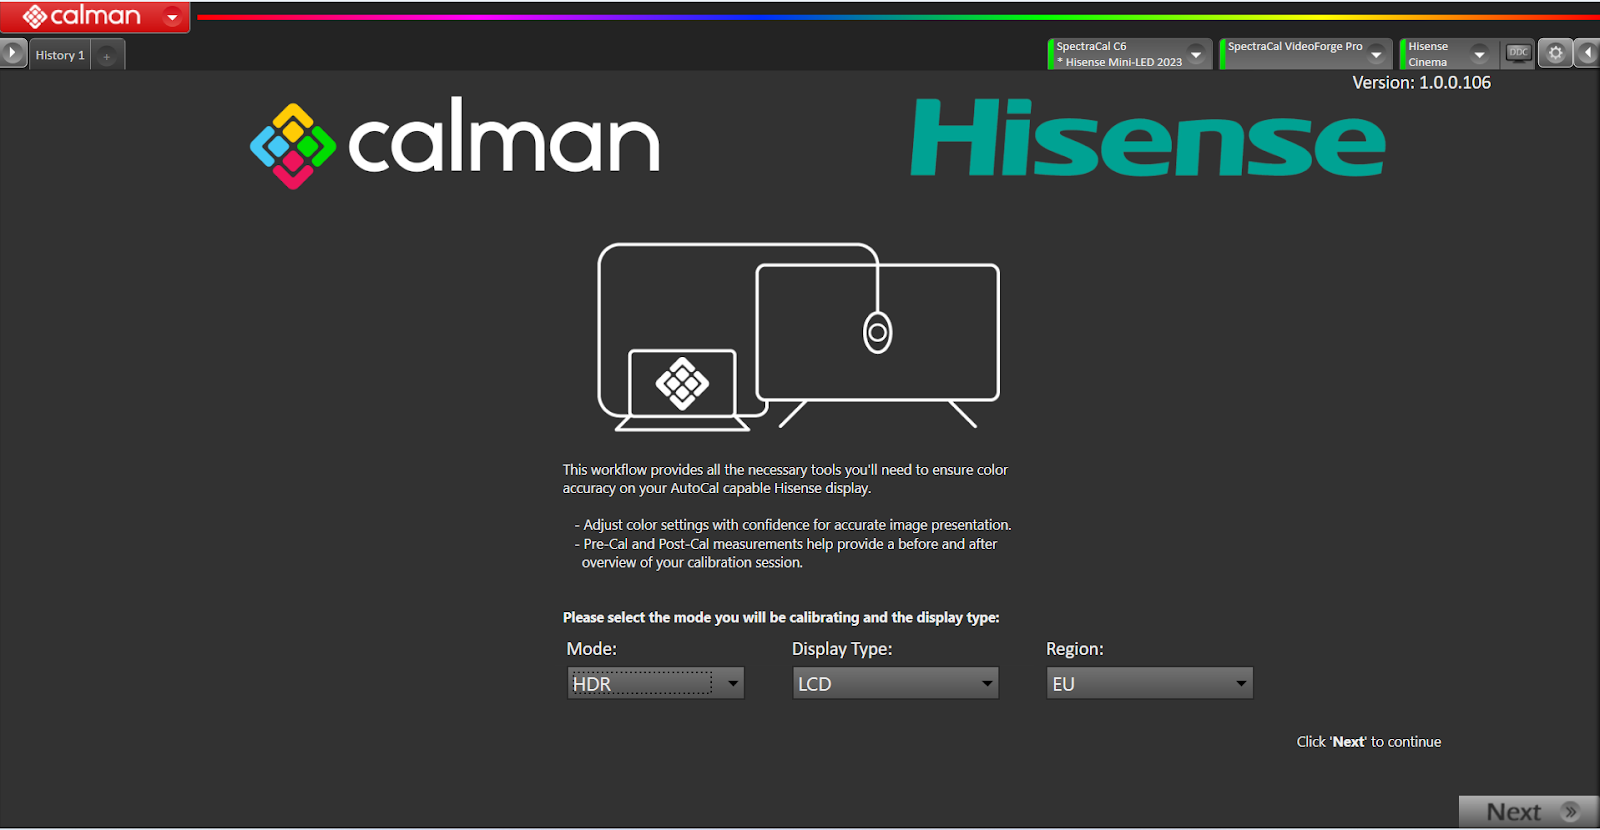
Select mode, display type and Region
SDR Calibration
Select mode SDR and display type
Select Next
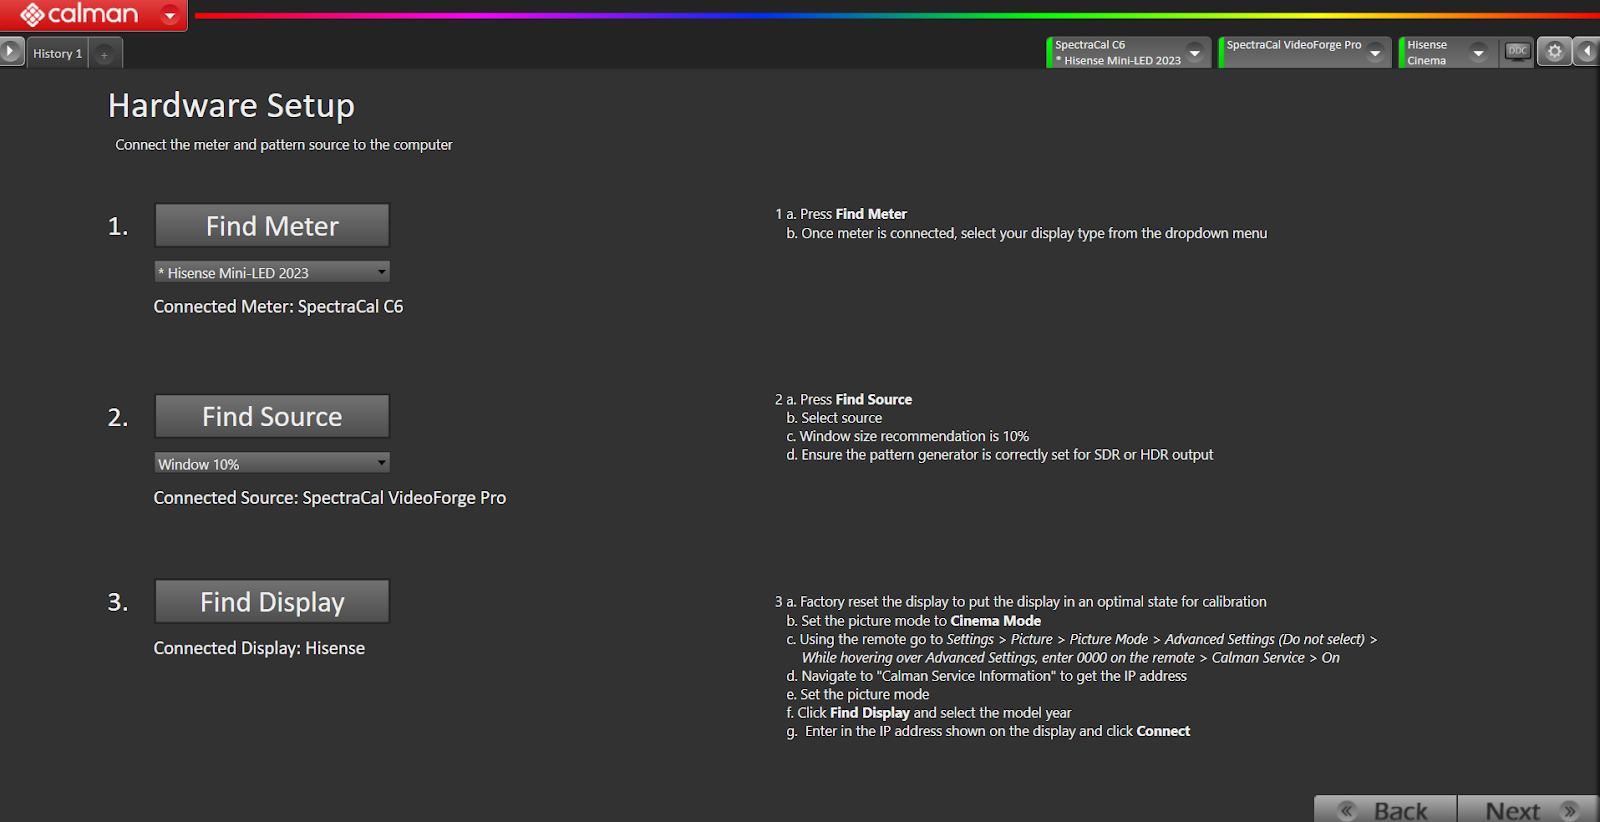
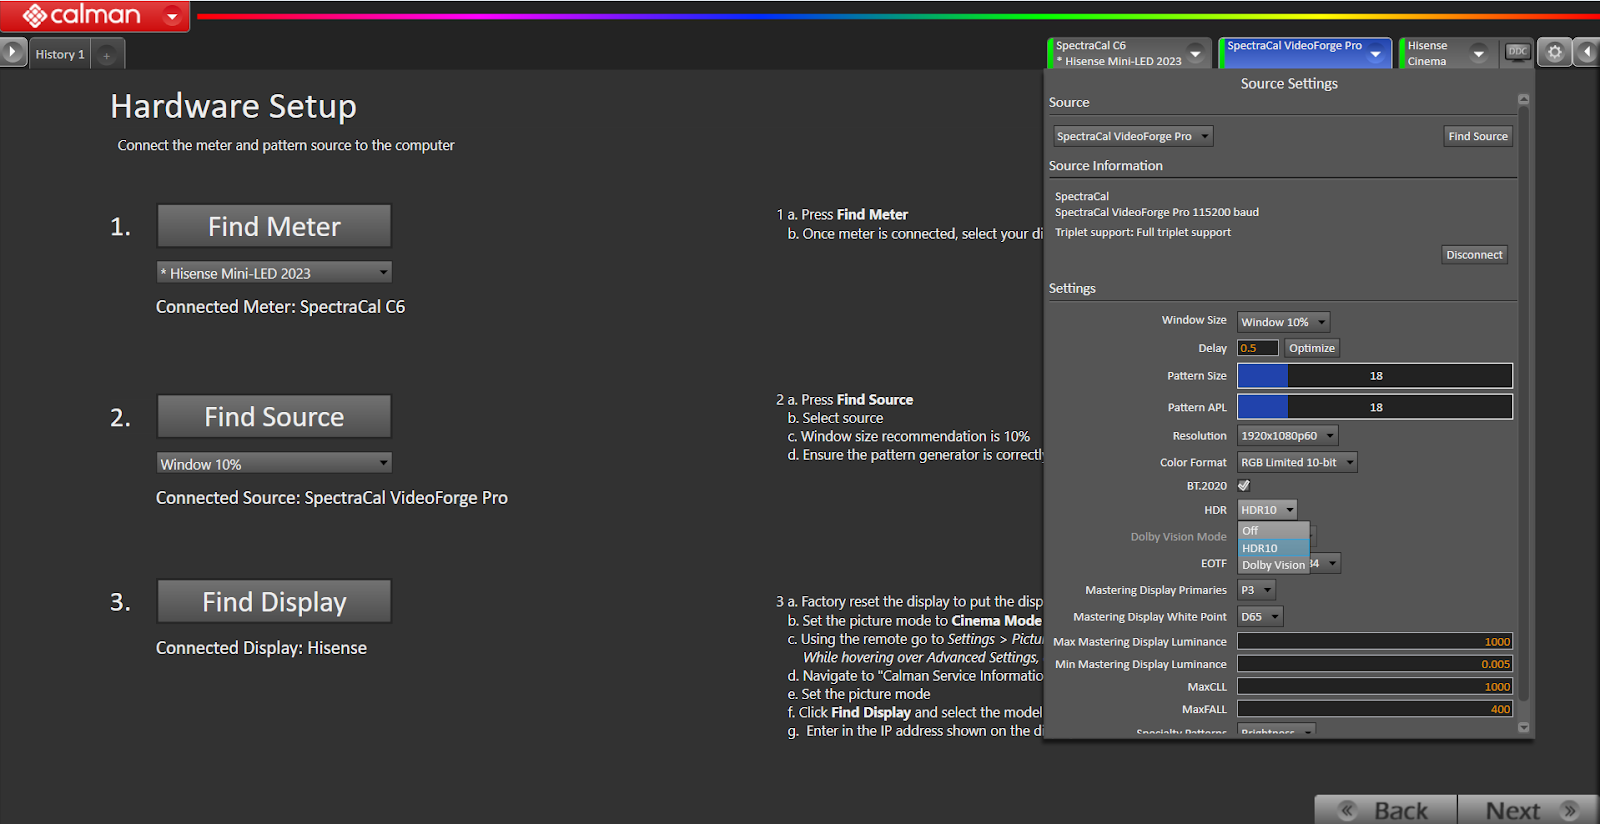
Hardware Setup
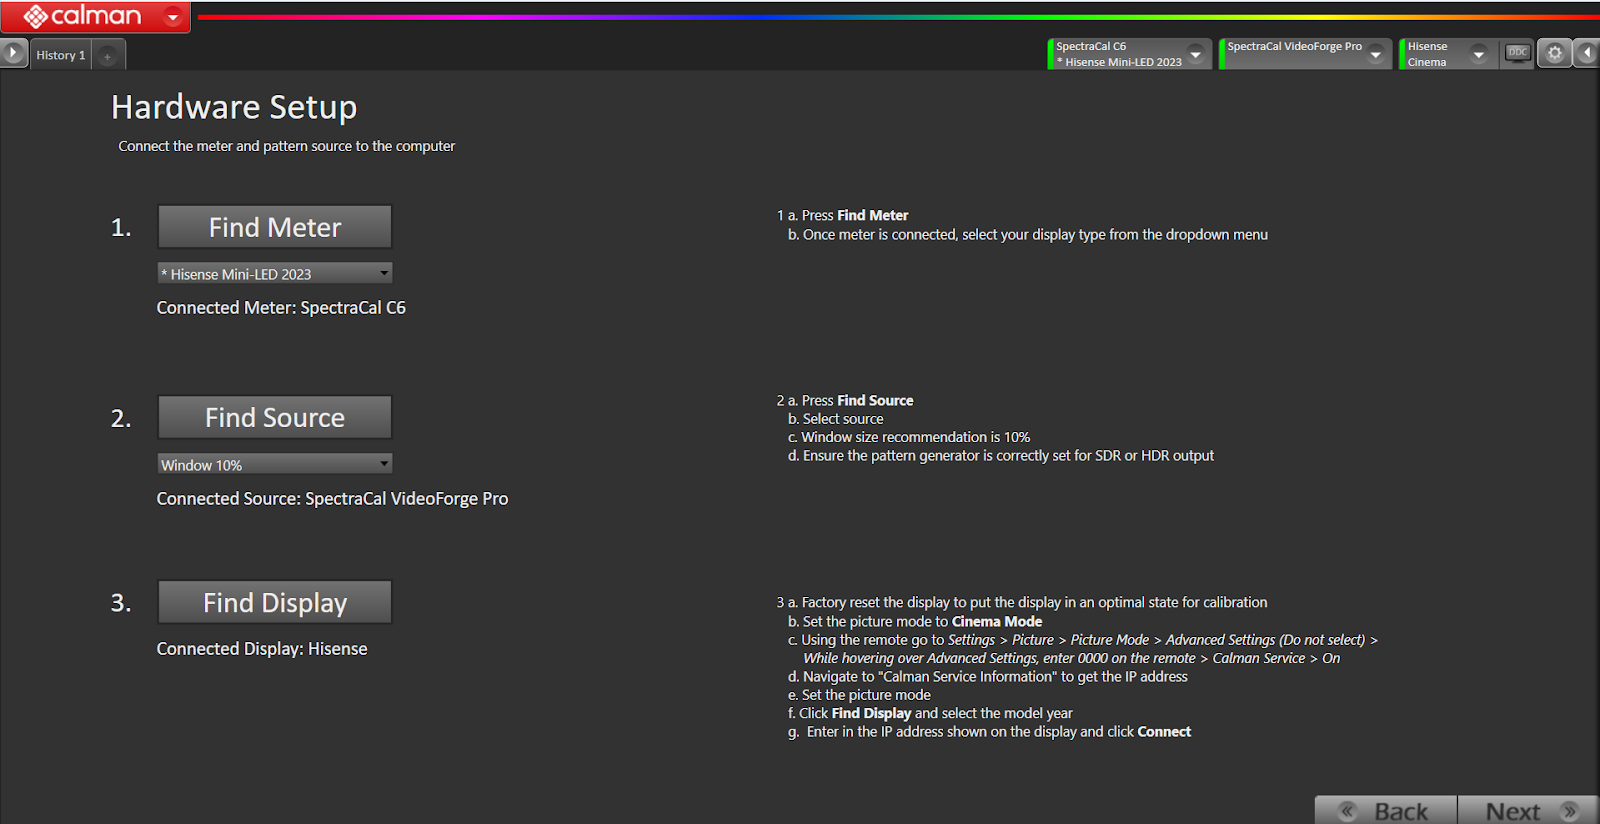
- Select Find Meter
- Select Find Source
- Select Find Display
On the display select Calman Service Option (currently hidden) using the remote select
- Settings-Picture-Picture Mode Settings-Advanced Settings- and enter enter 0000 while hovering on the Advanced Settings (do not select Advanced Settings)
- Calman Service will be displayed, select enter to enable (check the box)
- Additional options in this menu will be displayed
- Calman Service Information, includes the IP address, port number
- Clear All Calman AutoCal Data
Select Next
Calibration Targets
Validate the Calibration targets and select Reset Targets
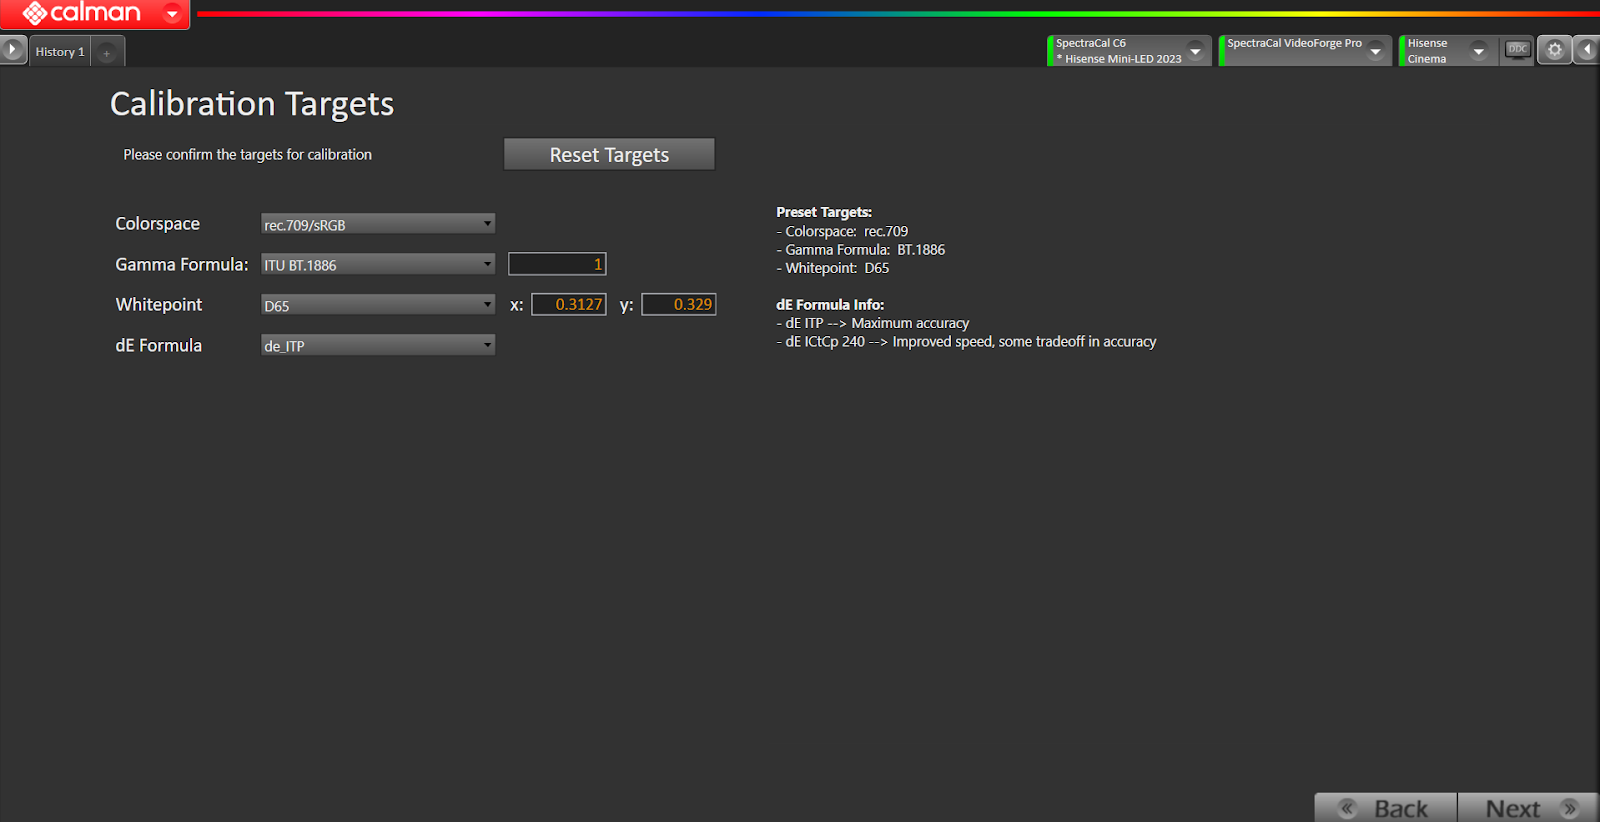
Select Next
Verify Display Settings, for SDR are Cinema and Filmmaker
Select Next
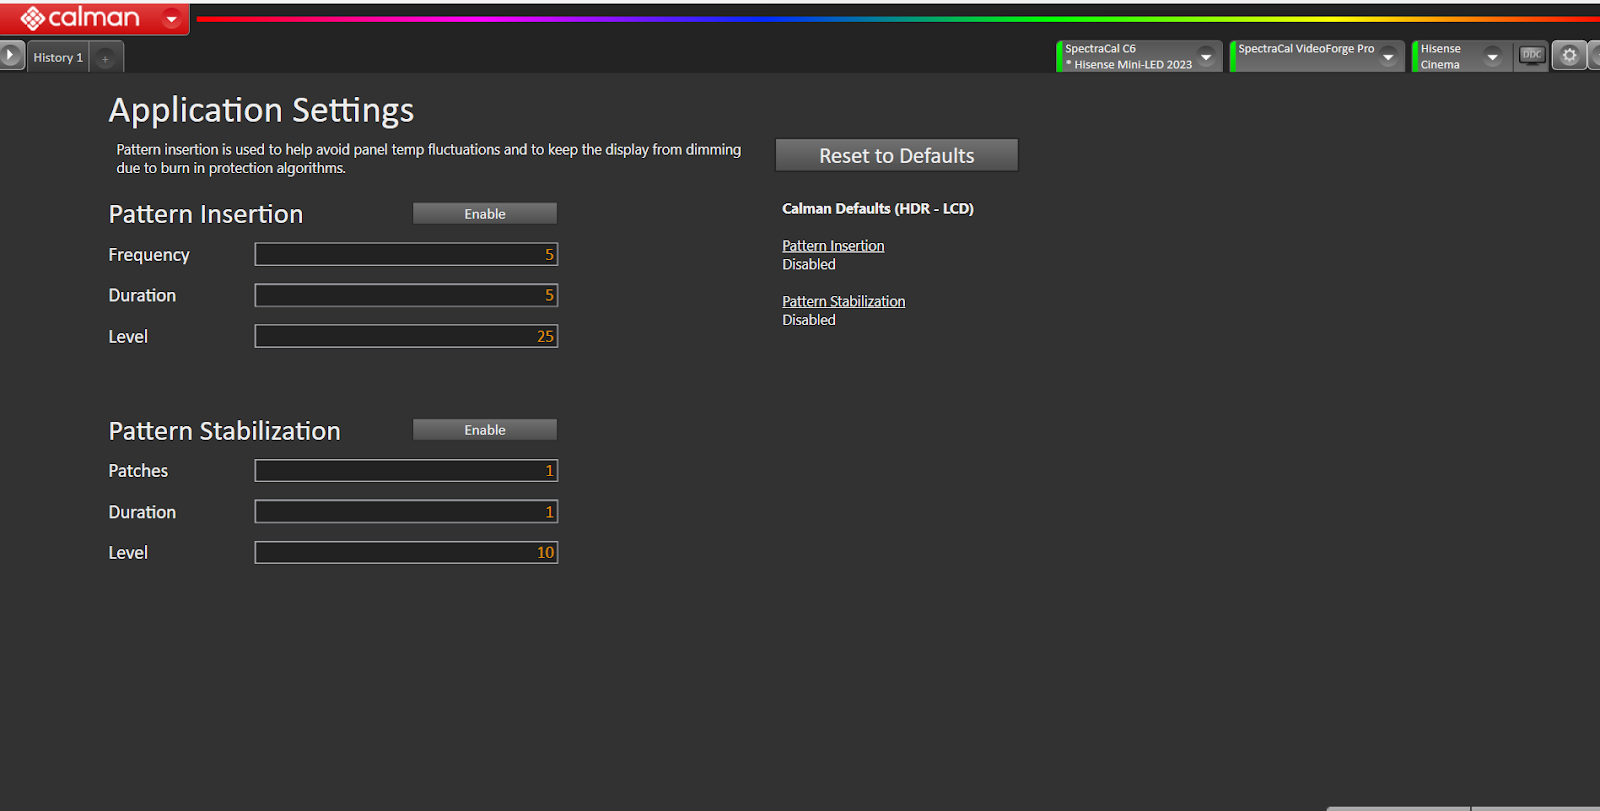
Application Settings
For SDR pattern insertion should be disabled
Select Next

Pre-Cal Measure
Reading of the display before calibration
Select Measure

Select Next
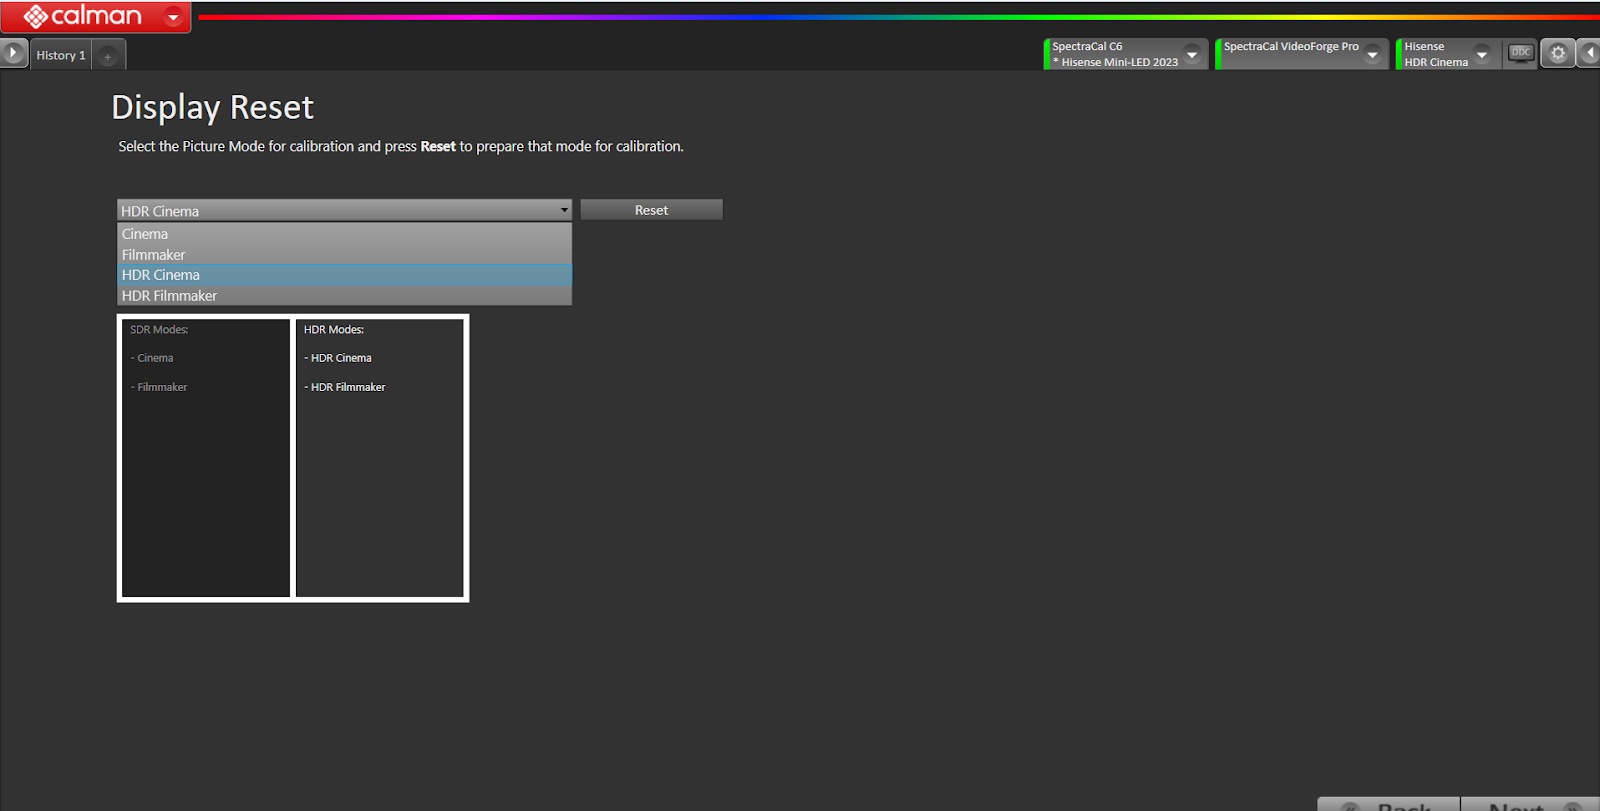
Display Reset
Select the mode from the dropdown (Cinema or Filmmaker) and Reset
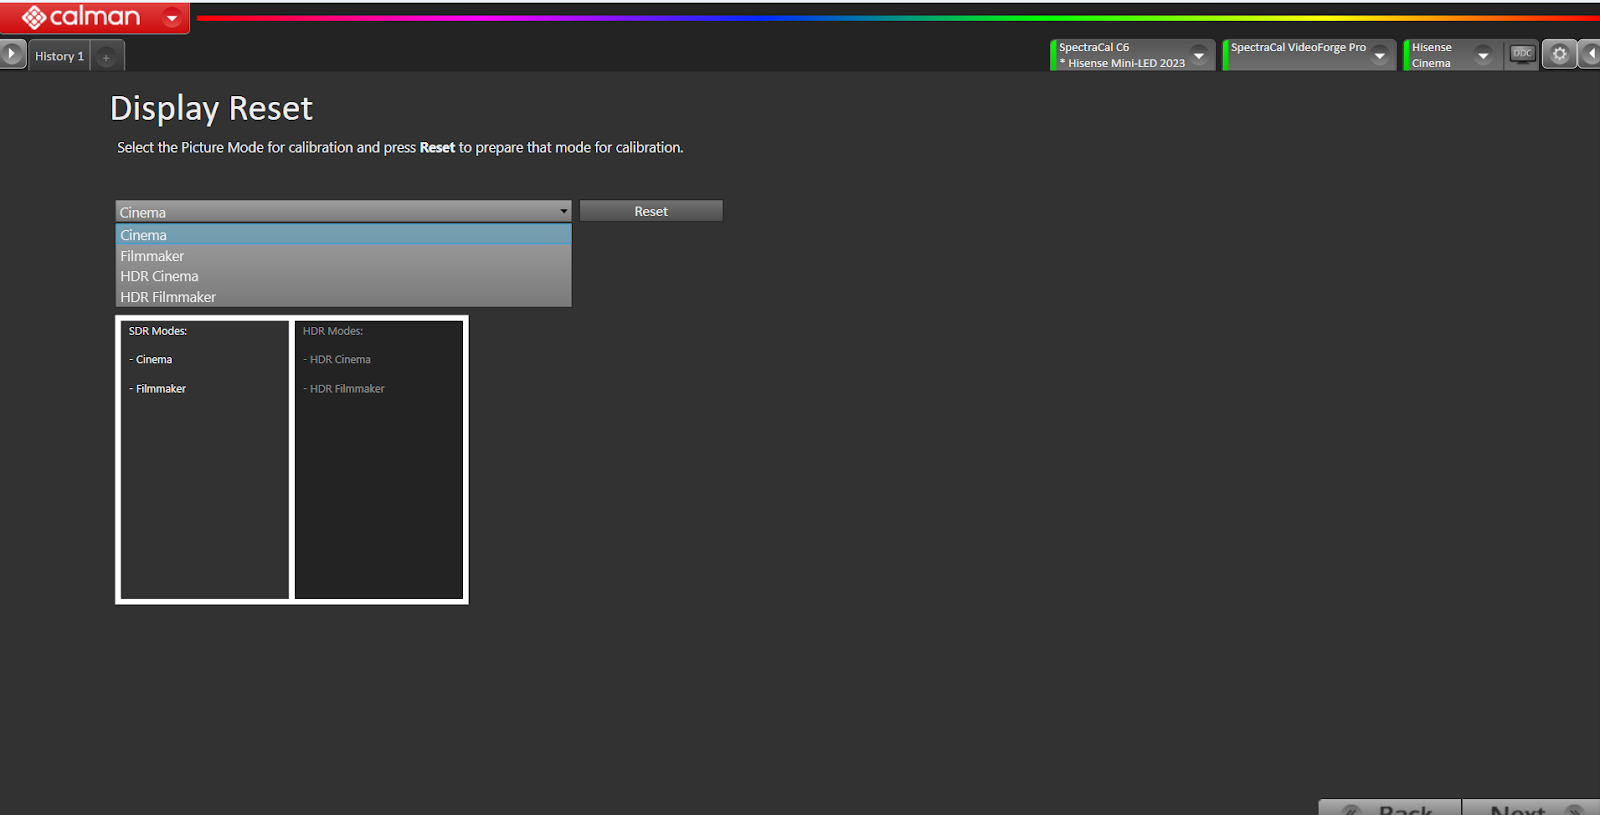
Select Next
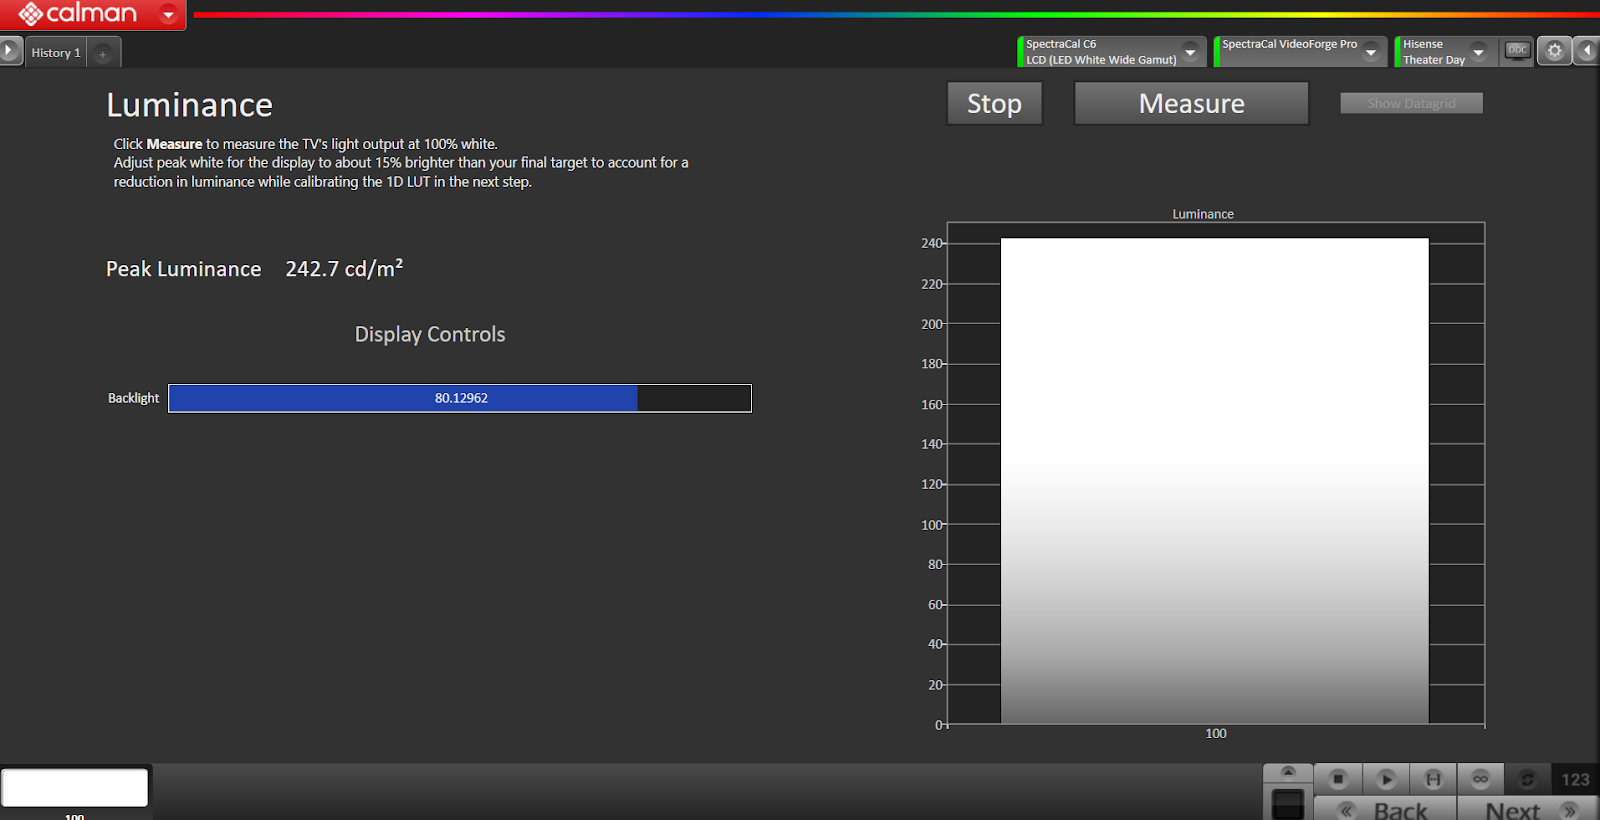
Luminance
- Luminance will measure the display’s light output
- Select Measure
- Adjust the Display Controls for desired level by sliding the Backlight bar
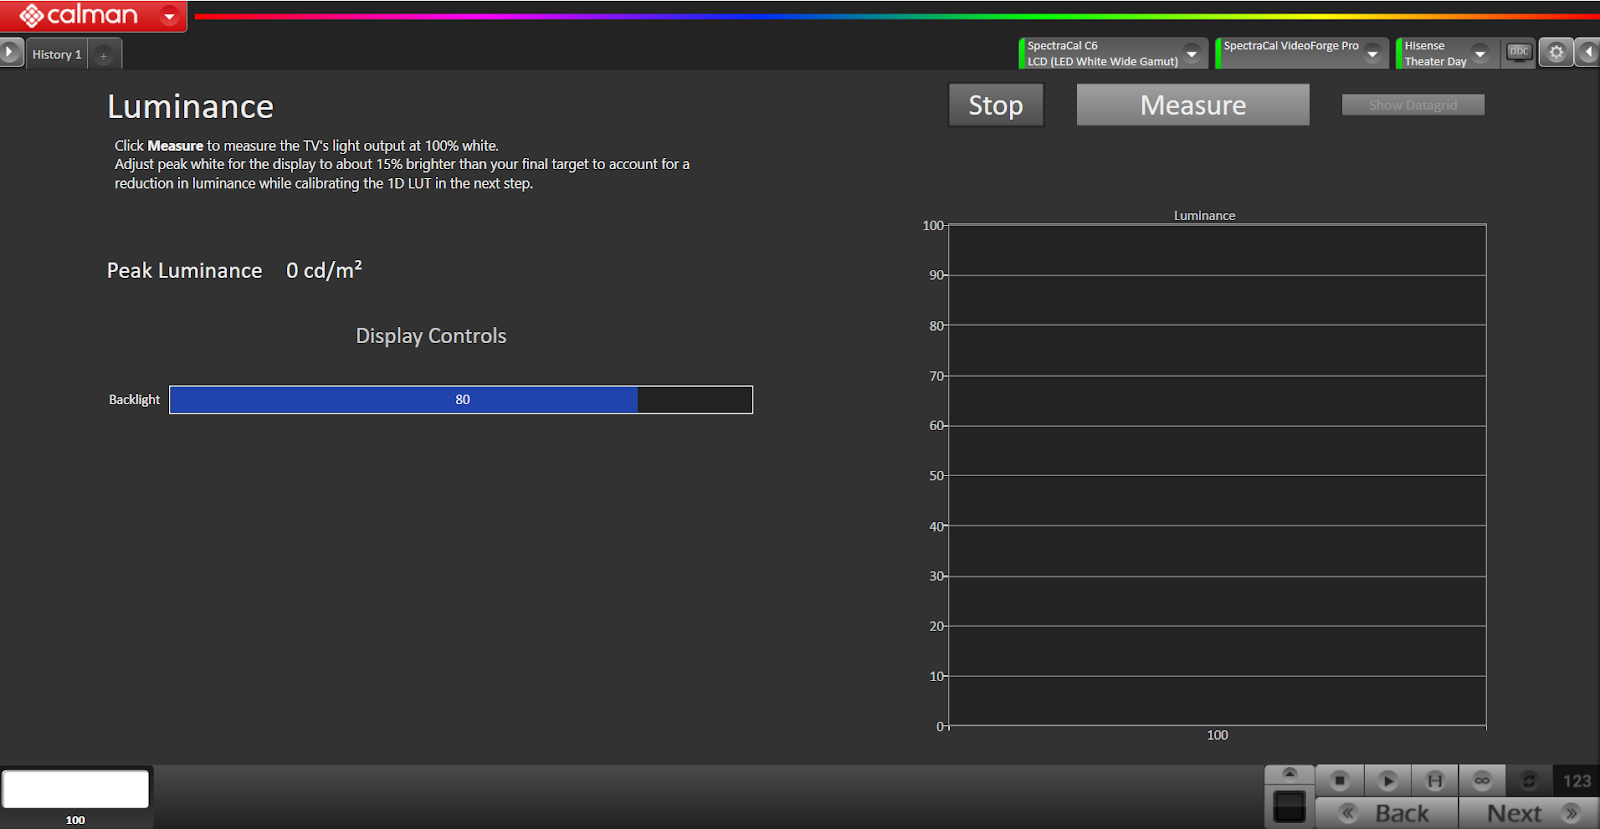
Select Stop when desired luminance is reached:
Select Next
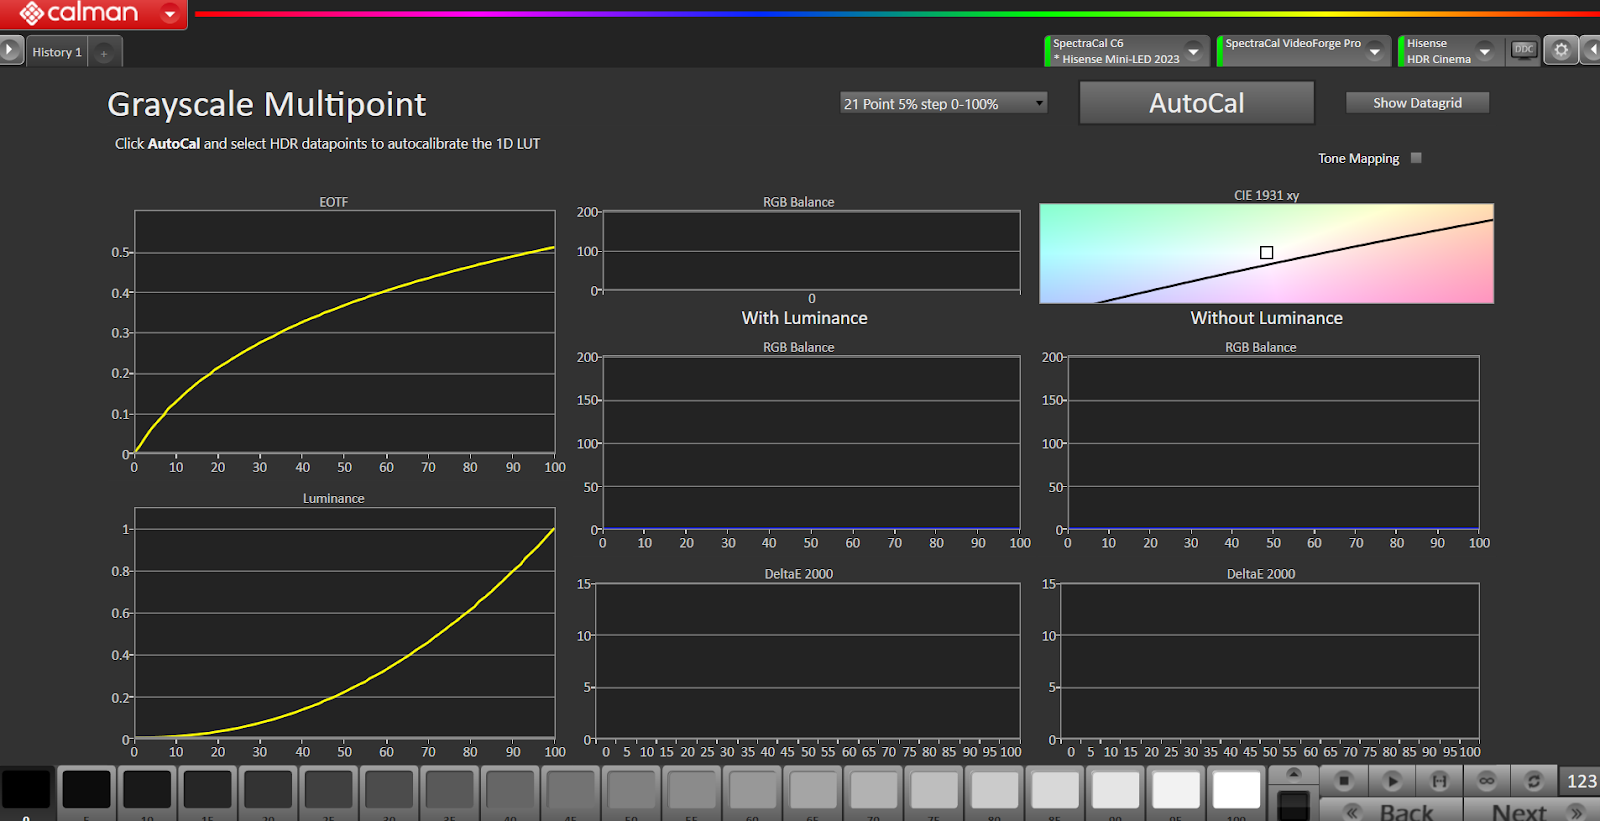
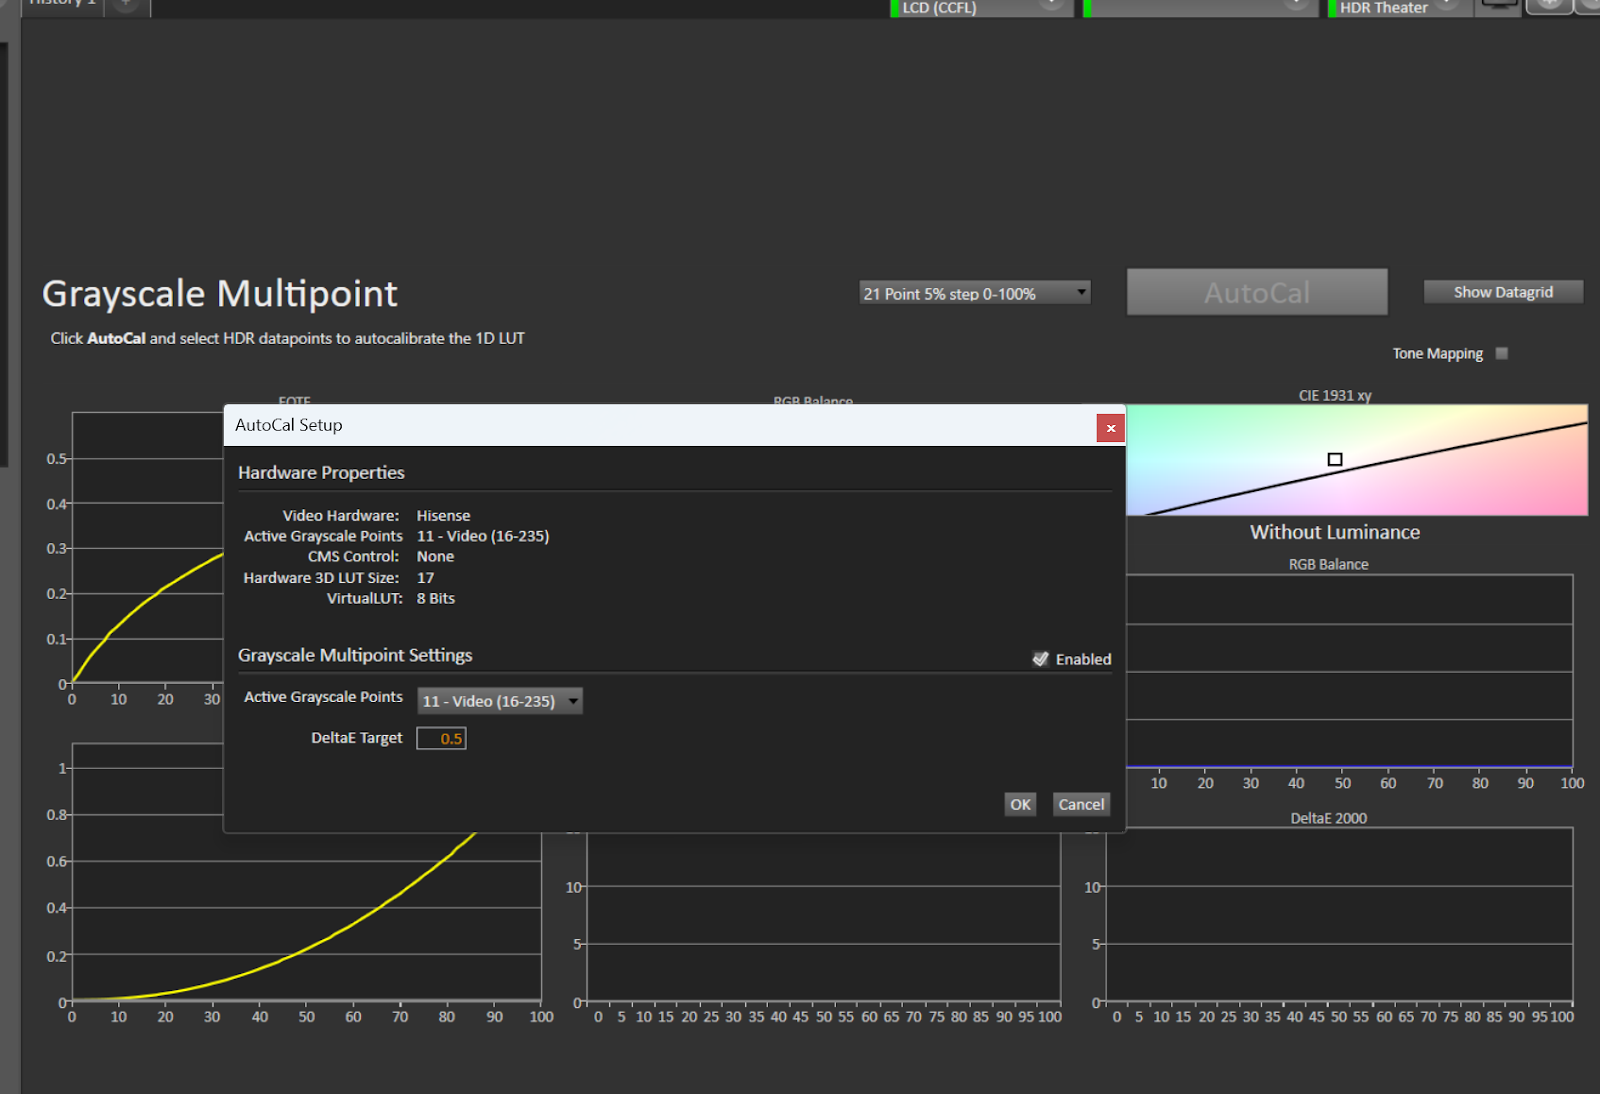
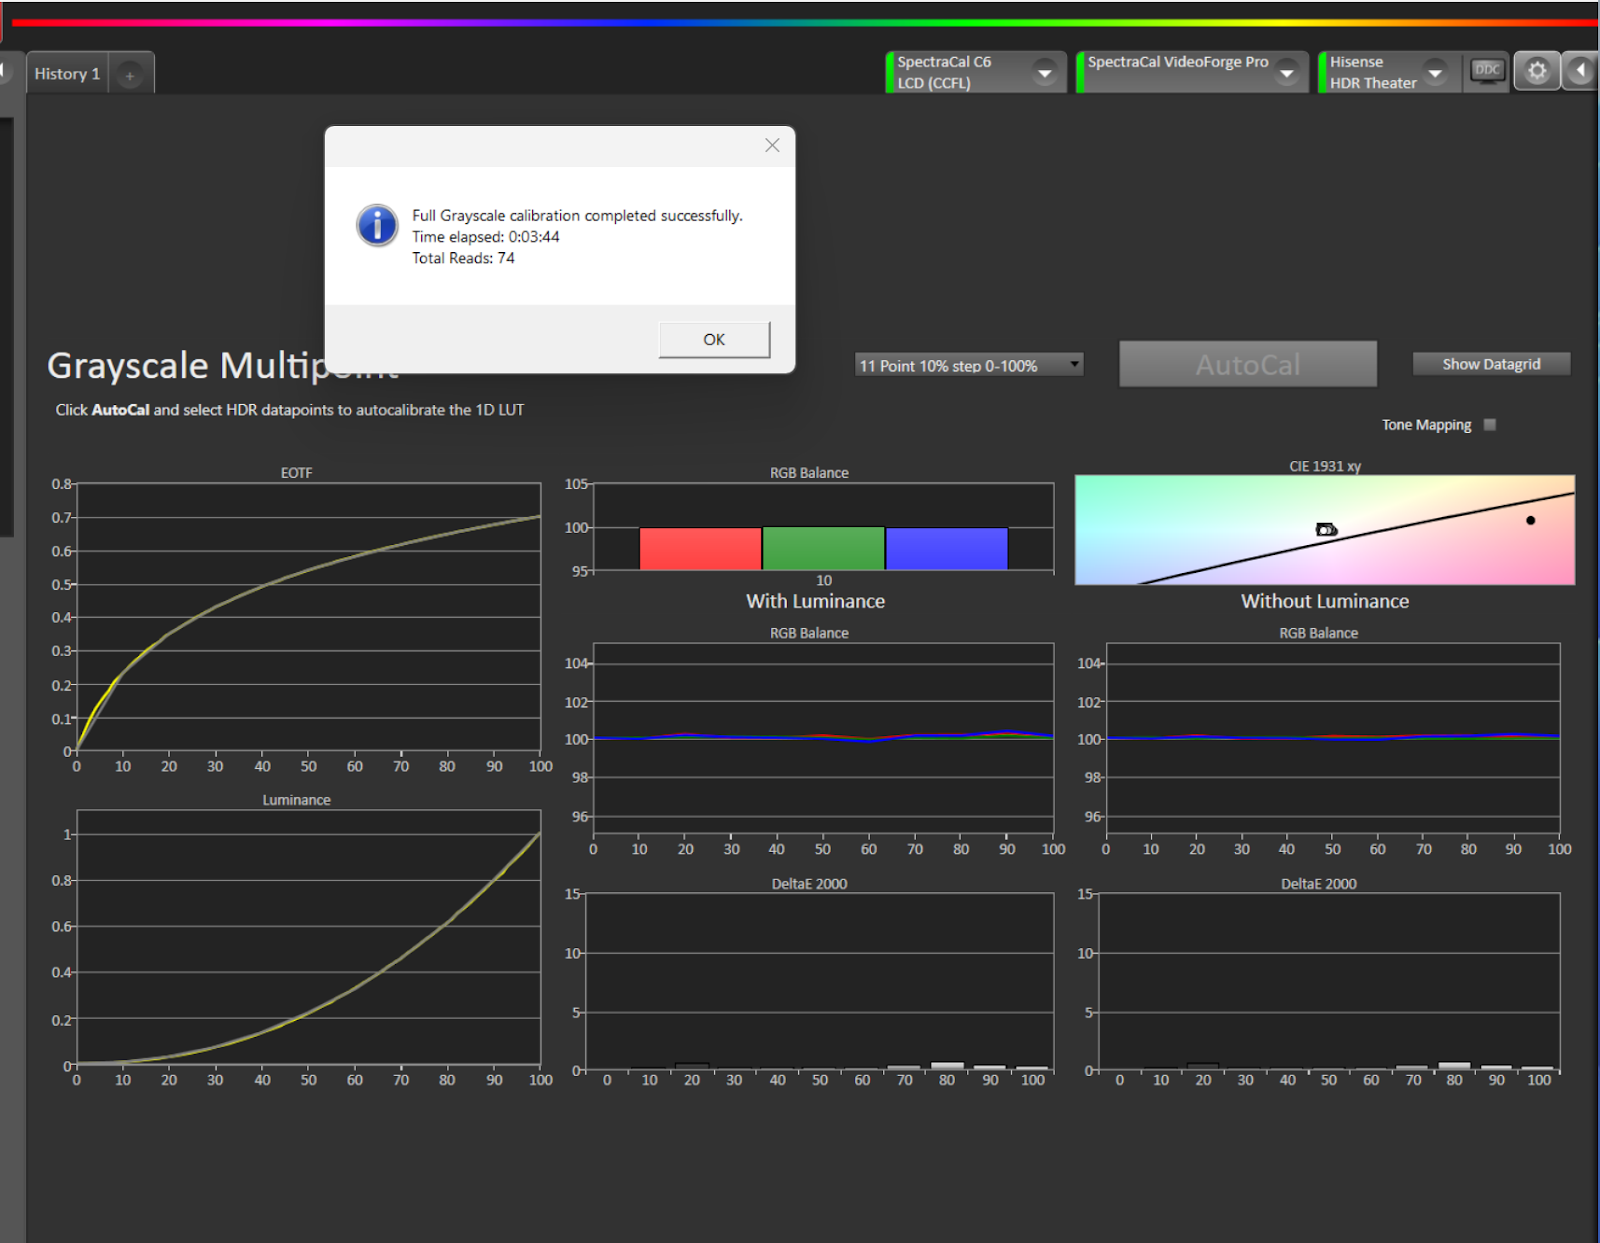
Grayscale Multipoint
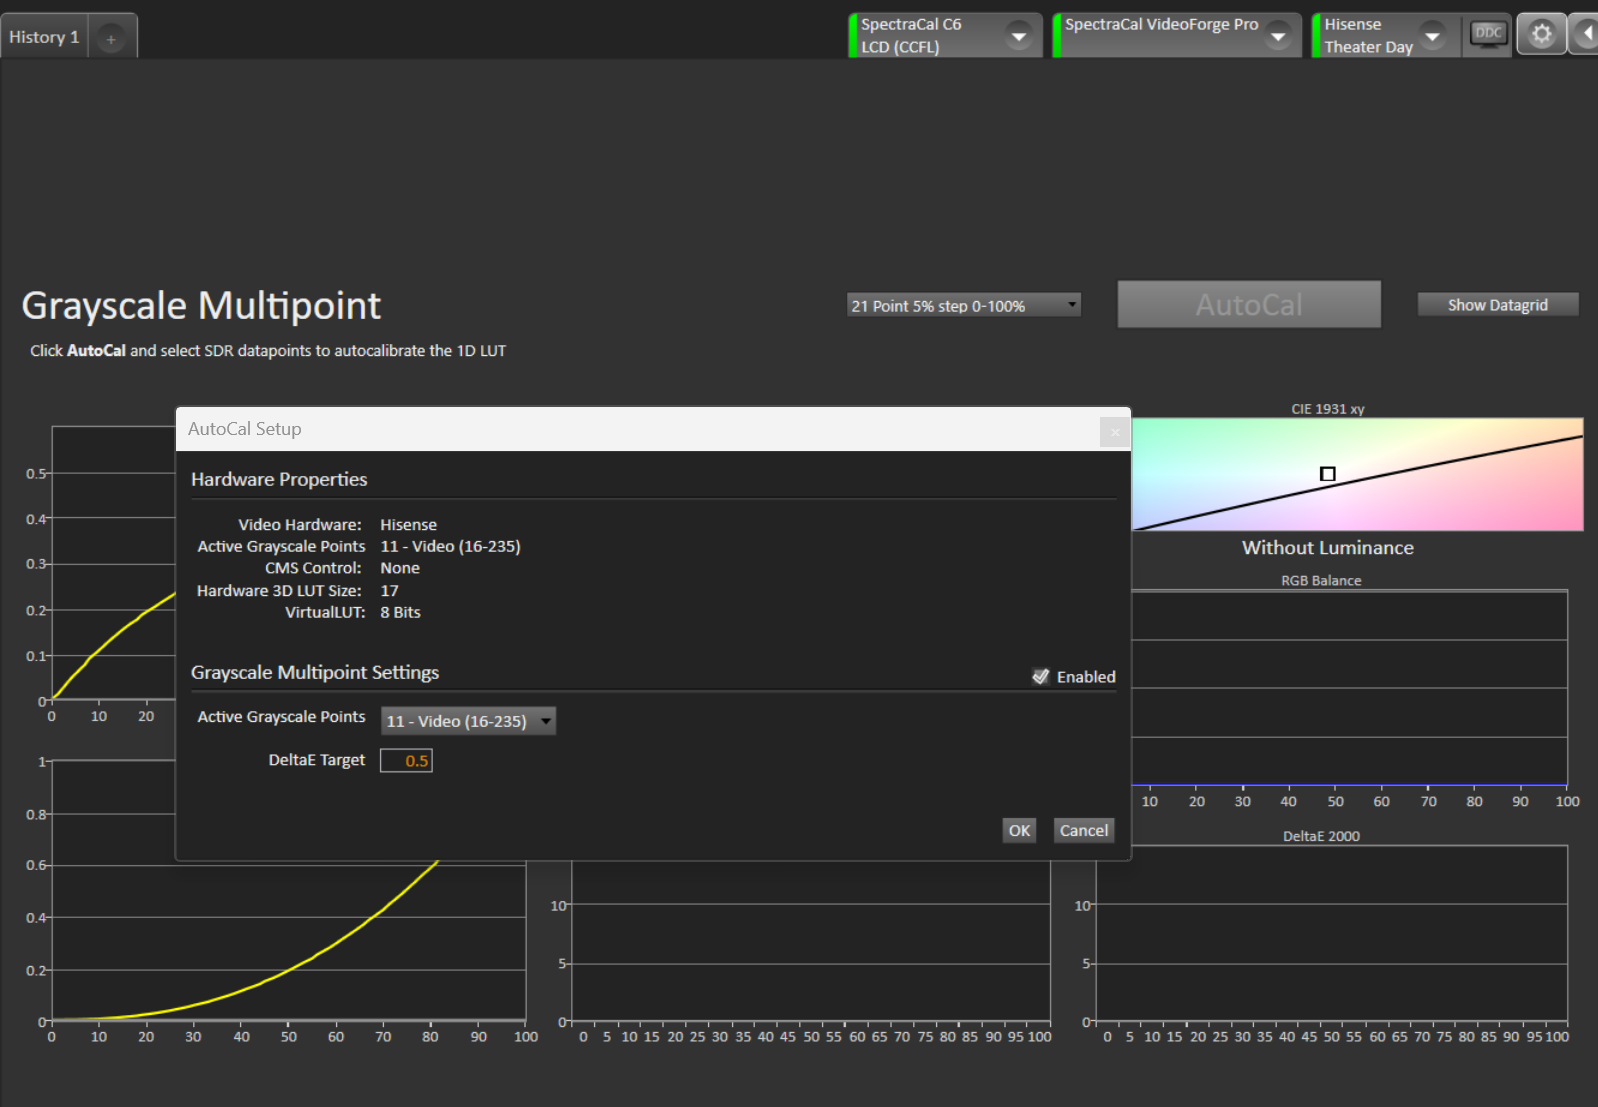
Select AutoCal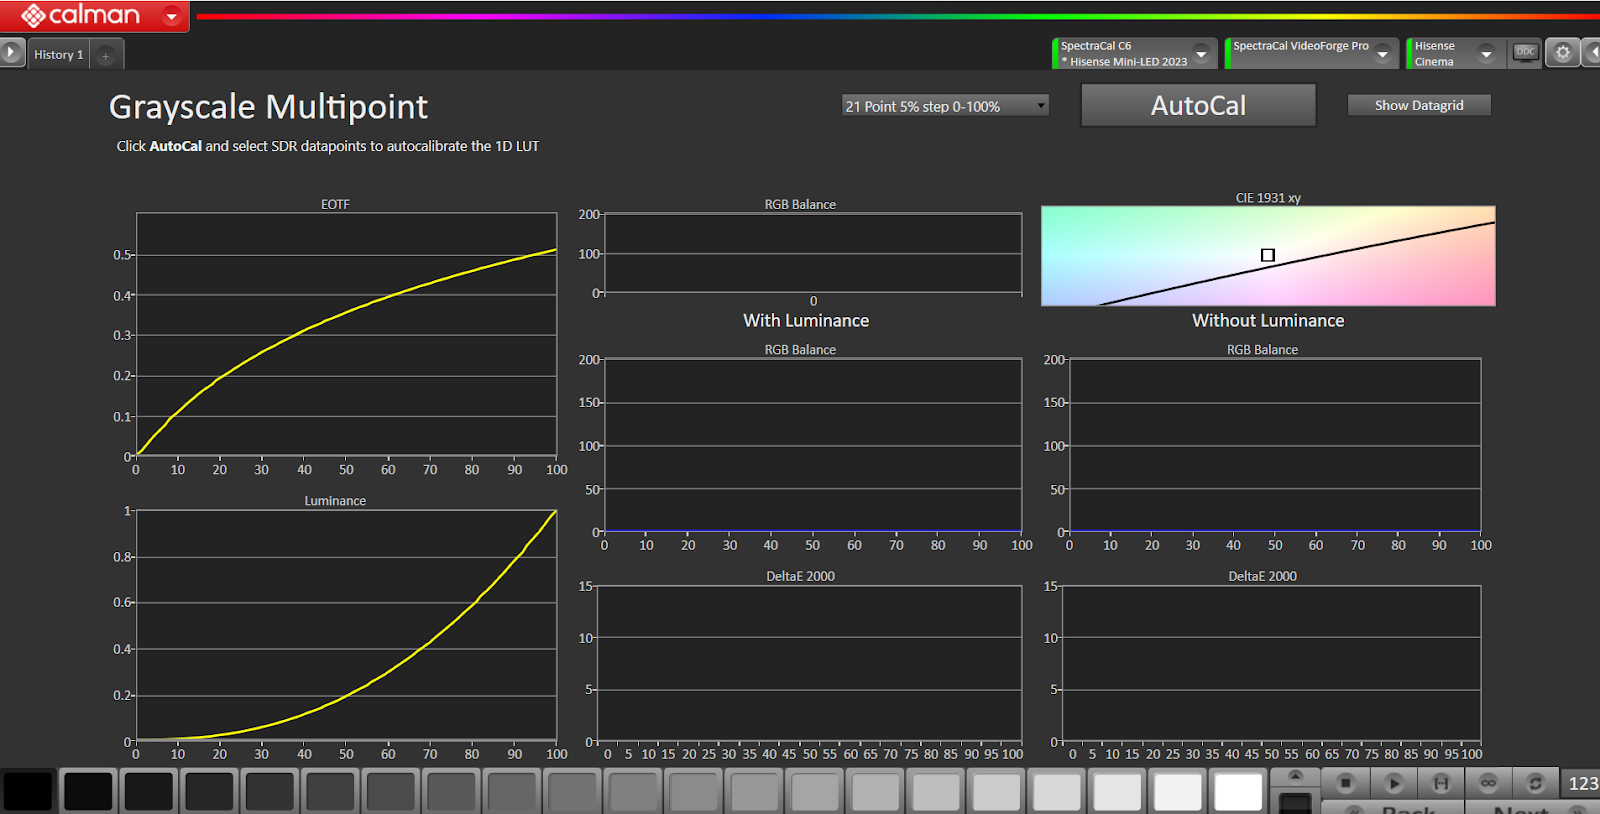
Select Ok when window is displayed:
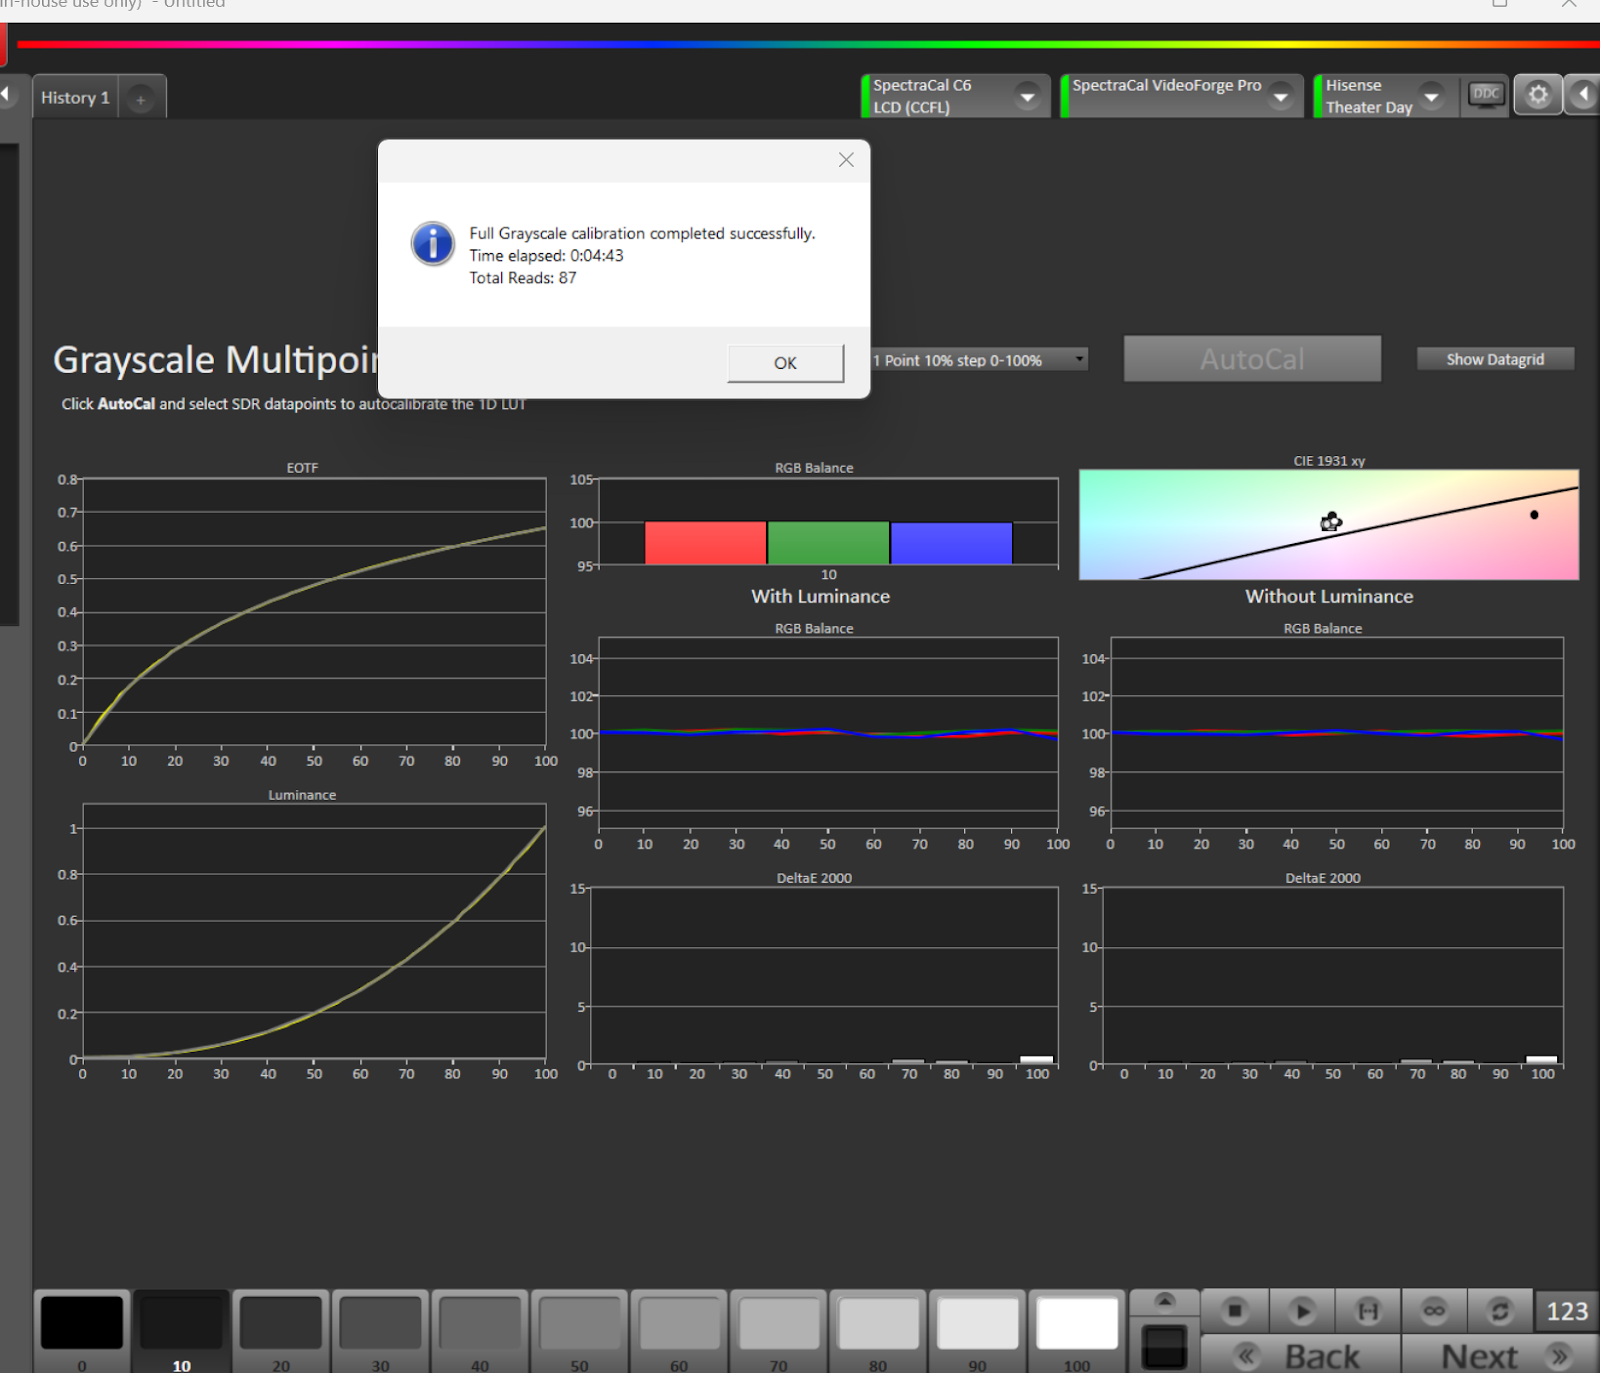
Select OK when the Full Grayscale calibration completed successfully window is displayed:
Select Next
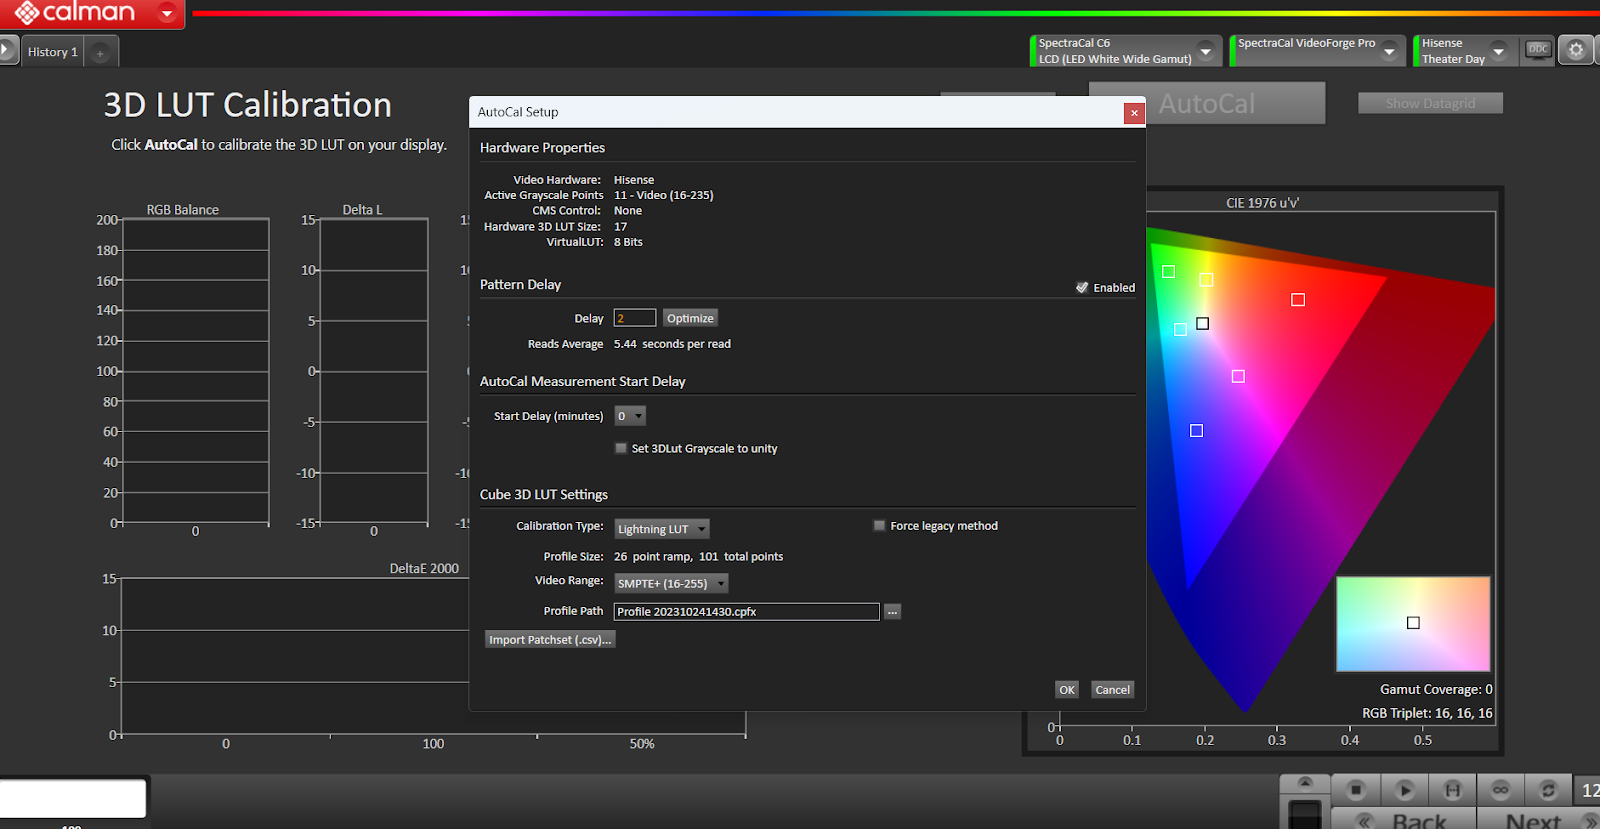
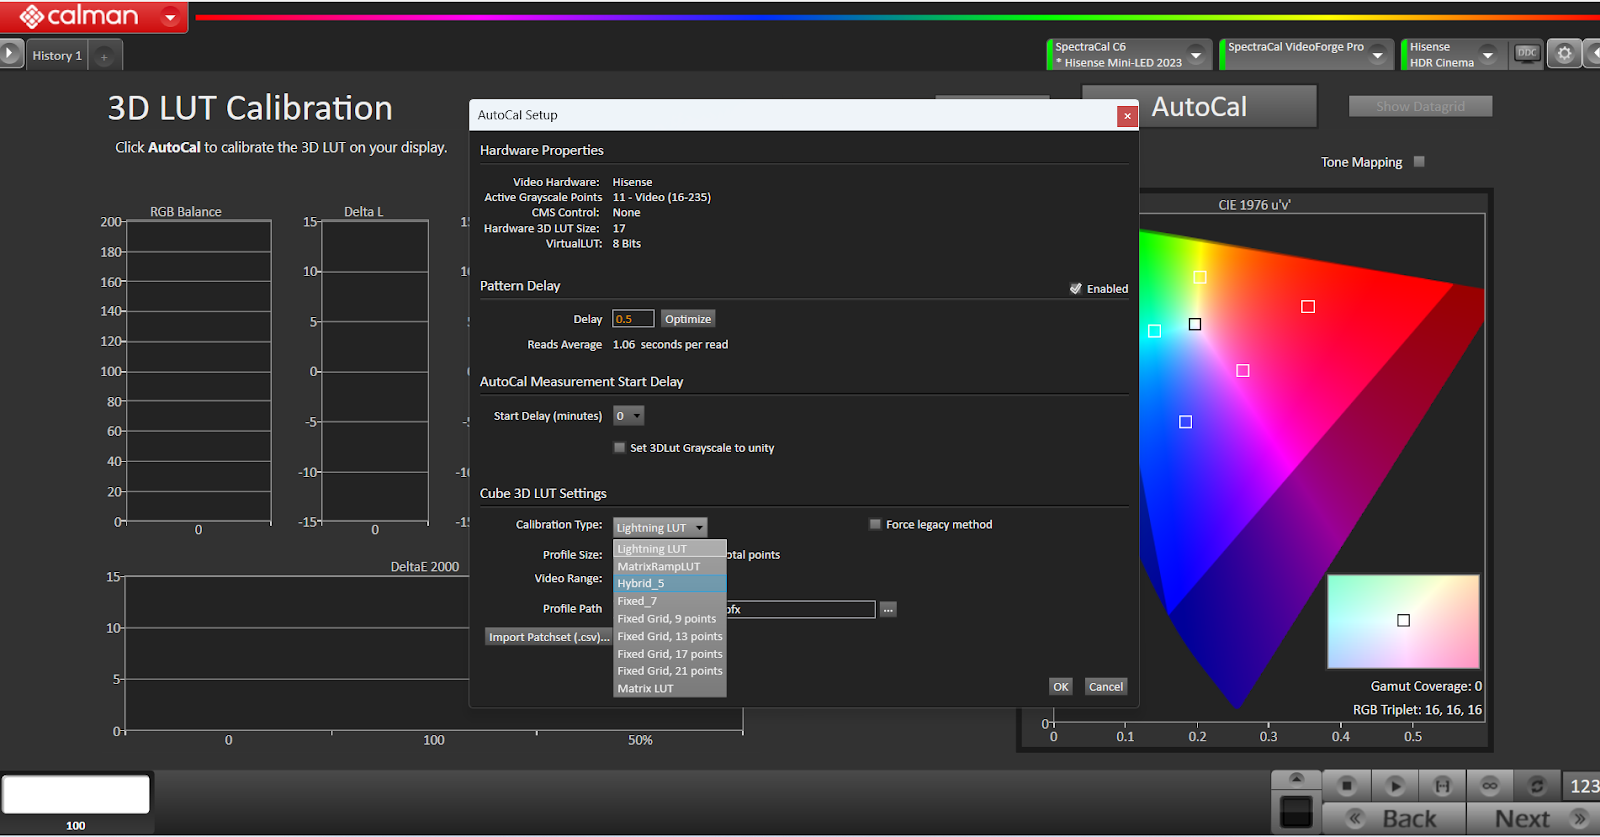
3D LUT Calibration
- Select AutoCal:

- Select the Calibration type [for best results use Hybrid_5]
- Select OK when the Hardware Properties window is displayed:
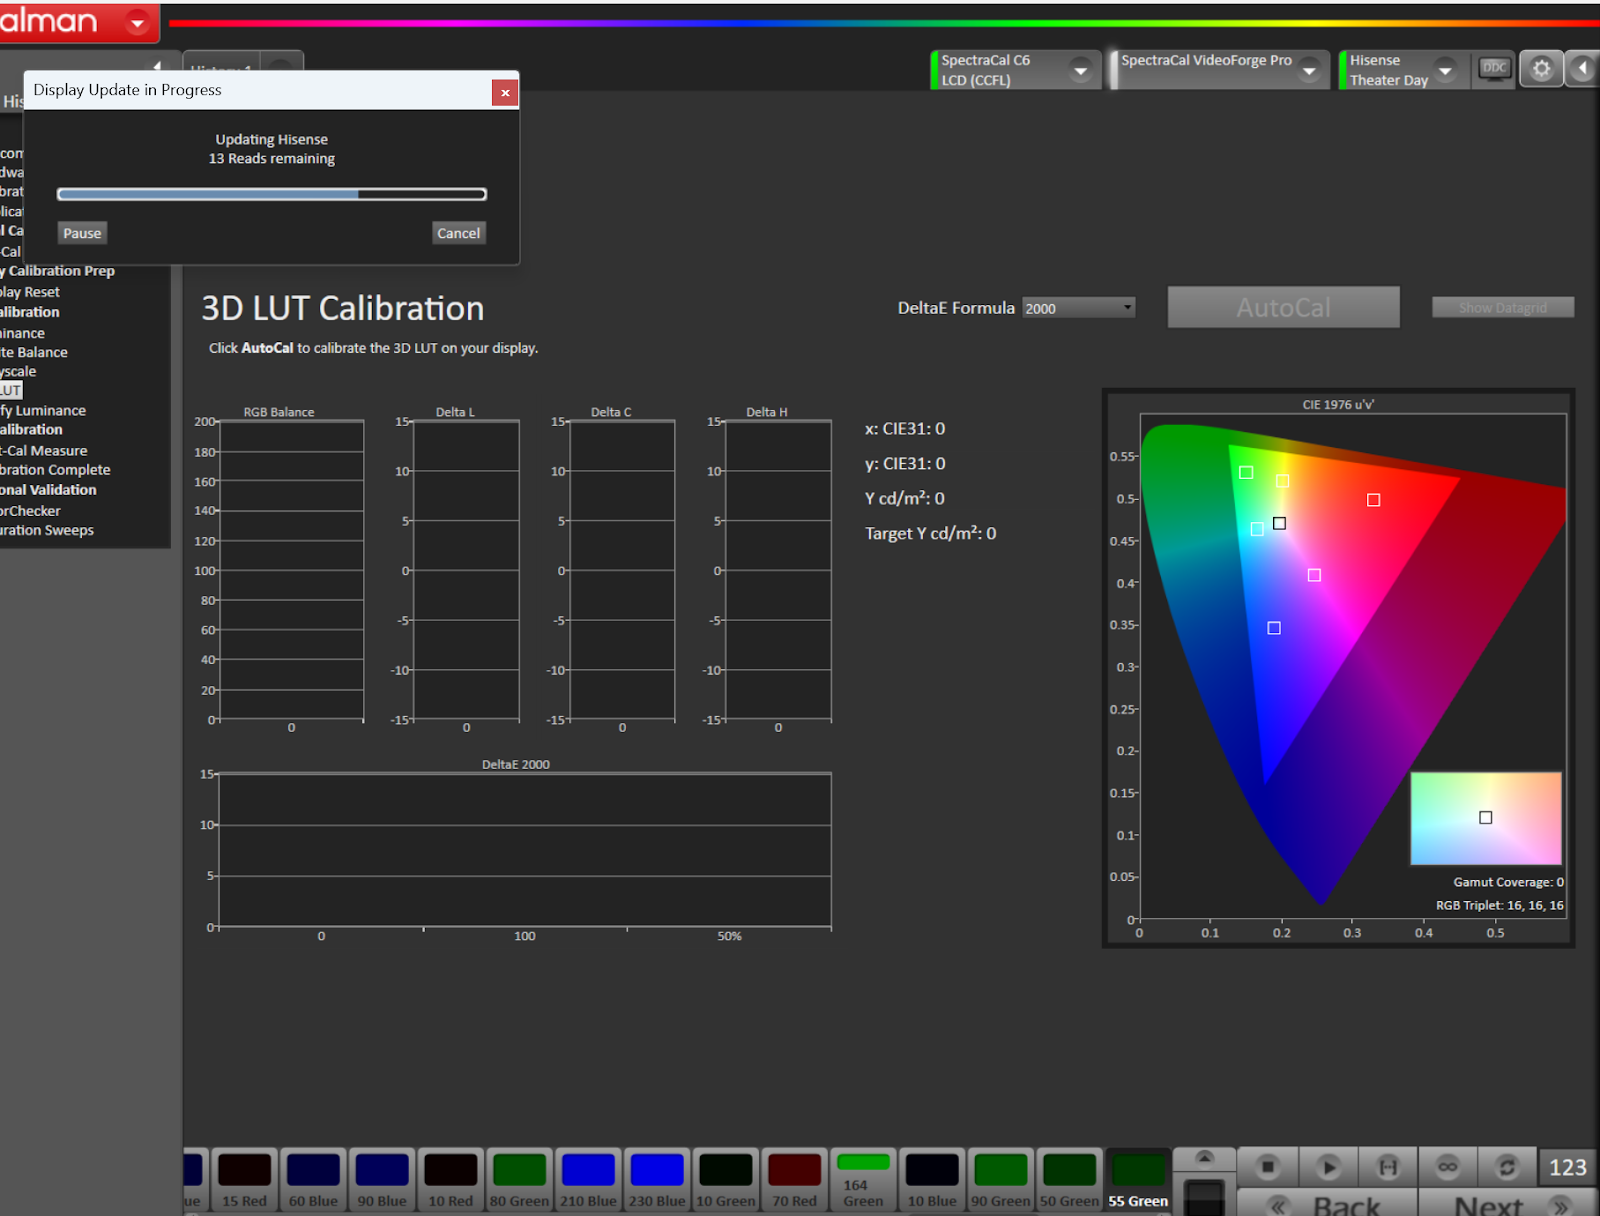
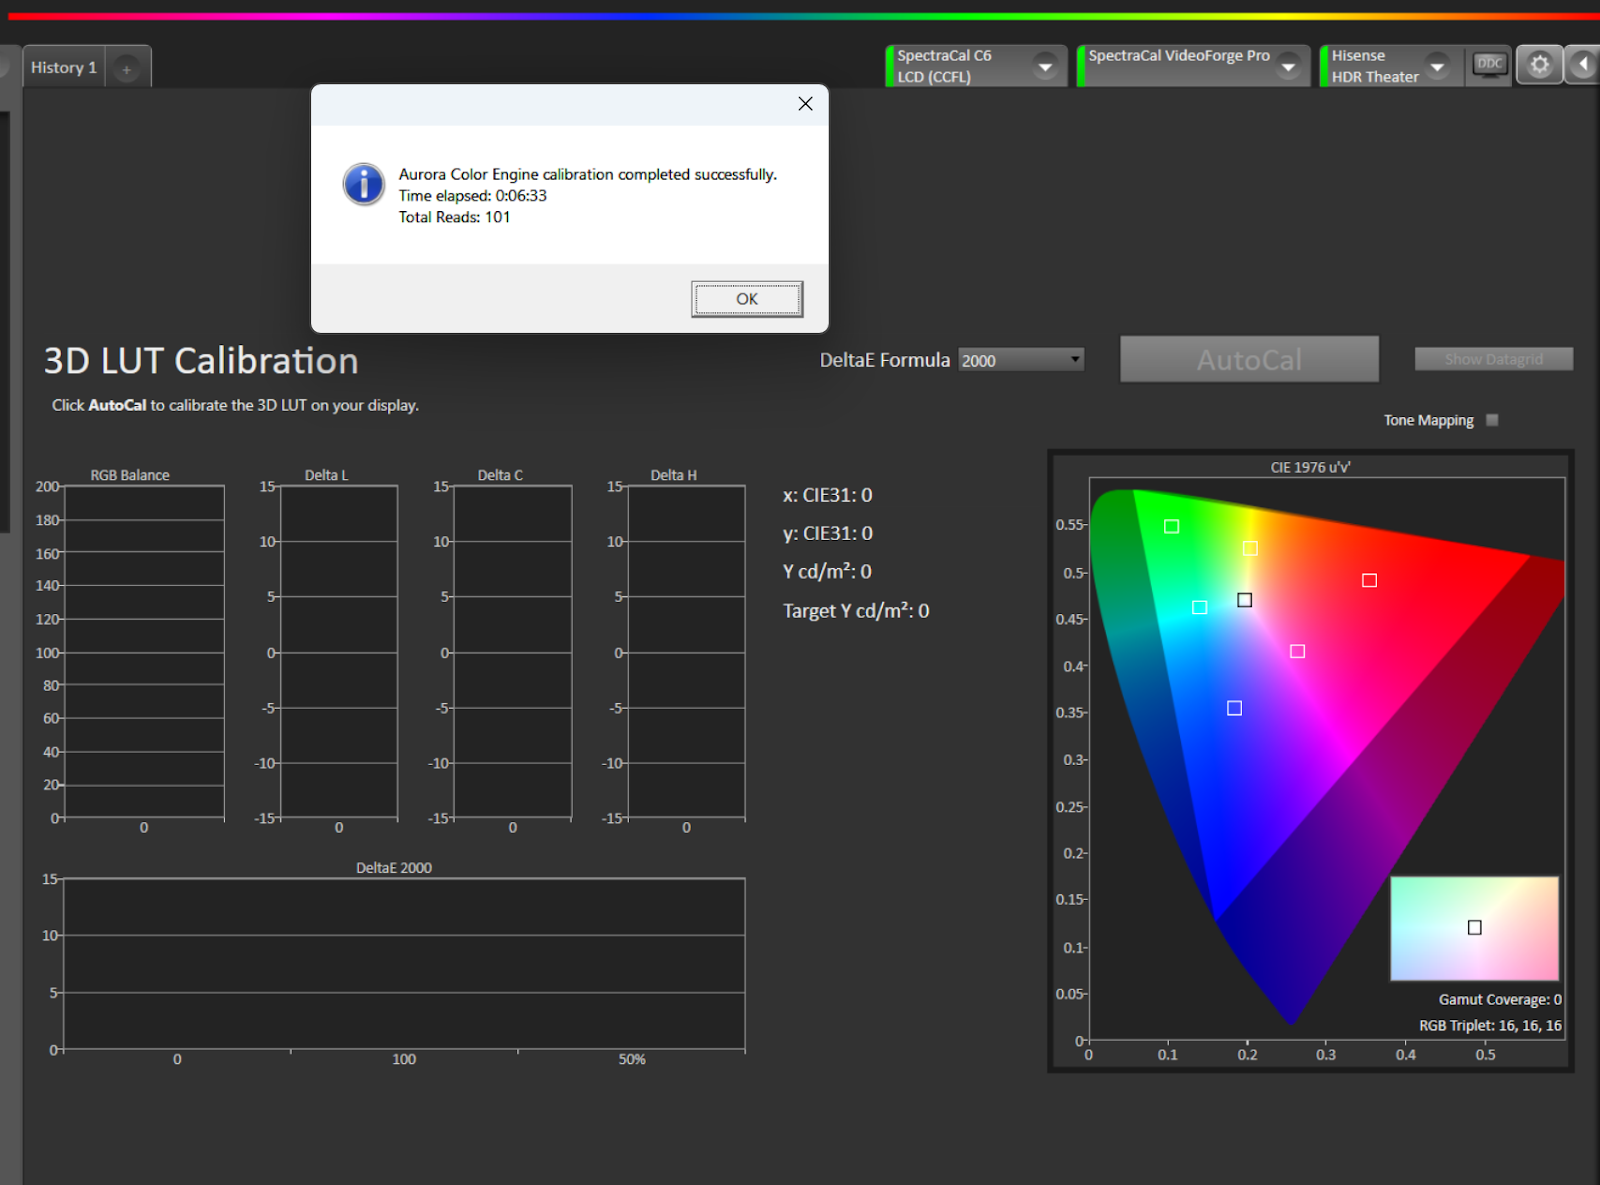
Several reads will take place…
Select OK when the Aurora Color Engine calibration completed successfully is displayed:
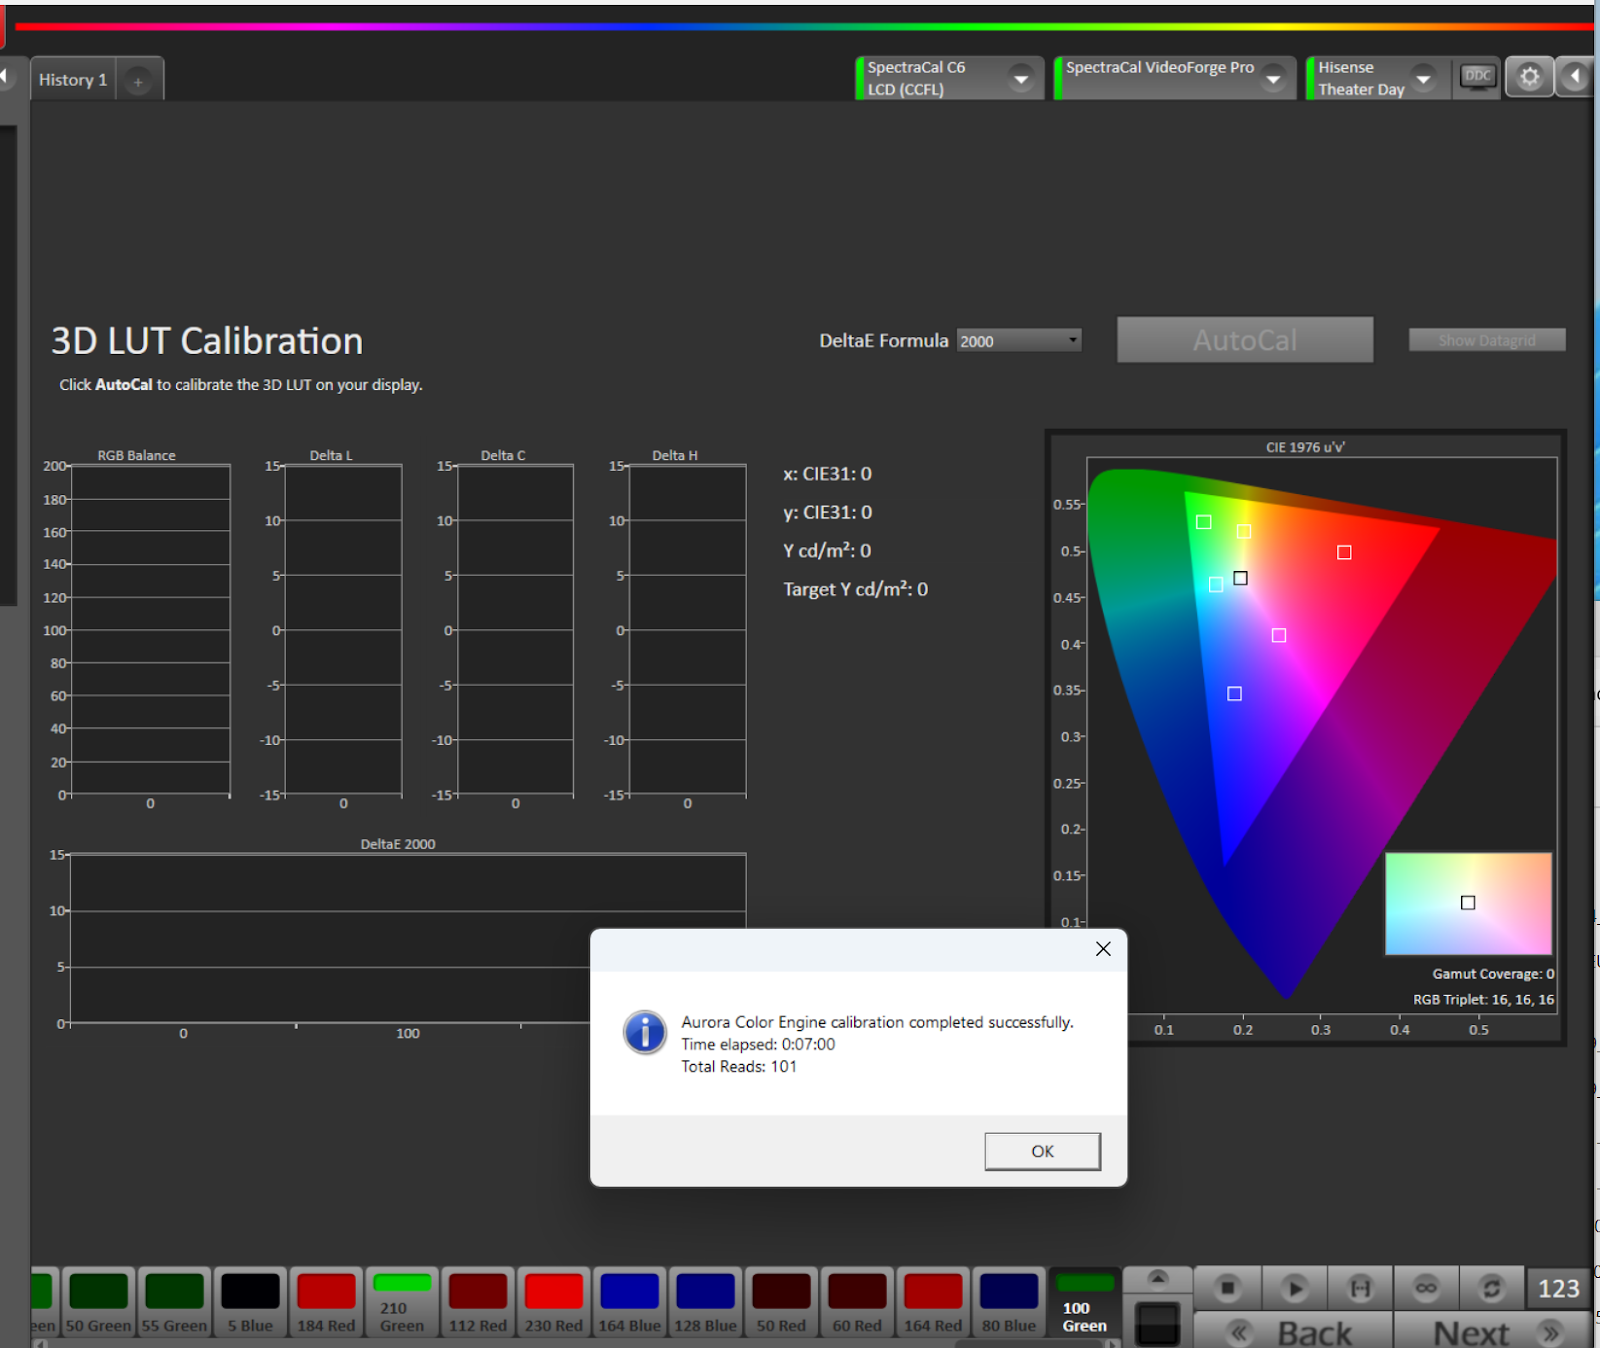
The results will be displayed.
Select Next
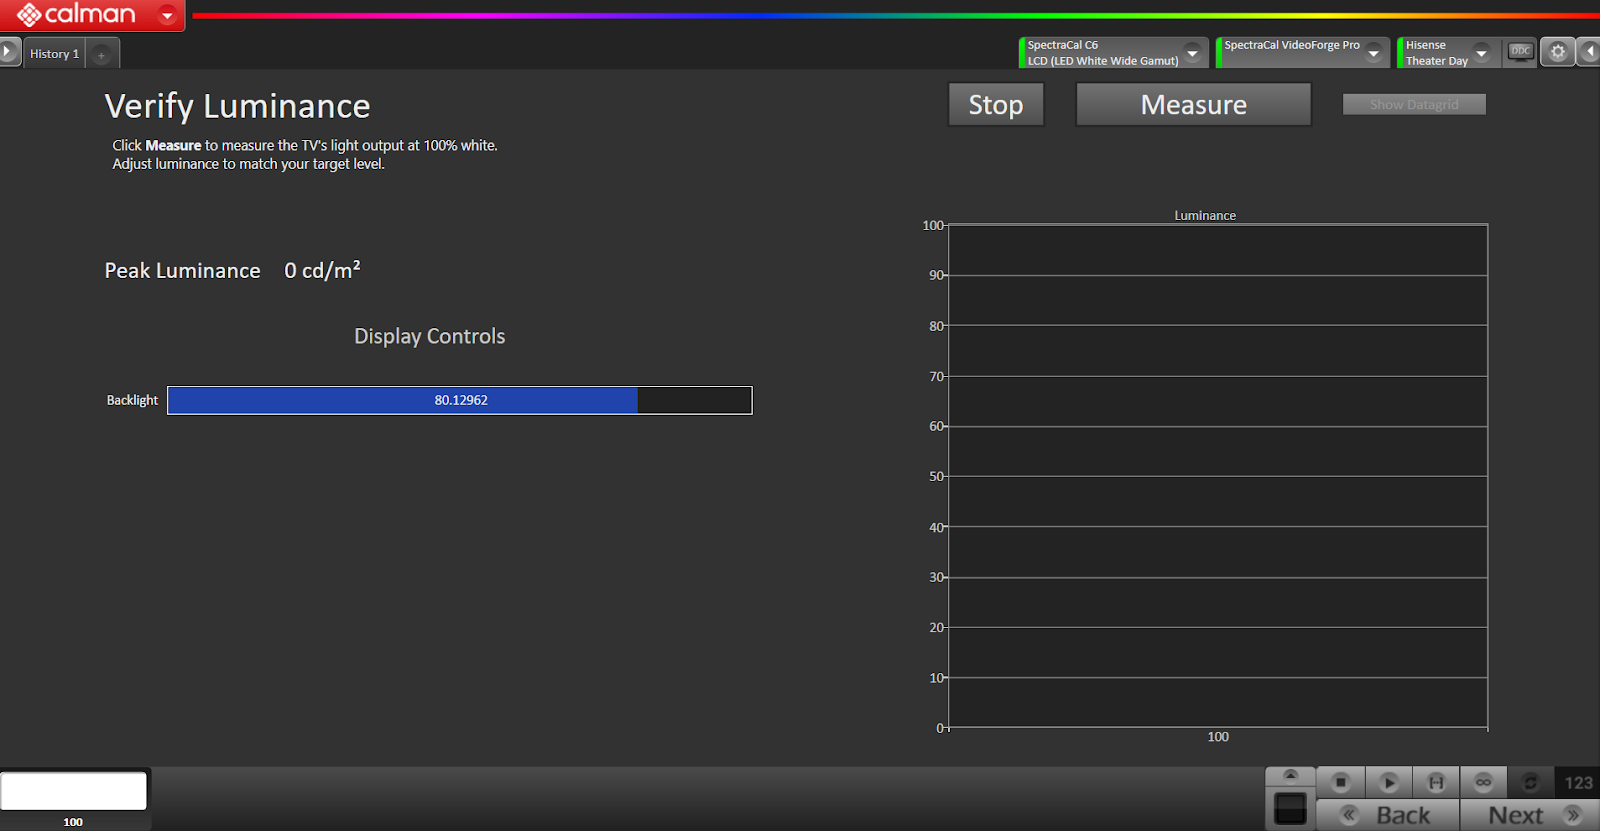
Verify Luminance
Select Measure and Stop when Peak Luminance results are reached
Select Next
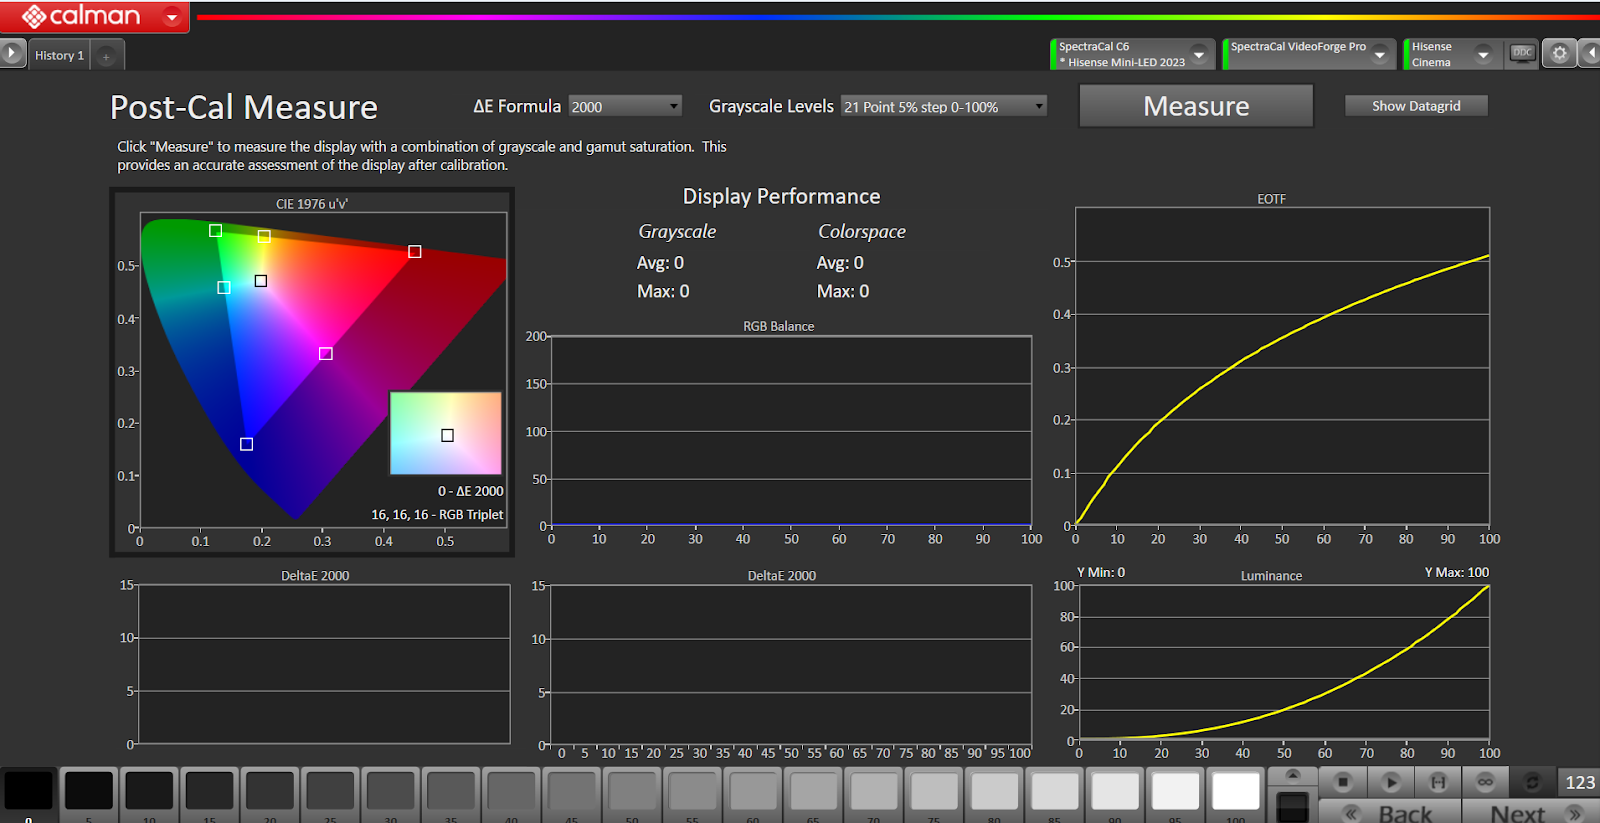
Post-Cal Measurement
Select Measure
Select Next
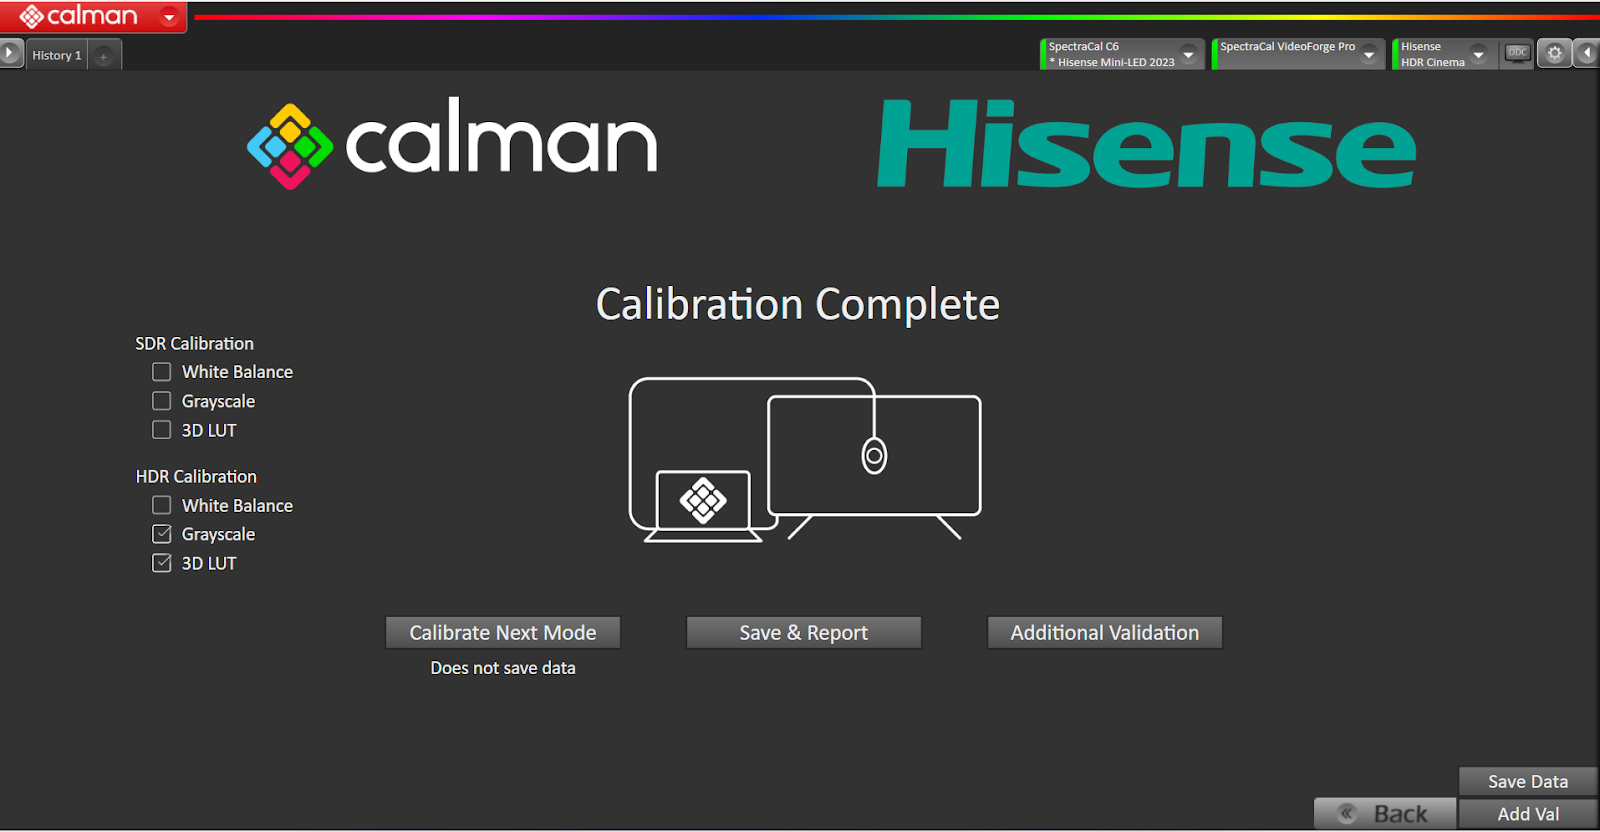
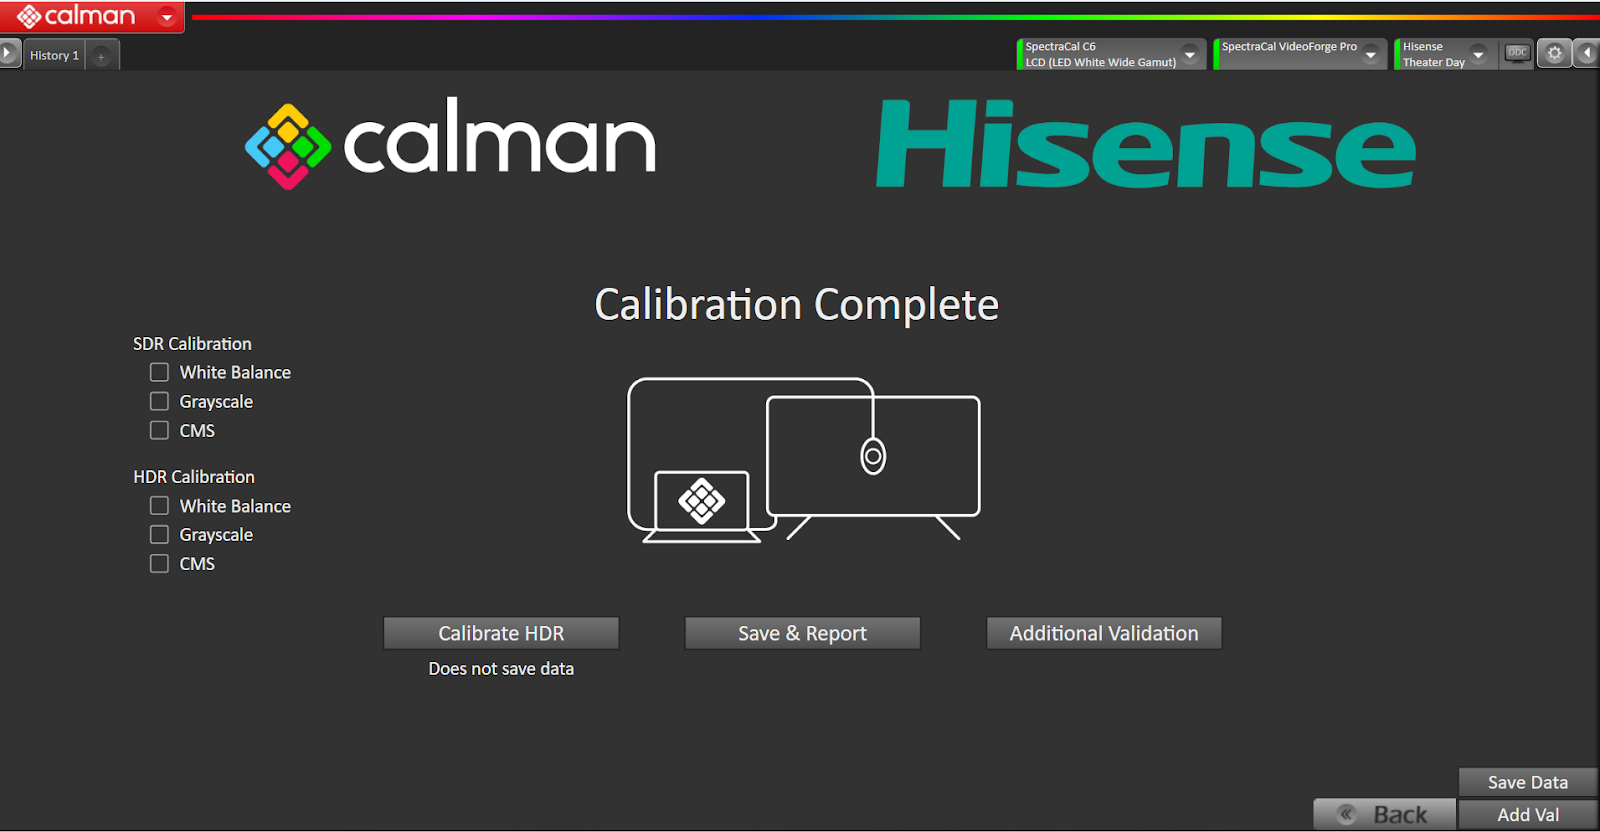
– SDR Calibration Complete –
SDR Calibration has been completed. There are options to Calibrate Next Mode, Save & Report, or Additional Validation.
Use Calibrate Next Mode to calibrate Filmmaker
HDR Calibration
Select Mode: HDR
If the Meter, Source and Display are already connected the Hardware connection can be skipped. The source requires HDR setting.
- Select Find Meter
- Select Find Source
- Select Find Display
Find meter, if already connected it is not necessary to reconnect, but update the meter to HDR signal.
Required step: From the Source tab, select HDR from the dropdown
Verify EOFT is SMPTE ST 2084:
Find Display [this step can be skipped if already connected to the display]
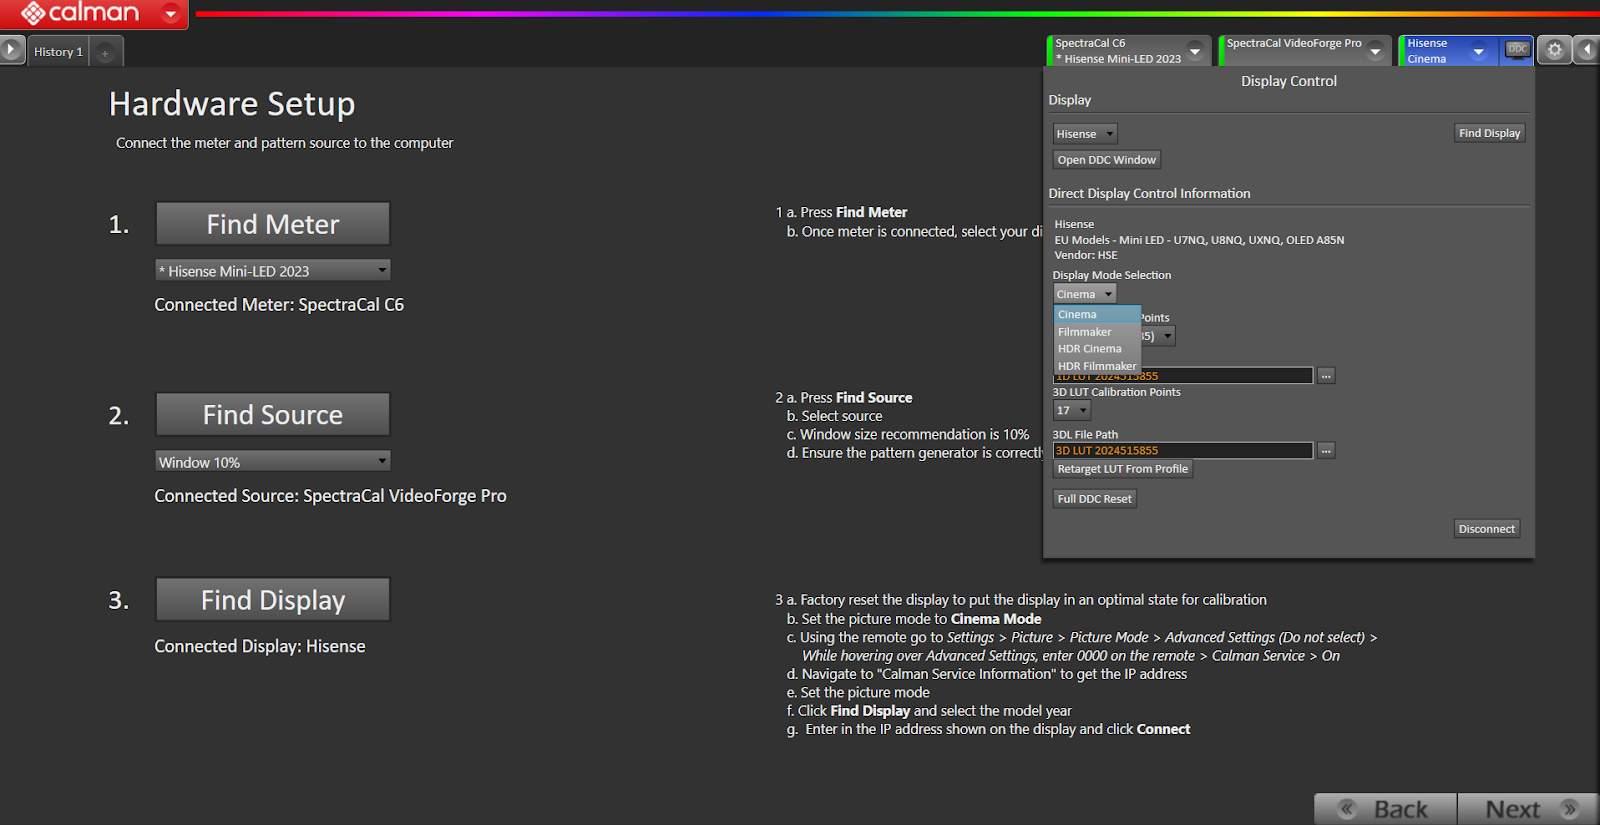
- Select the manufacturer from the dropdown options
- Select the model
- Enter the IP address (settings, WiFi)
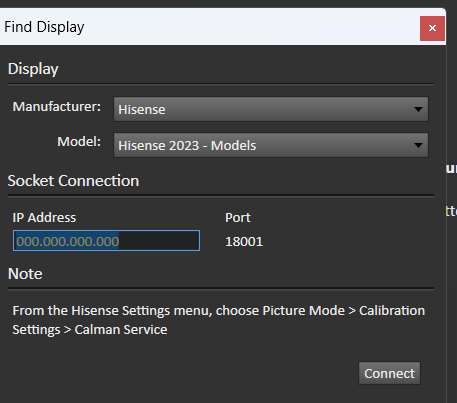
When the three tabs at the top of the screen are green, select Next:
Calibration Targets
Validate the Calibration Targets for HDR
- Colorspace: rec.2020
- Gamma Formula: ST 2084 HDR (PQ)
- Whitepoint: D65
- dE Formula: de_ITP
Select Reset Targets:
Application Settings
Validate the Application Settings:
Pre-Cal Measure
The pre-calibration will take readings. The reading should be along the same line as the yellow.
Select Measure
Display Reset
- Select the Display picture mode HDR Cinema or HDR Filmmaker
- Verify the Display has the correct mode and select Next
- Note: After selecting Reset the Display Tab will be updated to the selected picture mode
Grayscale Multipoint
The calibration results should match the display default (yellow EOTF) – Note that Calman will target Power 2.2 for this display default unless directed otherwise.
Select AutoCal
Select OK when the Hardware Properties is displayed.
Select OK when the Full Grayscale calibration completed successfully is displayed
Select Next
3D LUT Calibration
- Select AutoCal (a popup window will be displayed)
- Select the Calibration type [for best results use Hybrid_5]
- Select OK
- Autocal will complete with TONEMAP turned off
- Several readings will be taken
- Select OK when the Aurora Color Engine calibration completed successfully is displayed
Select Next when all three tabs are green:

After the 3D LUT going into post calibration turn tone mapping back on before the post calibration. The workflow will automatically set the tone mapping on and off for calibrations.
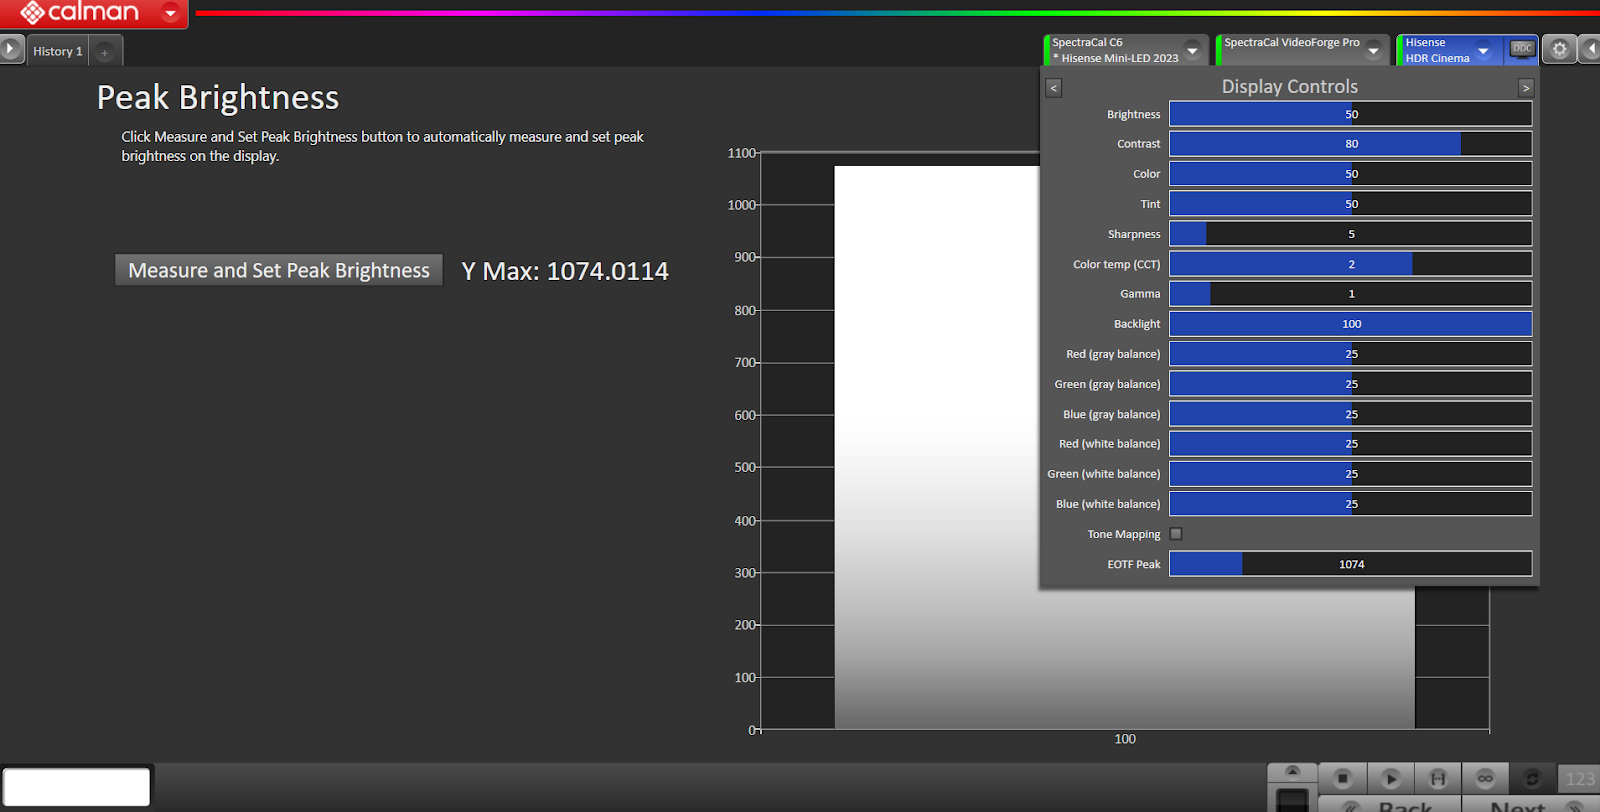
Peak Brightness
Select Measure and Set Peak Brightness
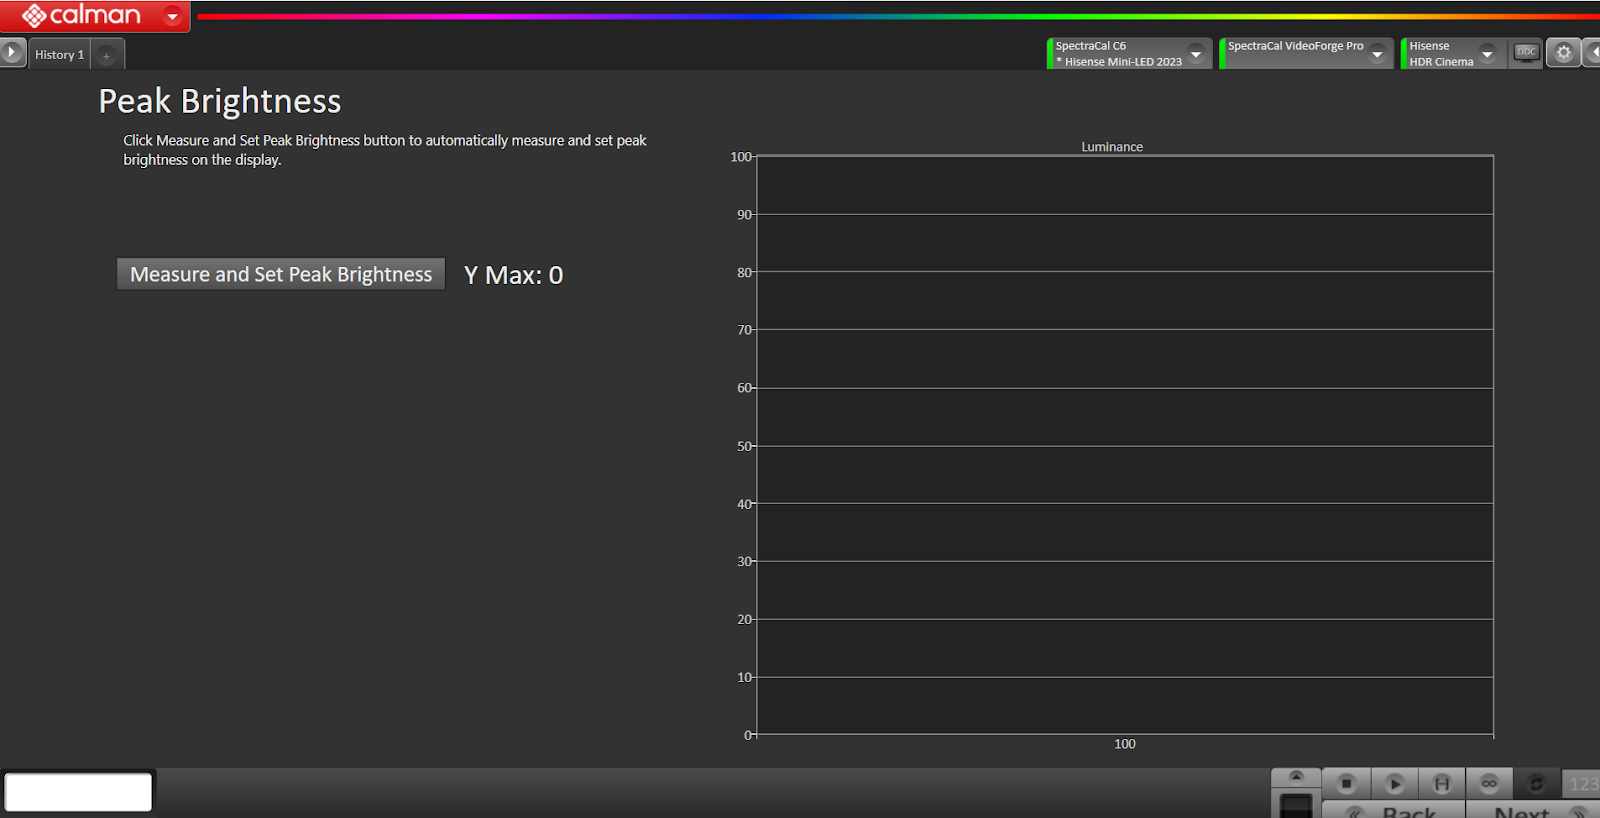
To validate the Peak Brightness setting, select the DDC button, select the > until Display Controls is displayed
The EOTF Peak will match the measurement taken
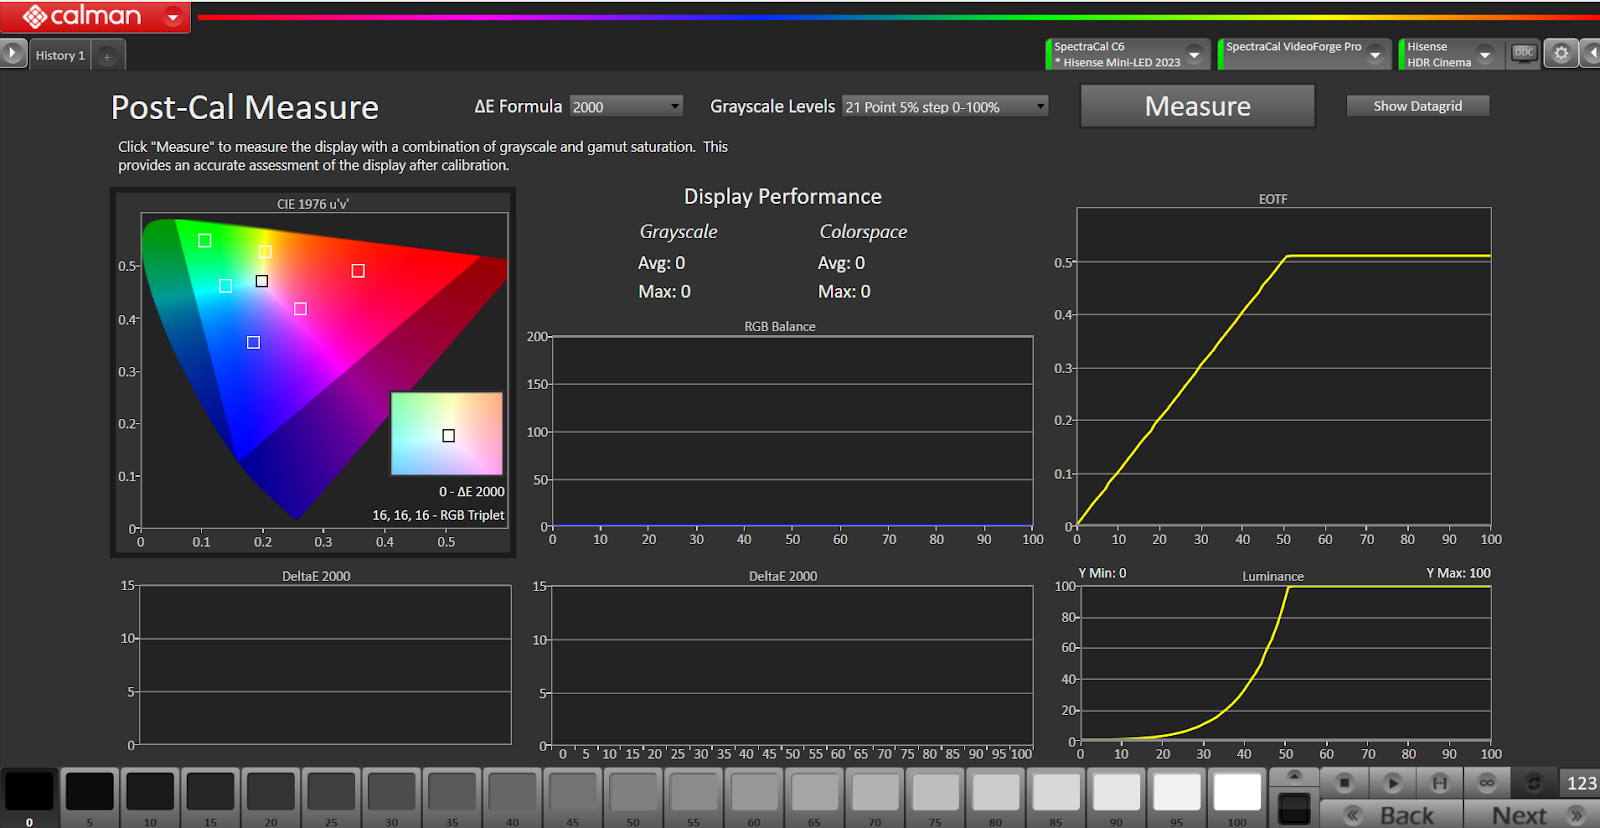
Post-Cal Measure
Post-Cal is used to measure the display combination of grayscale and gamut saturation providing an accurate assessment of the display.
Select Measure:
– HDR Calibration Complete –
- The HDR calibration has been completed.
- Select the next Option: Calibrate Next Mode, Save and Report data or Additional Validations
Use Calibrate Next Mode to calibrate HDR Filmmaker