![]()

Hisense offers calibration options for SDR and HDR through the Autocal workflow. While most settings are automatically configured, HDR calibration necessitates manual adjustment of specific settings, which will be noted in the workflow.
Requirements
Calman Required Version
- Calman Studio, Video Pro, or Ultimate
- v5.15.4 or newer for Hisense US models
Calman Required Workflows
- Hisense AutoCal Workflow
Required Hardware
- HDR Compatible Pattern Generator
- HDR Compatible Meter
- For information see Calman Compatible Meters
- Calman Compatible Hisense TV
- Hisense Models Models
- 2023:
- U7K
- U8K
- UXK
- A85K
- 2024:
- U7N
- U8N
- UXN
- A85N
- 2025
- U9QG
- U8QG
- U75QG
- U75QU
- 2023:
- Hisense Models Models
TV setup:
- Complete TV network setup and ensure TV is connected to the same local area network as the computer running Calman software
- Connect the Calman-supported pattern generator to the TV’s HDMI 1 Port with a certified (at least HDMI 2.0 grade) cable.
- Verify Calman Services is enabled by selecting Settings → Picture → Calibration Settings → Calman Services
Getting Started
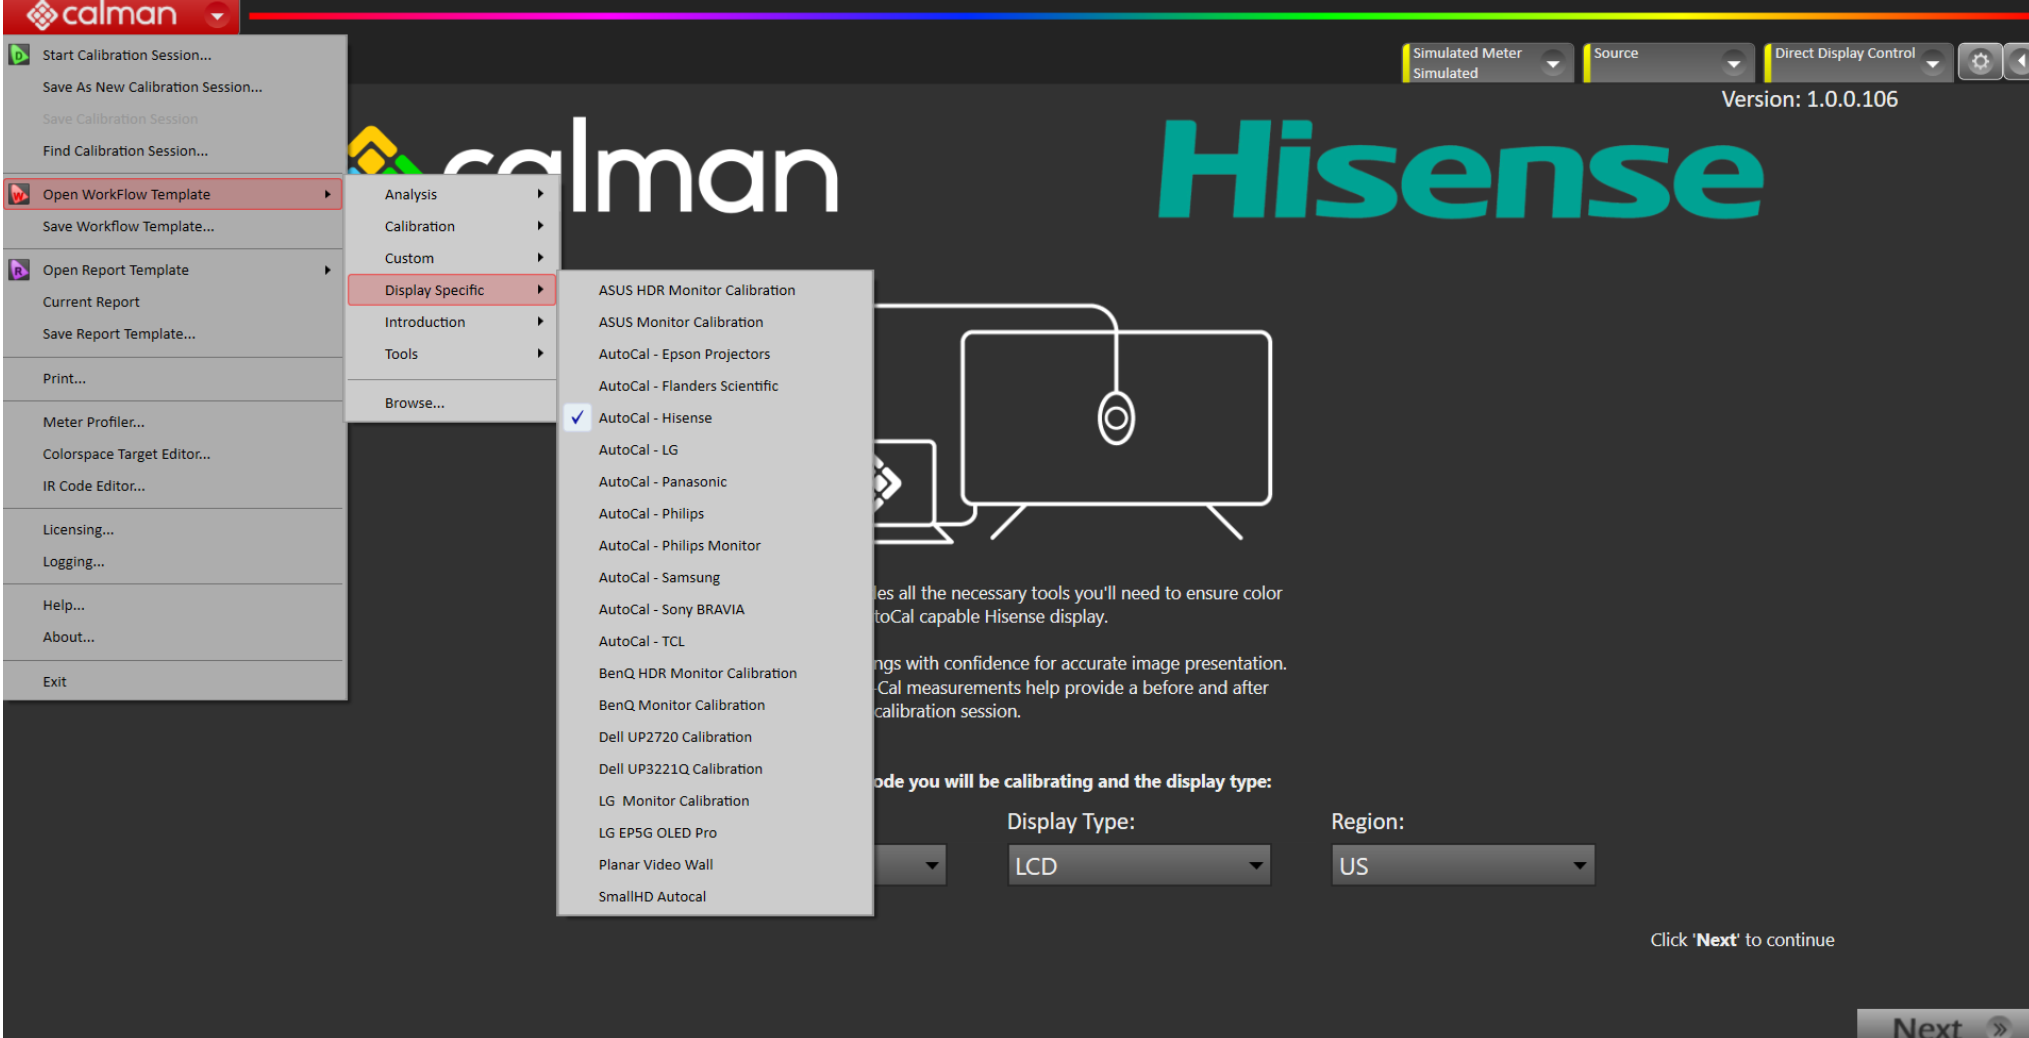
- From the Calman Menu in the top-left, choose Open Workflow Template > Display Specific and then AutoCal – Hisense
- Select calibration mode (colorspace) and display type and Region
- Click Next to proceed to calibration
Most of the functions have been automated when using the Hisense workflow, such as tone mapping.
SDR Calibration
Step 1 Hardware Setup
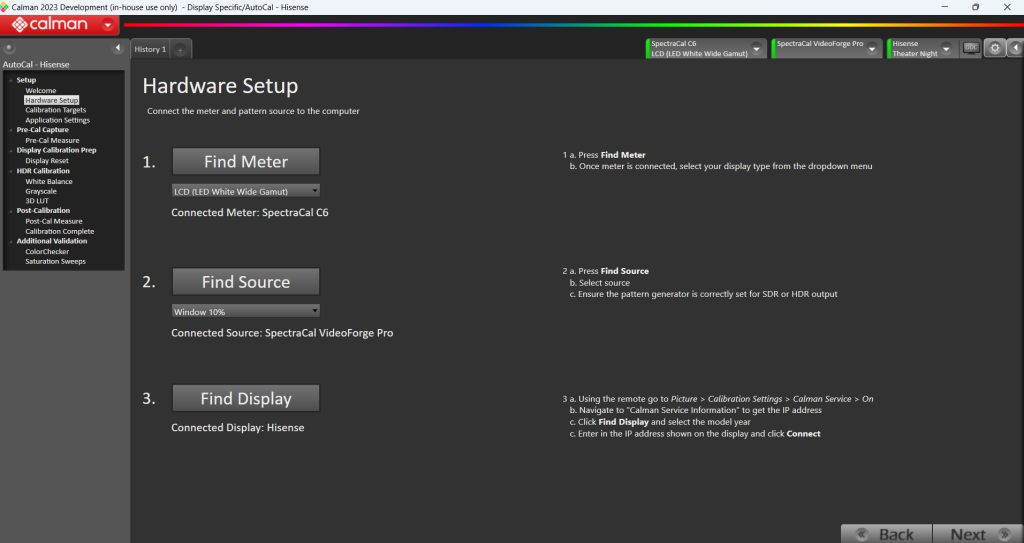
- Connect the meter: Plug the meter into a USB port on the computer and press the Find Meter button on the workflow.
- When the meter is connected, select your display type from the dropdown (this will vary by meter)
- Connect Pattern Source to your computer.
- Click the Find Source button then select the source
- Connect to the Hisense TV
- From the TV OSD:
- Choose Settings → Picture → Calibration Settings and ensure Calman Service is enabled
- Navigate to “Calman Service Information” to get the IP address
- In Calman:
- Click Find Display and select the model year
- Enter the IP address shown on the display and click Connect
- From the TV OSD:
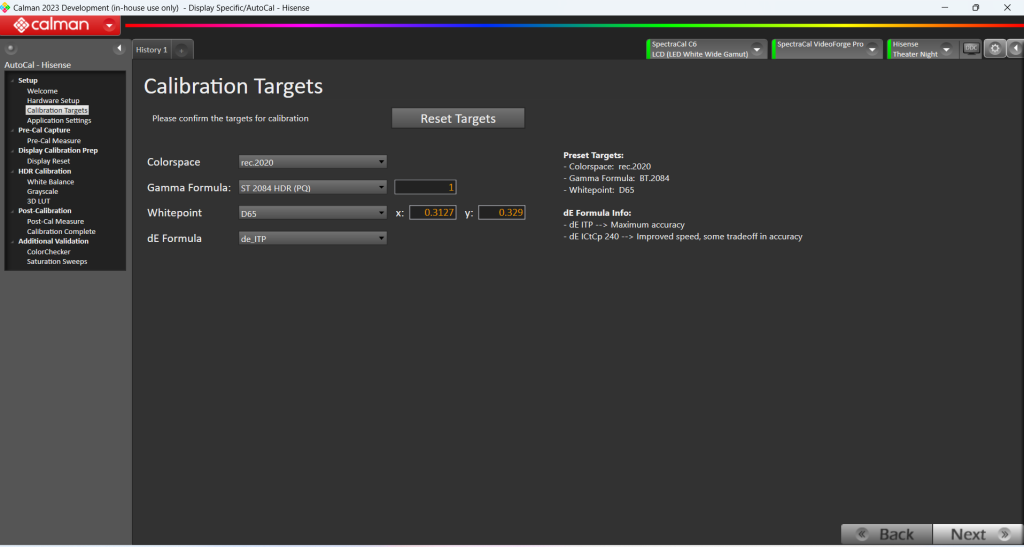
Step 2 Calibration Targets
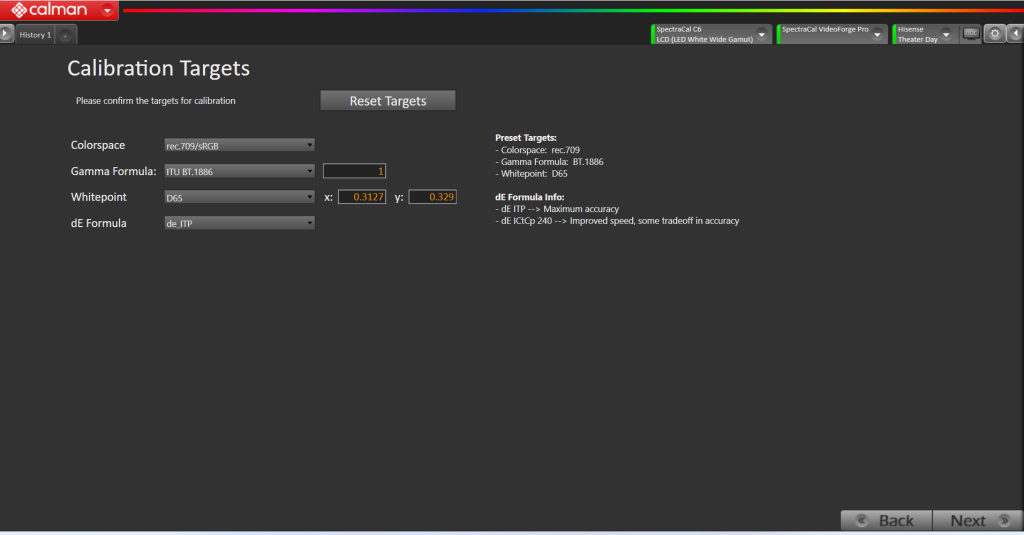
Confirm your calibration targets and prepare the TV. Settings will be automatically set as part of the workflow.
- For best SDR calibration, configure Calman settings to match the configuration recommendation provided in the workflow.
- Whitepoint: D65
- Corlorspace: Rec709
- EOFT: BT.1886
- AutoCal dE Formula
- dE ITP
- Increases accuracy, but calibration time may be extended
- dE ICtCp 240
- Improved speed, with a small tradeoff in accuracy
- dE ITP
Press Next to move to the next page
Step 3 Application Settings
Select Set calibration mode defaults for SDR
To prevent an OLED display from entering auto-dimming mode during extended measurements, the Calman Pattern Insertion feature periodically inserts a different test pattern during measurements, to reset the display’s auto-dimming timer. This can be disabled for LCD TVs.
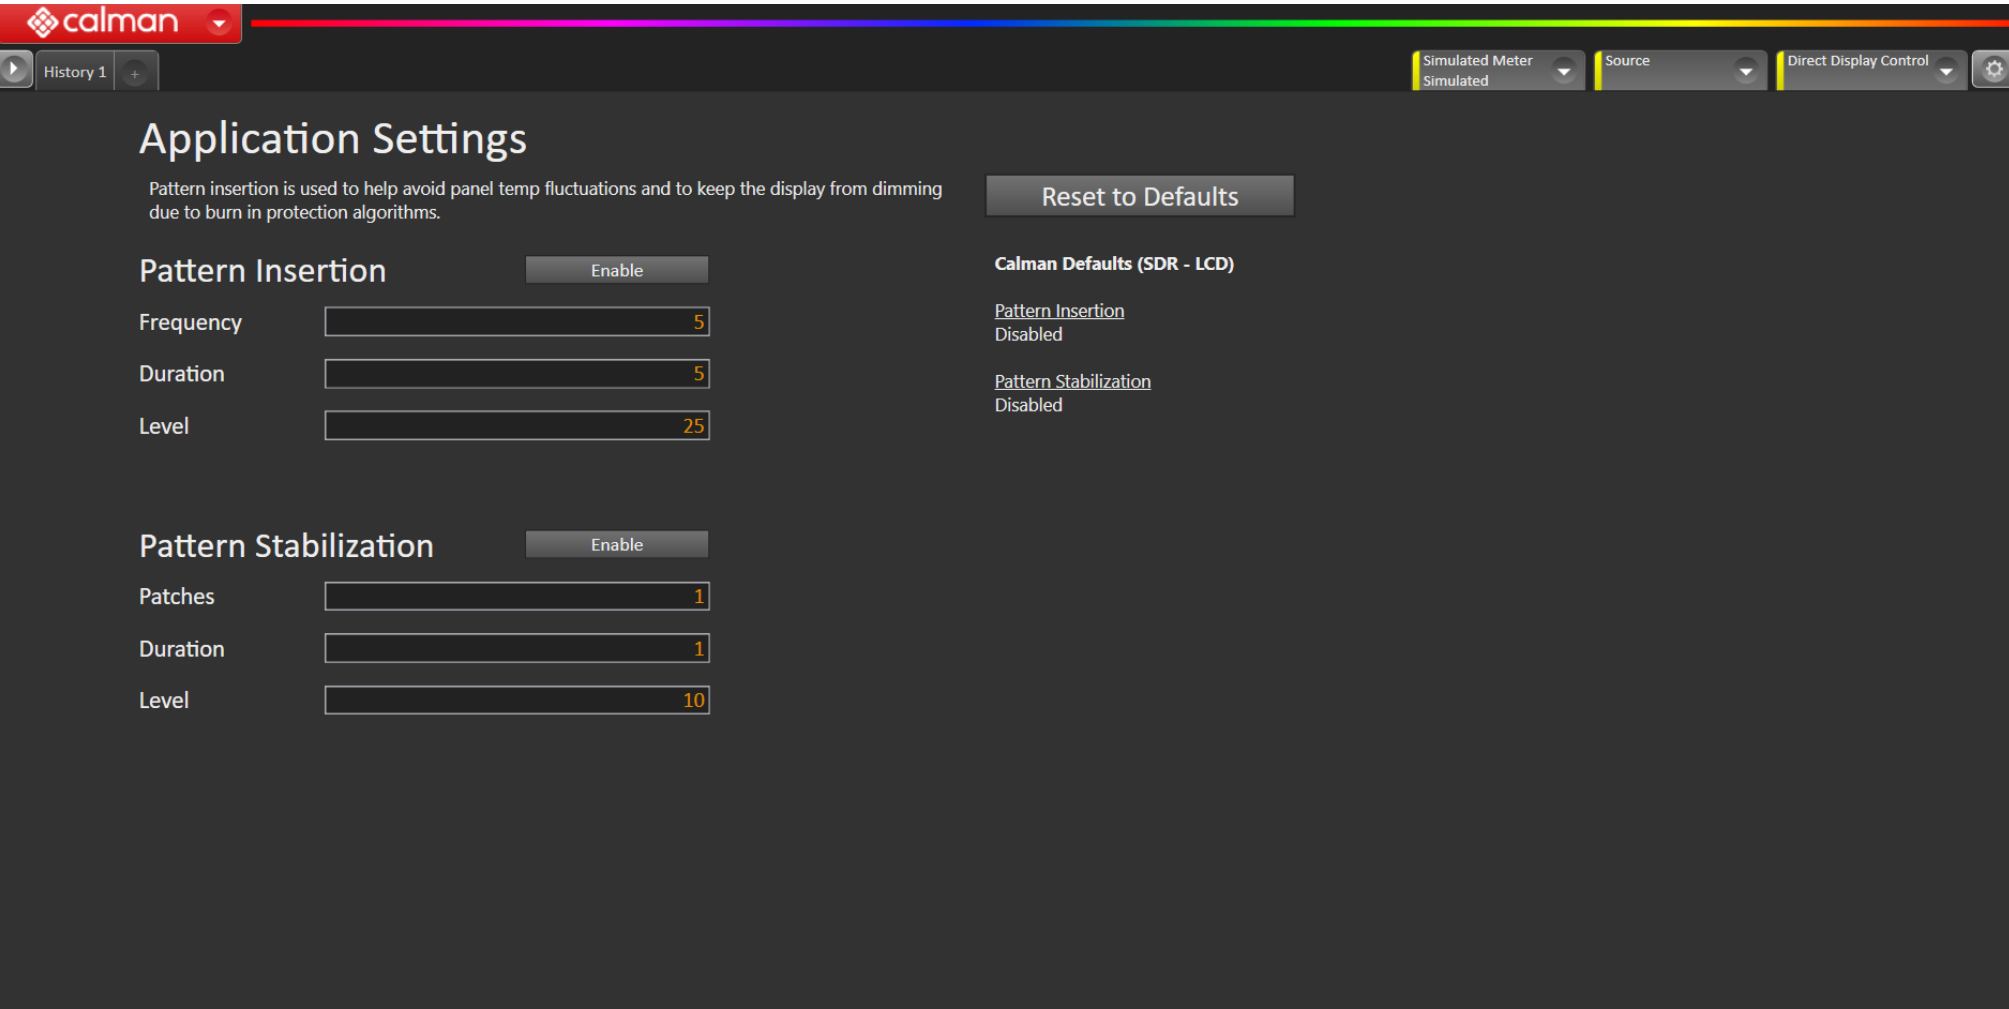
Press the Set SDR Defaults to configure pattern insertion to the following parameters
- Pattern Insertion
- Frequency: 5
- Duration: 5
- Pattern Level: 25
- Pattern Stabilization
- Patches: 1
- Duration: 1
- Level: 10
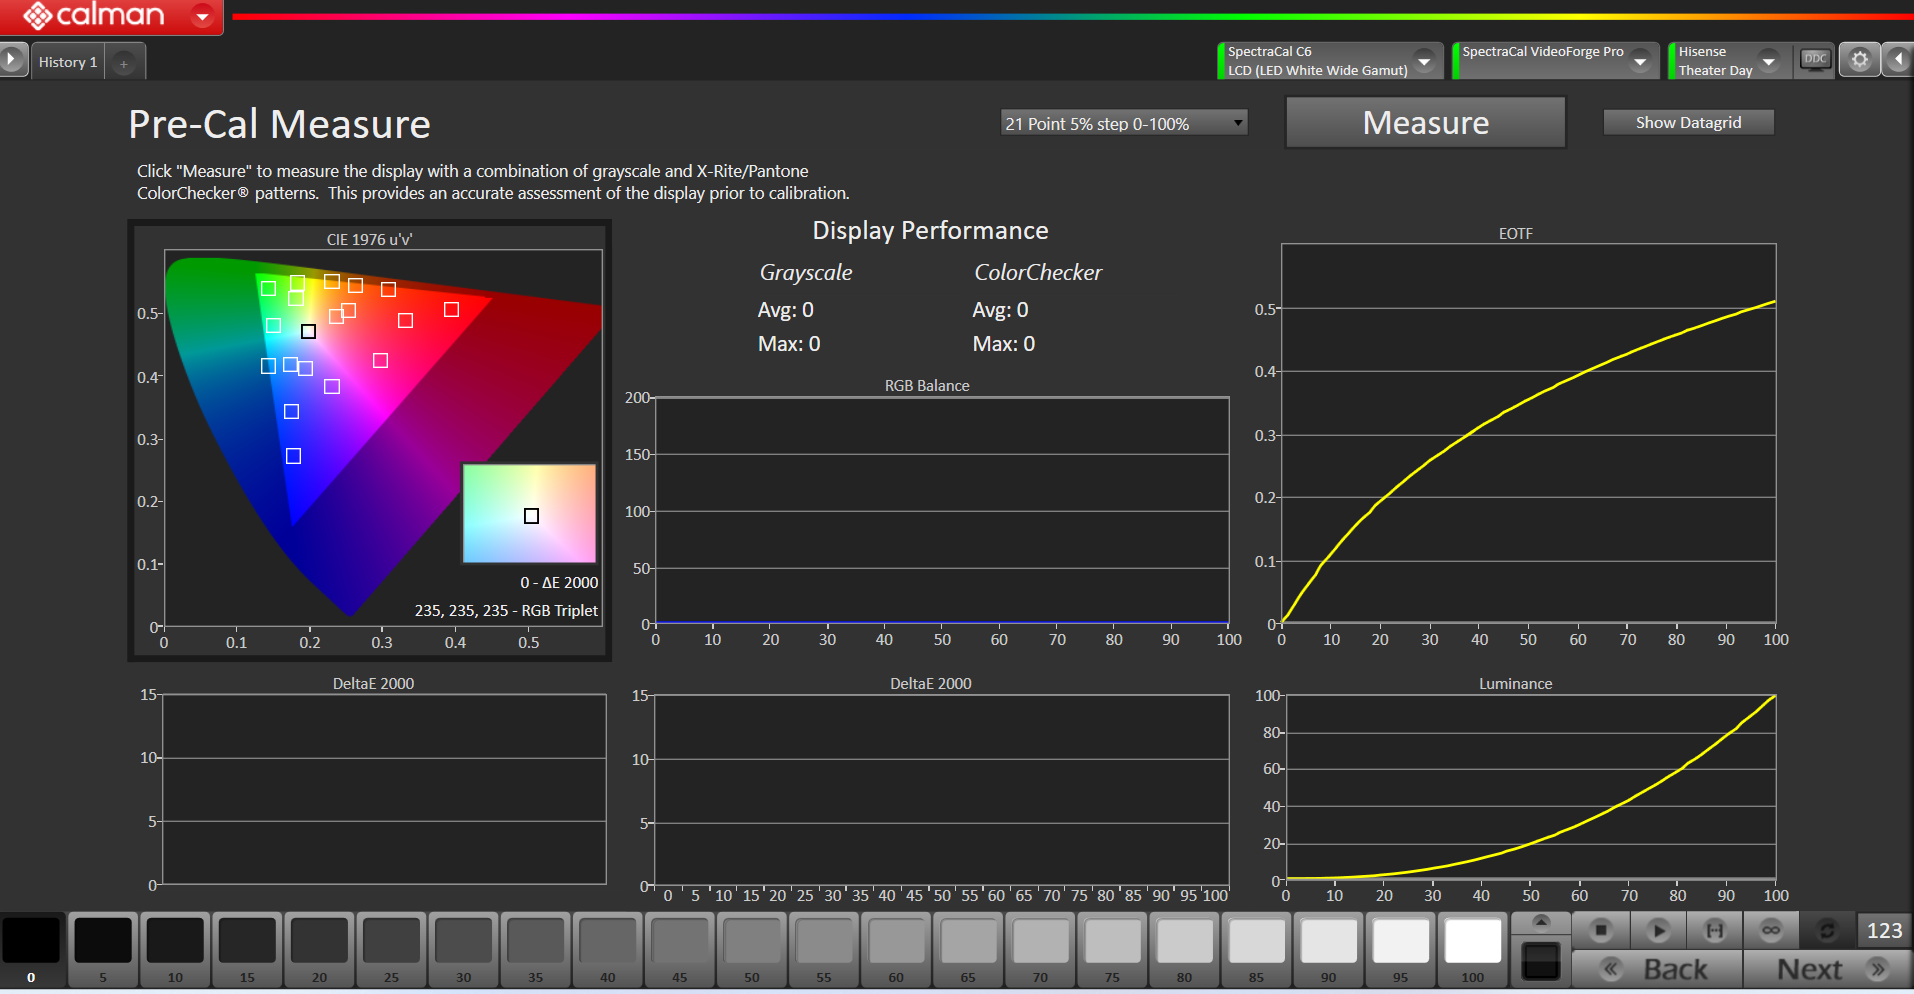
Step 4 Pre-Cal Measure
In this step, takes readings of the display before the calibration and are used to compare the calibration results.
-
Select Measure button to take Pre-Calibration Measurements of the display’s grayscale and ColorChecker response
- This will provide a point of reference to compare your calibration results
Once Pre-Calibration Capture is complete, click Next
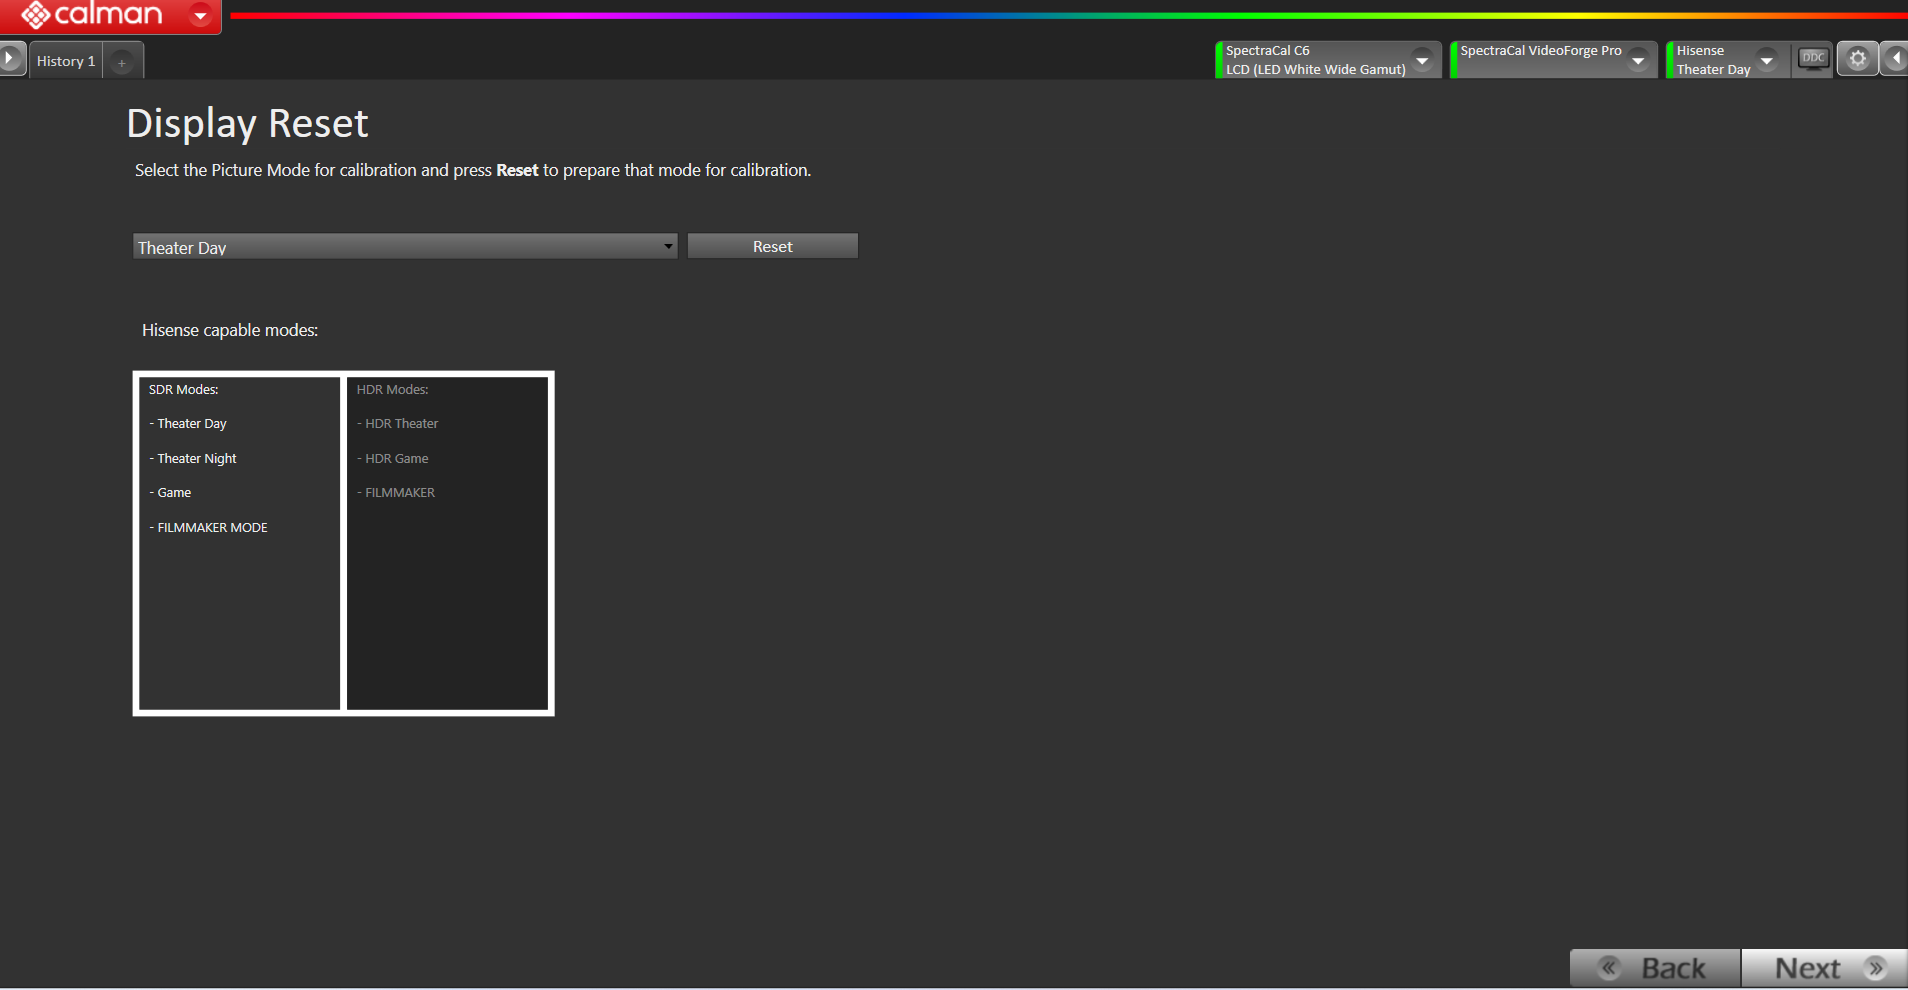
Step 5 Display Reset
Display Reset is used to update the Display Controls for the selected mode.
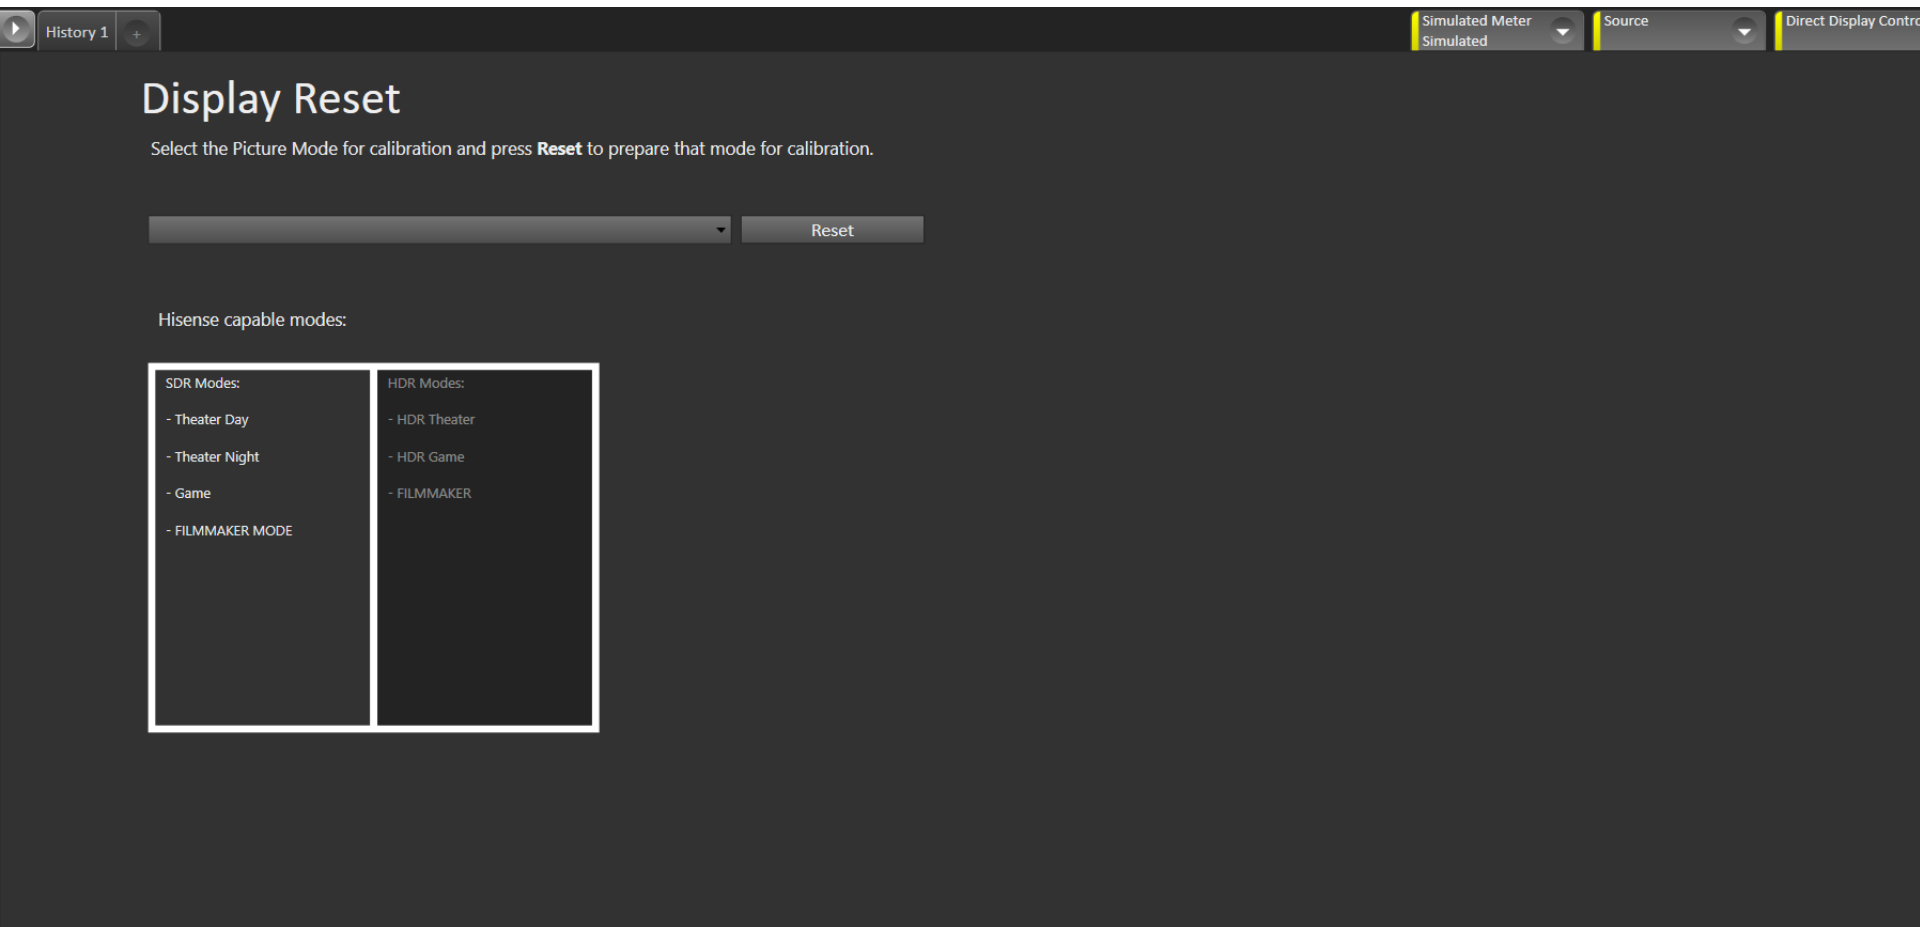 On the Display Reset page:
-
On the Display Reset page:
- Choose the picture mode you wish to calibrate
- The following modes are available for calibration:
- Theater Day
- Theater Night
- Game
- FILMMAKER MODE
- The following modes are available for calibration:
- Click the Reset button. This resets and prepares the picture mode for calibration
- Click Next after the DDC reset is complete
- Choose the picture mode you wish to calibrate
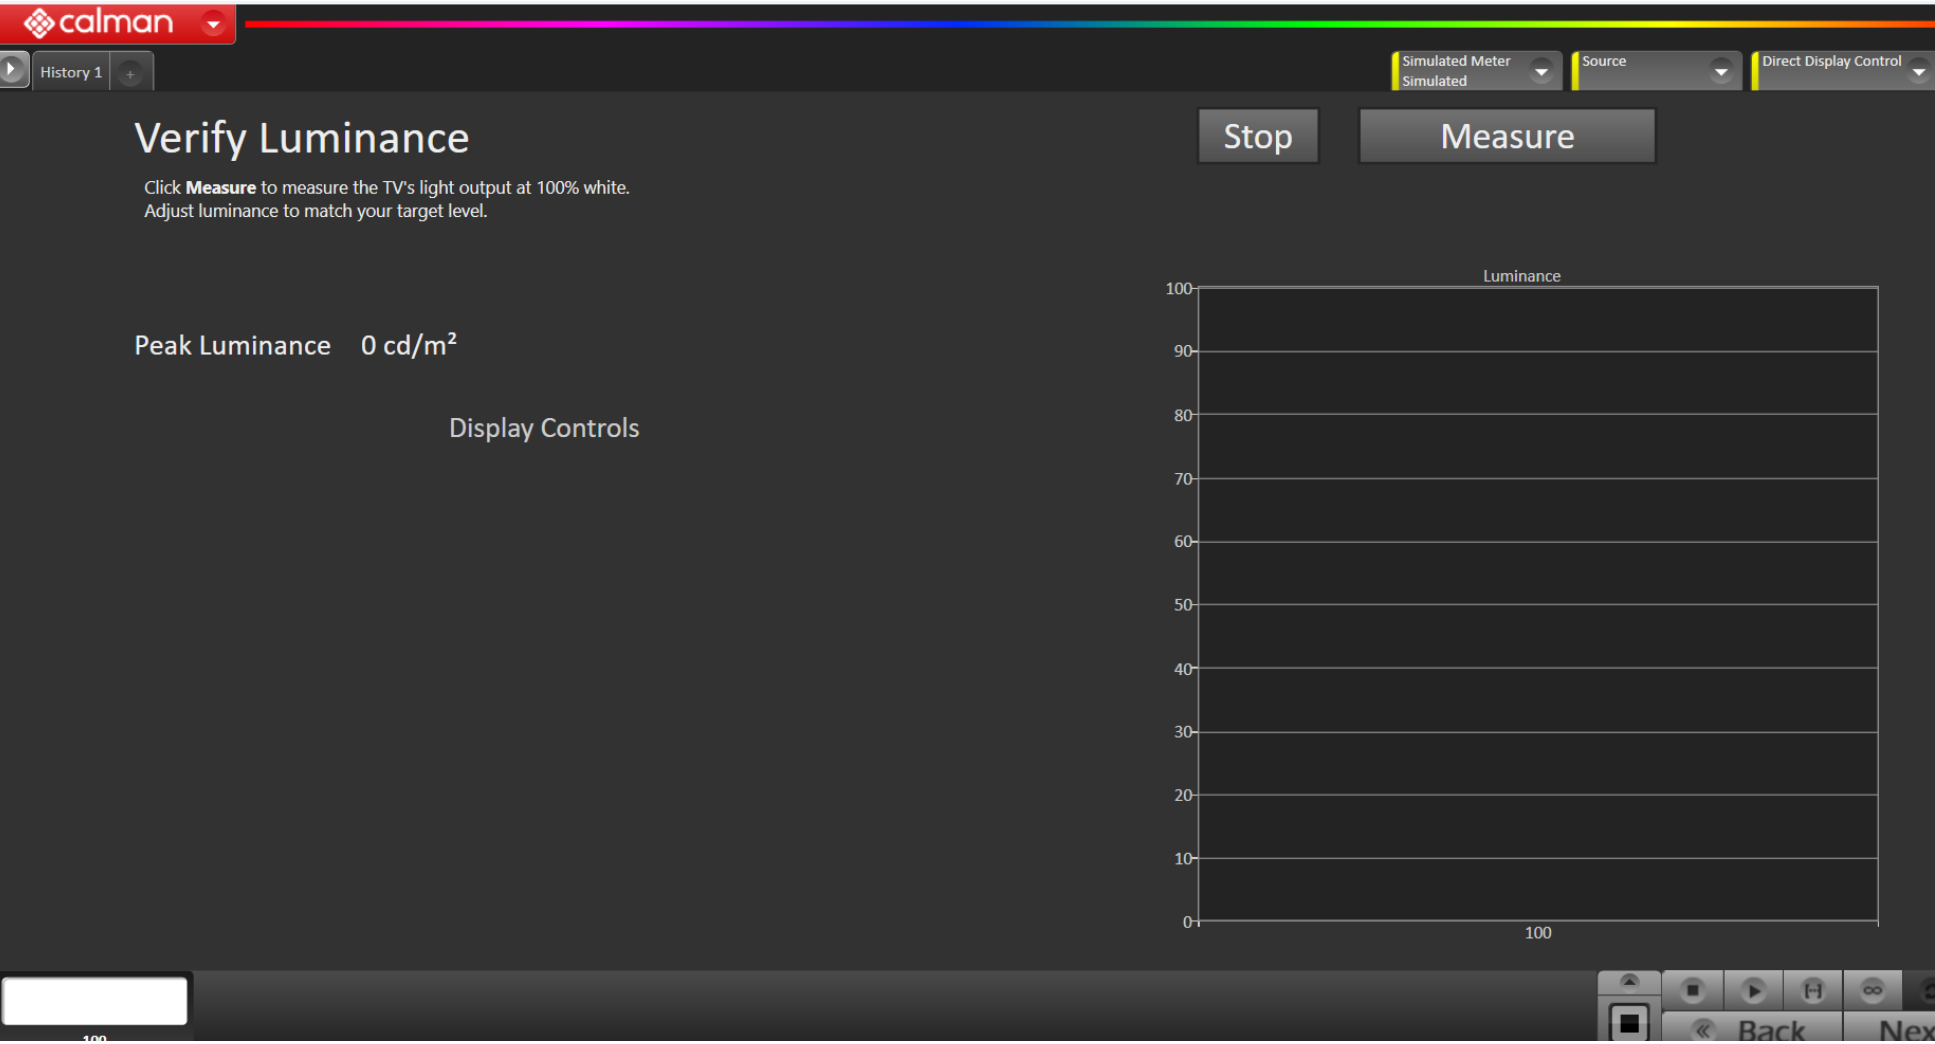
Step 6 Luminance
In this step, adjust the Luminance of the display to match the desired target. Luminance is a subjective target. SDR reference luminance is 100cd/m2, but you may need to target higher to account for the ambient light in the environment
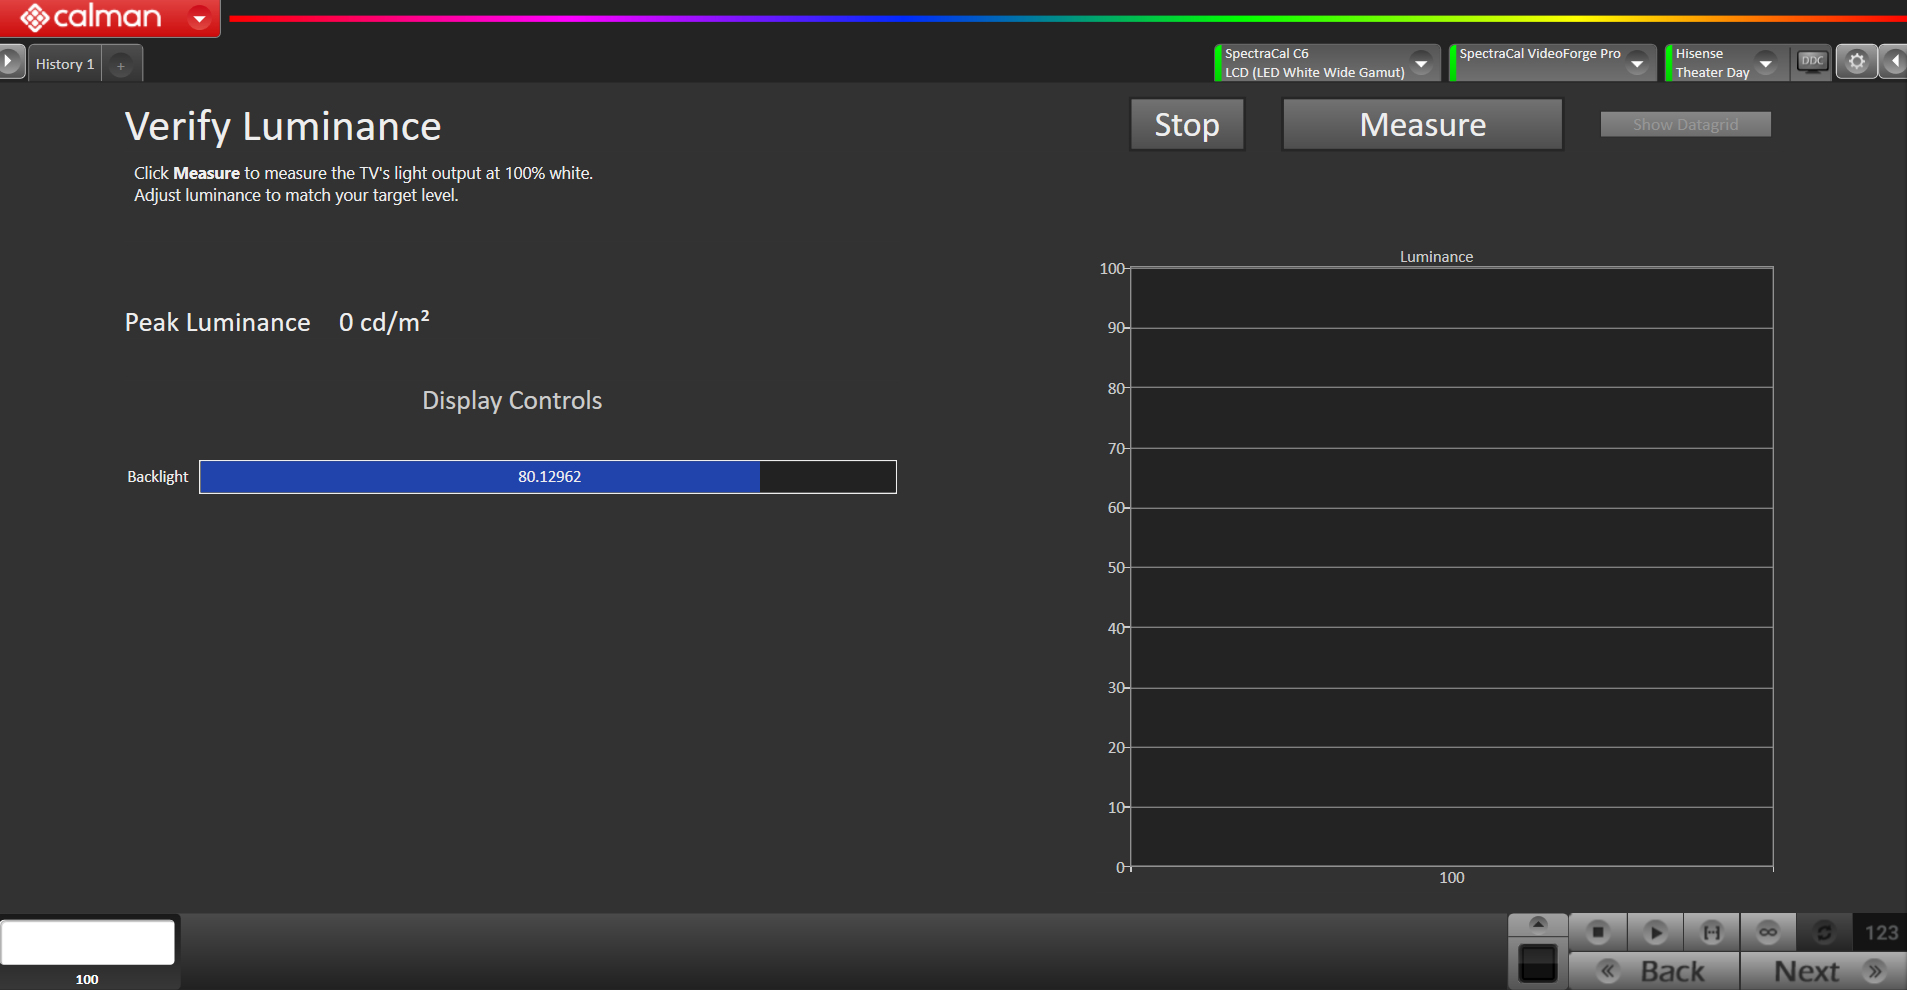
- Click the Measure button to measure your TV’s light output at 100% white and adjust the display’s peak white to the desired luminance.
- Luminance is a subjective target. SDR reference luminance is 100nits, but you may need to target higher to account for the ambient light in your environment.
- Use the Blacklight slider to adjust for the desired results.
- Press Stop when luminance adjustment is complete
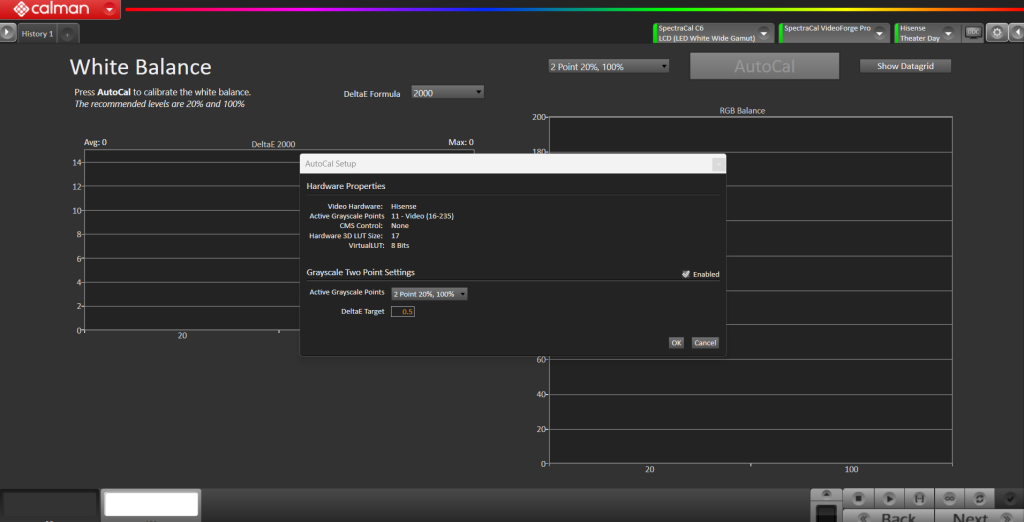
Step 7 White Balance
For this step, Calman will adjust the display’s White Balance

- Click the AutoCal button to perform the 2pt greyscale AutoCal
Step 8 Grayscale Multipoint
This step, Calman will adjust the Grayscale Multipoint of the display
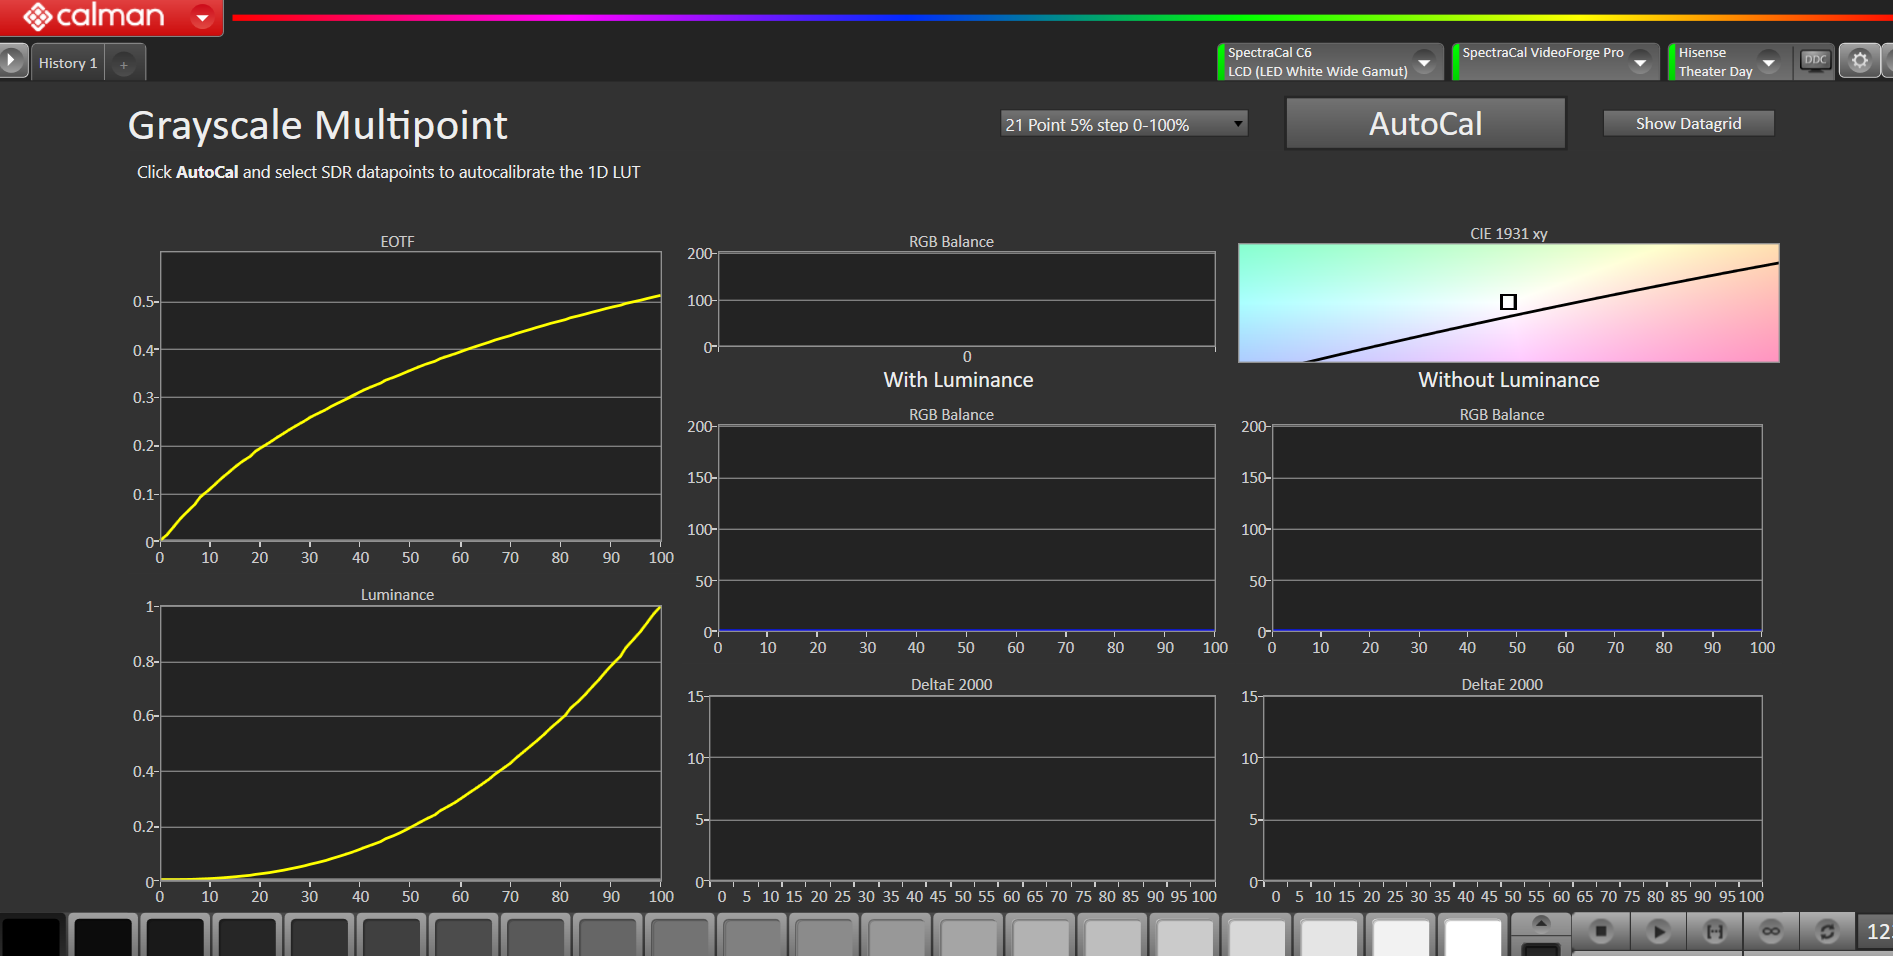
- Press the AutoCal button and verify that the SDR point set is selected
- Click OK to begin greyscale AutoCal
Step 9 3D LUT Calibration
This step, Calman will calibrate the Color Management using a 3D LUT

- Press the AutoCal button to open the AutoCal dialog
- Calman has multiple methods for creating a 3D LUT. For information about these LUTs see 3D LUT ARTICLE
- Suggested using the Hybrid_5 for the best results
- Choose the video range matching the target and pattern generator settings
- Click OK to begin the colorspace AutoCal process
When AutoCal is complete, press the Next button to proceed
Step 10 Verify Luminance
It’s common to lose some overall luminance after the 1D LUT calibration. Use step this to adjust back to your luminance target if it has changed
- Click the Measure button to measure your TV’s light output at 100% white and adjust the display’s peak white to the desired luminance
- Press Stop Measuring when luminance adjustment is complete
Step 11 Post Calibration
Post-calibration readings to document the post-calibration condition of the display.

SDR calibration is complete
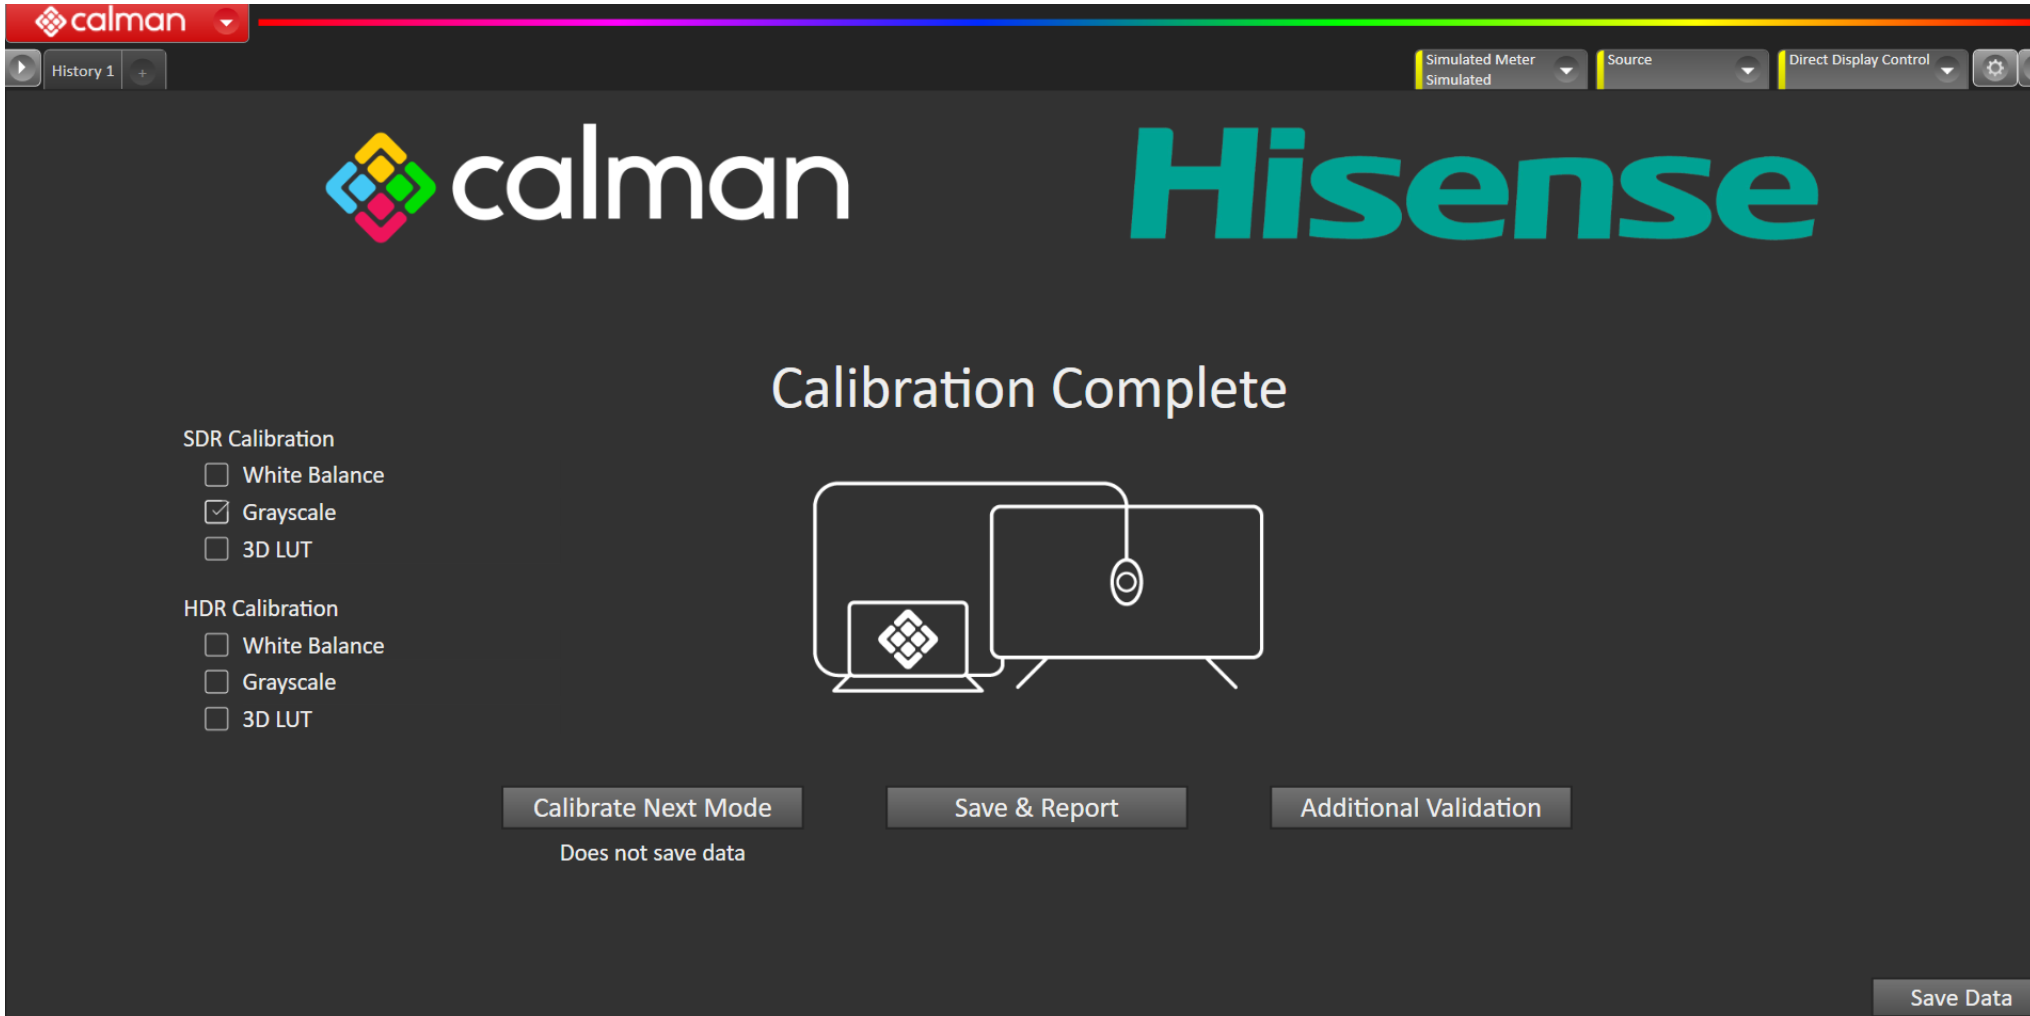
Select an option:
- Calibrate Next Mode
- Save & Report
- Additional Validation
HDR Calibration
Step 1 Getting Started
-
-
-
Connect the meter: Plug your meter into a USB port on the computer and press the Find Meter button on the workflow.
When your meter is connected, select your display type from the dropdown (this will vary by meter)
-
Connect Pattern Source to your computer.
- Click the Find Source button then select your source
- Reminder to set the Source signal to HDR
-
Connect to the Hisense TV
- From the TV OSD:
- Choose Settings → Picture → Calibration Settings and ensure Calman Service is enabled
- Navigate to “Calman Service Information” to get the IP address
- In Calman:
- Click Find Display and select the model year
- Enter the IP address shown on the display and click Connect
- From the TV OSD:
-
-
Step 2 Calibration Targets
Confirm your calibration targets and prepare the TV. Settings will be automatically set as part of the workflow.
- For best HDR calibration, configure Calman settings to match the configuration recommendation provided in the workflow.
- Whitepoint: D65
- Corlorspace: Rec2020
- EOFT: BT.2084
- AutoCal dE Formula
- dE ITP
- Increases accuracy, but calibration time may be extended
- dE ICtCp 240
- Improved speed, with a small tradeoff in accuracy
- dE ITP
Press Next to move to the next page
Step 3 Application Settings
Select Set calibration mode defaults for HDR
To prevent an OLED display from entering auto-dimming mode during extended measurements, the Calman Pattern Insertion feature periodically inserts a different test pattern during measurements, to reset the display’s auto-dimming timer. This can be disabled for LCD TVs.

Press the Set HDR Defaults to configure pattern insertion to the following parameters
- Pattern Insertion
- Frequency: 5
- Duration: 5
- Pattern Level: 25
- Pattern Stabilization
- Patches: 1
- Duration: 1
- Level: 10
Once Pre-Calibration Capture is complete, click Next
Step 4 Pre-Cal Measure
In this step, takes readings of the display before the calibration and will be used to compare your calibration results
- Click the AutoCal button to perform the 2pt greyscale AutoCal
Step 5 Display Reset
This step prepares the display to calibrate the selected mode.
On the Display Reset page:
- Choose the picture mode you wish to calibrate
- The following modes are available for calibration:
- HDR Theater
- HDR Game
- HDR FILMMAKER MODE
- The following modes are available for calibration:
- Click the Reset button. This resets and prepares the picture mode for calibration
- Click Next after the DDC reset is complete
Step 6 White Balance
On this step, Calman will adjust the display’s White Balance
- Click the AutoCal button to perform the 2pt greyscale AutoCal
- Click next when completed
Step 7 Grayscale Multipoint
This step Calman will adjust the Greyscale Multipoint of the display
- Press the AutoCal button and verify that the HDR point set is selected
- Click OK to begin greyscale AutoCal
- Note: The calibration results should match the display default (yellow EOTF)
- Calman will target Power 2.2 for this display default unless directed otherwise
Step 8 3D LUT
This step, Calman will calibrate the Color Management using a 3D LUT
- Press the AutoCal button to open the AutoCal dialog
- Calman has multiple methods for creating a 3D LUT. For information about these LUTs see the 3D LUT ARTICLE
- Choose the video range that matches the target and pattern generator settings
- Click OK to begin the colorspace AutoCal process
When AutoCal is complete, press the Next button to proceed
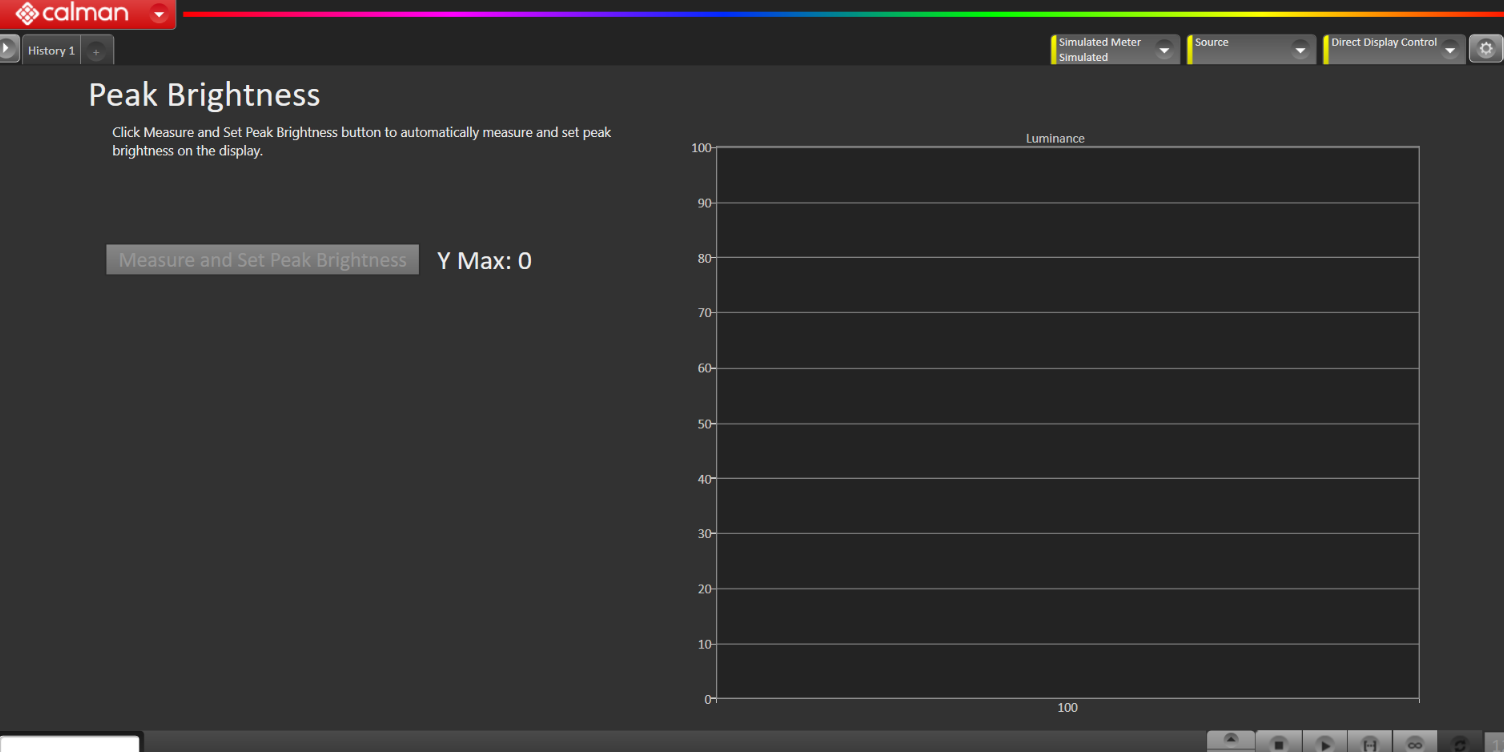
Step 9 Peak Brightness
It is common to lose some overall luminance after the 1D LUT calibration. Use step this to adjust back to the luminance target if it has changed
-
Click the Measure and Set Peak Luminance button to measure the TV’s light output at 100% white
-
Press Stop Measuring when luminance adjustment is complete
-
When AutoCal is complete, press the Next button to proceed
Step 10 Post-Cal Measure
Post-calibration readings to document the post-calibration condition of the display.
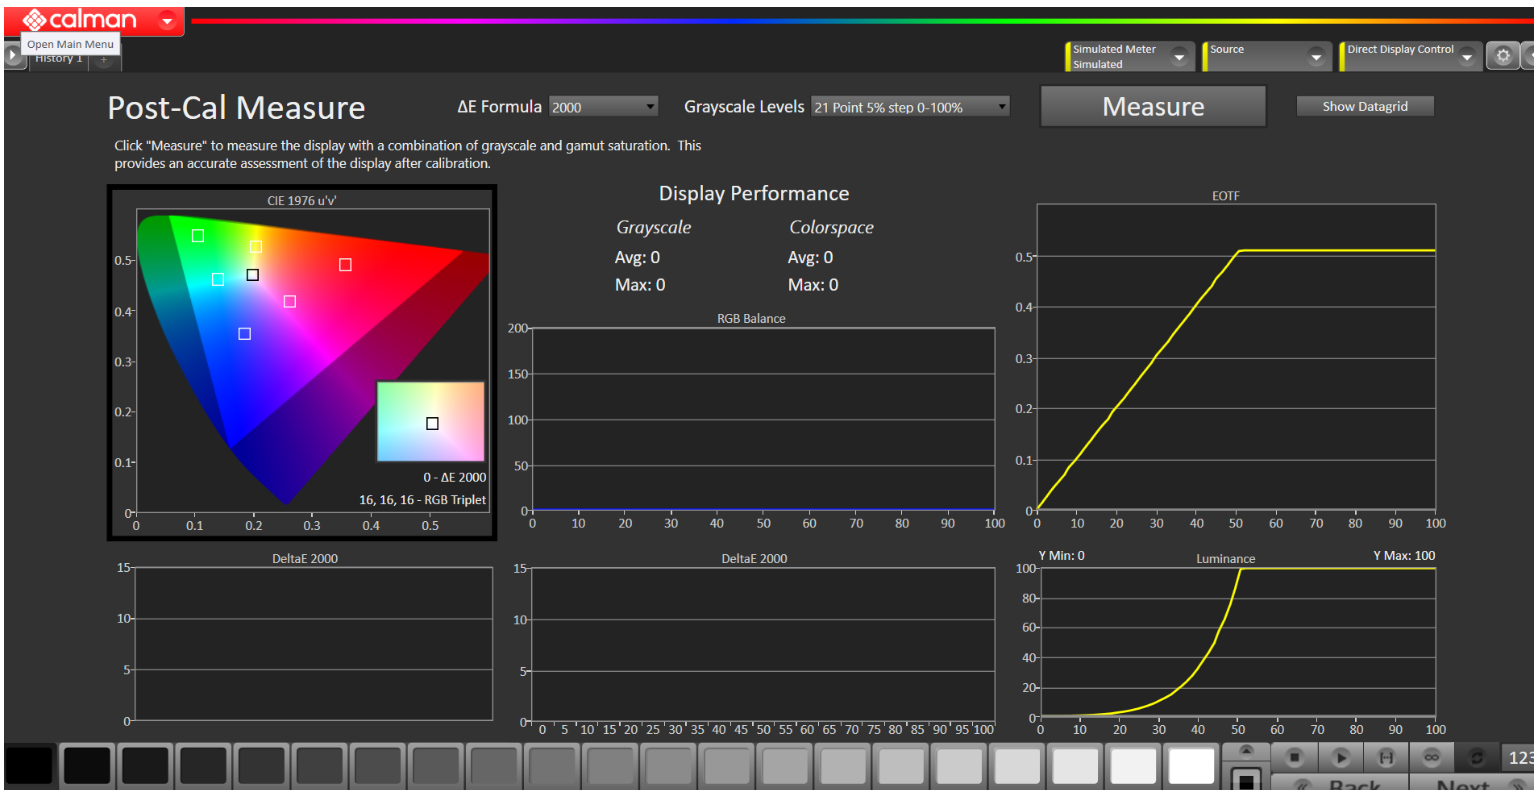
- Click the Measure button
- Click Next
HDR calibration is complete…
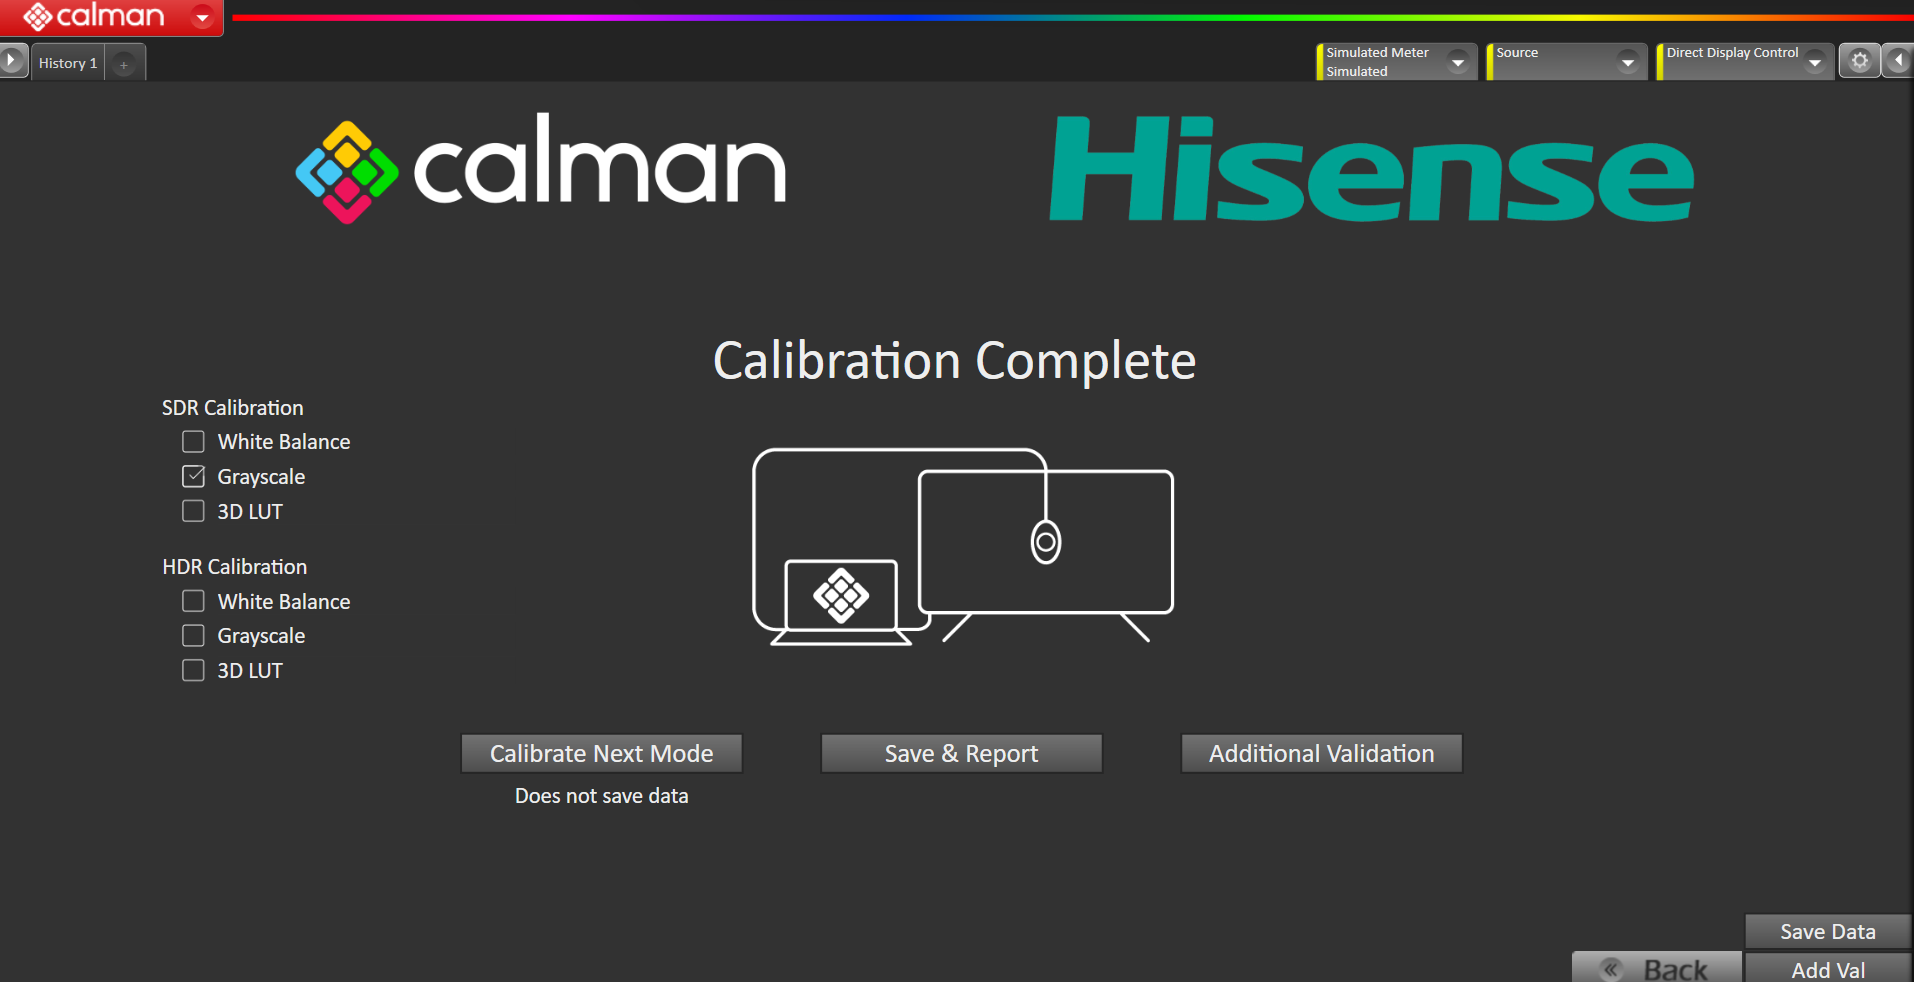
Select an option
- Calibrate Next Mode
- Save & Report
- Additional Validation