Calman can guide the calibration of compatible 2018, 2019, and 2020 LG TVs in SDR, HDR10, and Dolby Vision modes. This assures the most accurate rendering of both SDR and HDR picture content by the use of a 1D and 3D LUT.

Calman Required Version
- Calman Studio, Video Pro, or Ultimate
- Calman 2018 v5.9.0 (Including Home Enthusiast) or newer for 2018 TVs
- Calman 2019 v5.10.0 or newer for 2019 TVs
- Calman 2019 includes separate Dolby Vision workflow
- Calman 2020 v5.11.0 or newer for 2020 TVs
- For instructions on Calman Home for LG see This Article
Calman Required Workflows
- LG SDR Workflow
- LG HDR Workflow
- Covers both HDR and Dolby Vision in Calman 2018
- LG Dolby Vision
- Included in Calman 2019
Required Hardware
- HDR and Dolby Vision Compatible Pattern Generator
- For 2019 models, this can be the LG Internal Pattern Generator (For more info see This Article)
- For 2018 models, a hardware pattern generator like the VideoForge Pro must be used for HDR and Dolby Vision Calibration
- HDR Compatible Meter
- For information see Calman Compatible Meters
- Calman Compatible LG TV
- 2020
- Alpha 9 Gen 3
- OLED
- CX, GX, WX, ZX
- LCD
- NANO99, NANO097, NANO095,
- OLED
- Alpha 7 G3
- OLED
- BX
- LCD
- NANO090, and NANO085
- OLED
- Alpha 9 Gen 3
- 2019
- Alpha 9 Gen 2
- OLED R9 Z9 W9 W9S E9 C9 B9
- NanoCell SM99
- Alpha 7 Gen 2
- NanoCell LCD
- OLED B9
- Alpha 9 Gen 2
- 2018
- Alpha 9 Gen 1
- OLED C8 E8 G8 W8
- Alpha 7 Gen 1
- SuperUHD LCD
- Alpha 9 Gen 1
- 2020
Jump to
SDR Calibration
Step 1
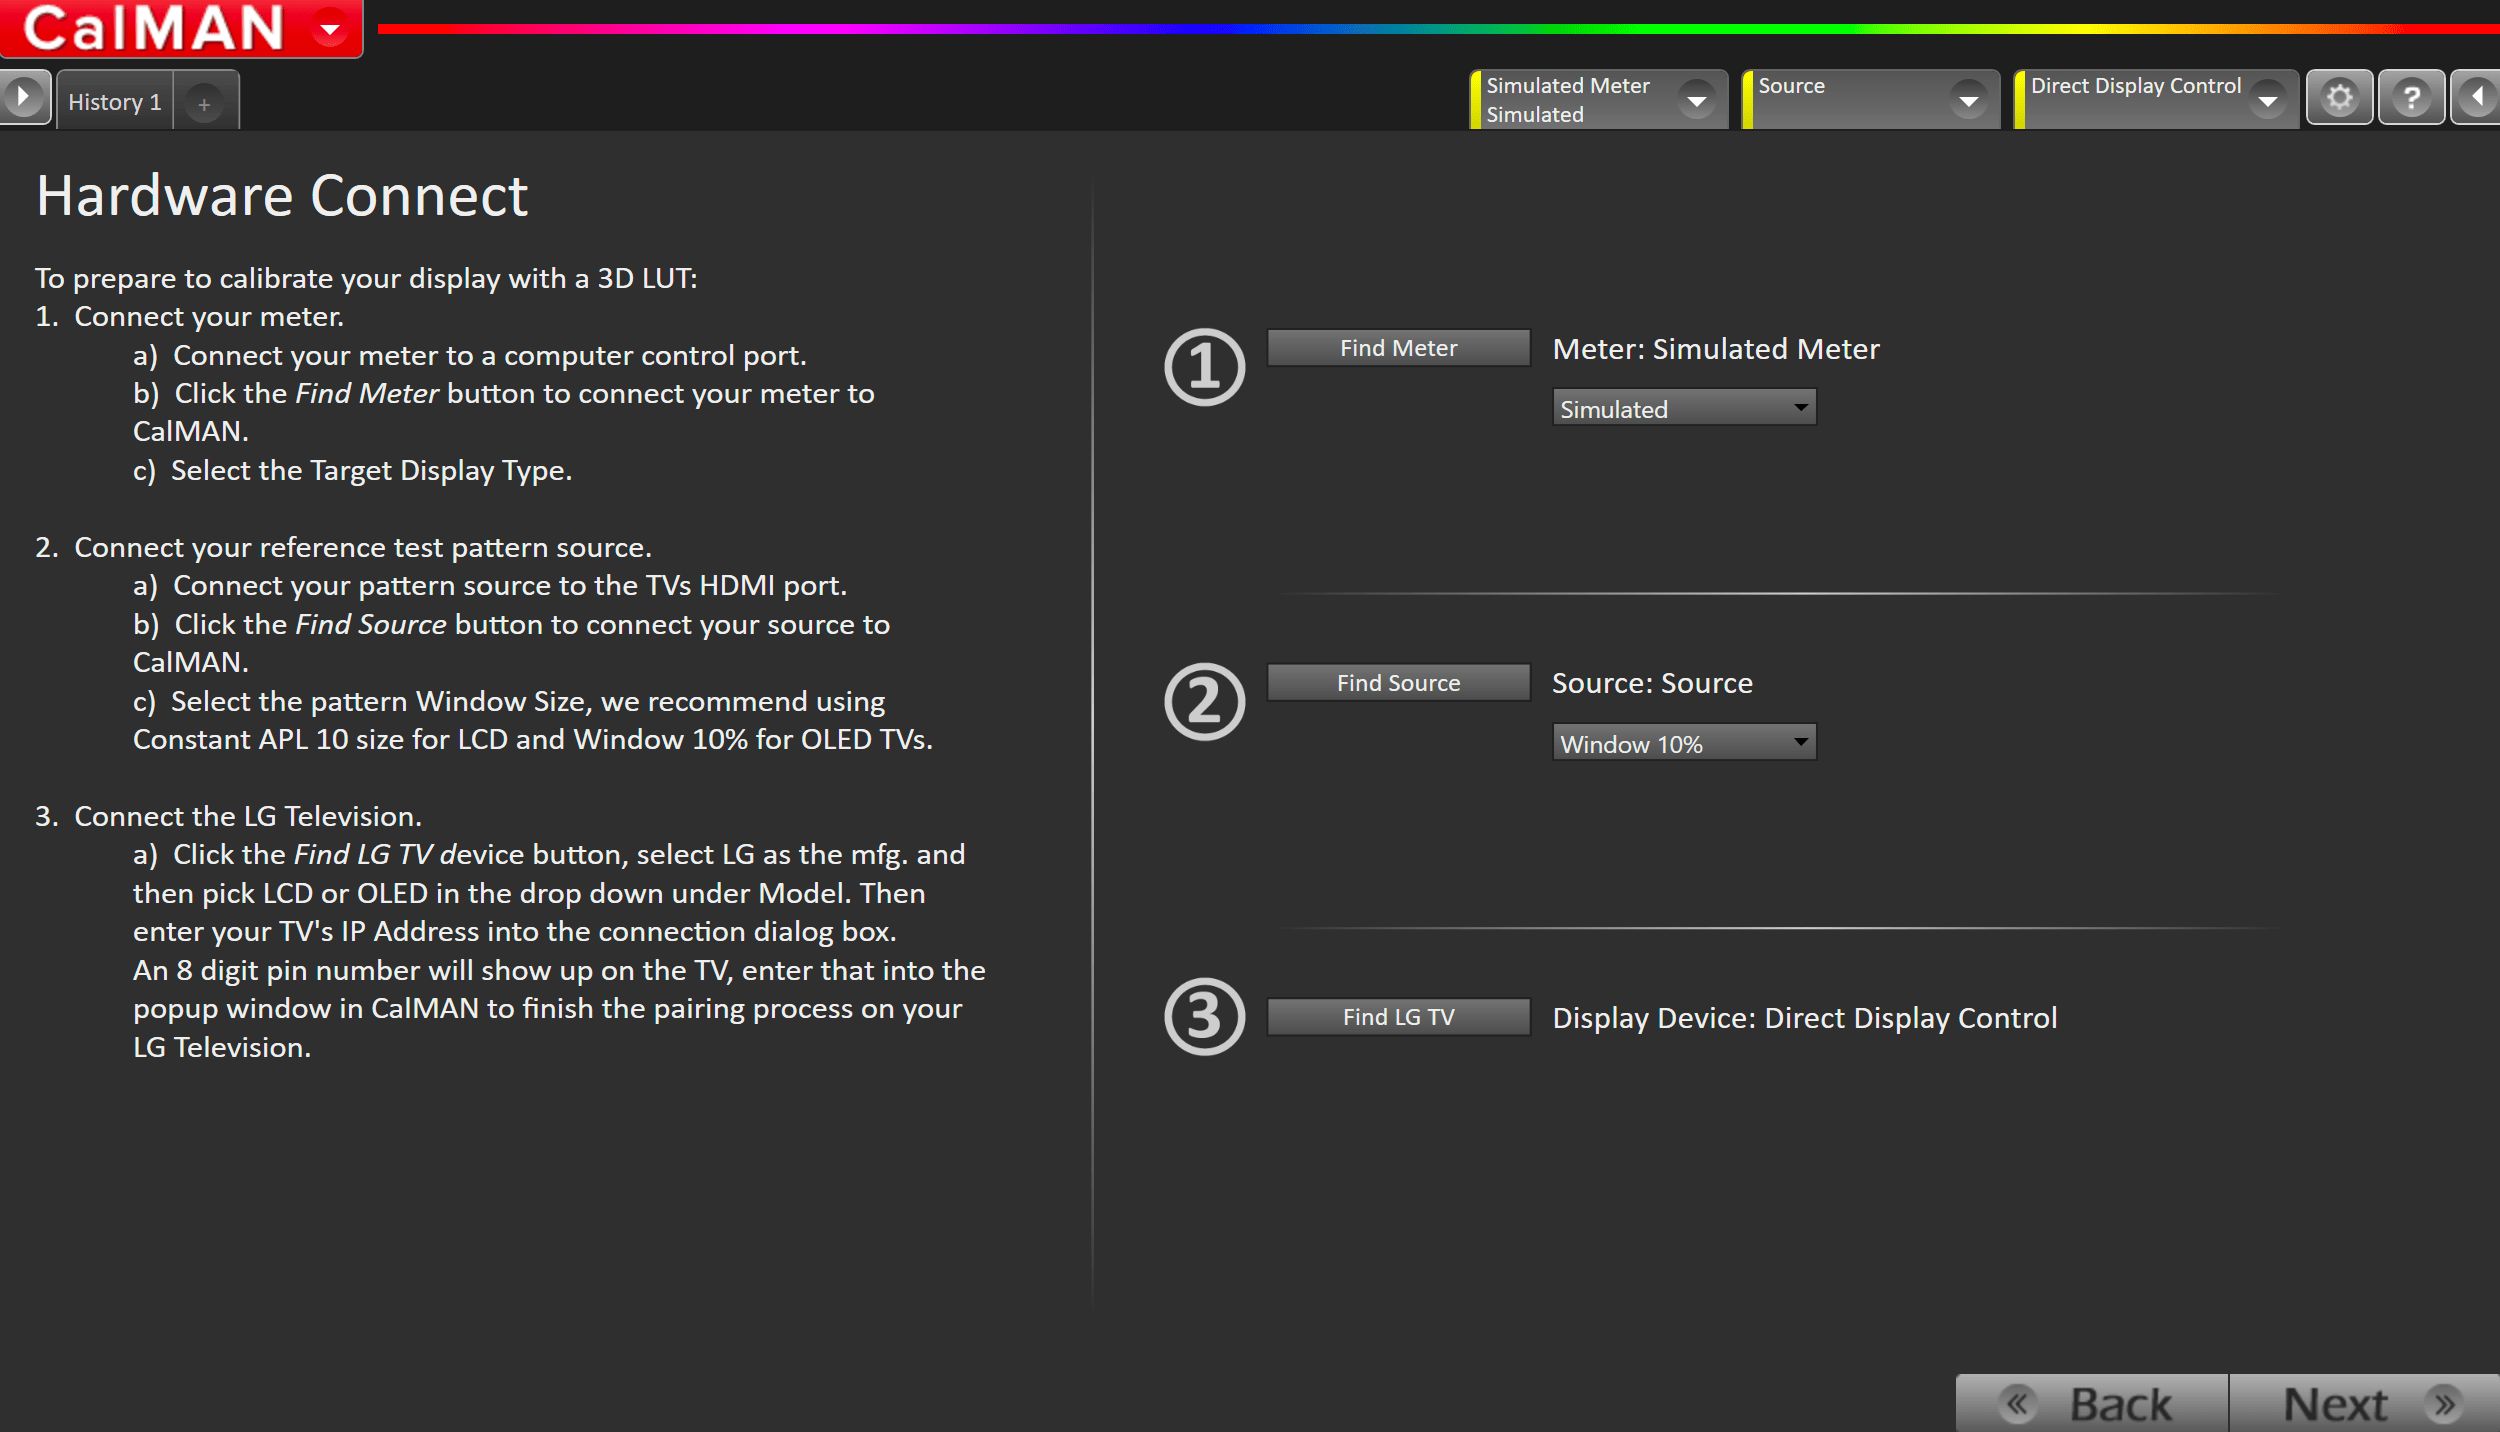
- From the Calman Menu in the top-left, choose Open Workflow Template -> Display Specific and then AutoCal – LG
- On the introduction screen, click SDR Calibration to proceed to the hardware connect page
- Plug your meter into a USB port on the computer and press the Find Meter button on the left
- When your meter is connected, select your display type from the dropdown (this will vary by meter)
- OLED: White-OLED (OLED (White) LG, Panasonic, FSI 2018 for C6 Meter)
- SuperUHD LCD – LCD LED Blue-Green (2018 LG SuperUHD LCD for C6 Meter)
- When your meter is connected, select your display type from the dropdown (this will vary by meter)
- Connect Pattern Source to your computer. If you’re using the internal pattern generator in 2019 TVs, see this article for connection steps
- Click the Find Source button then select your source
- Select the pattern window size
- OLED: Window 10%
- LCD and NanoCell: 100% full-screen (SDR)
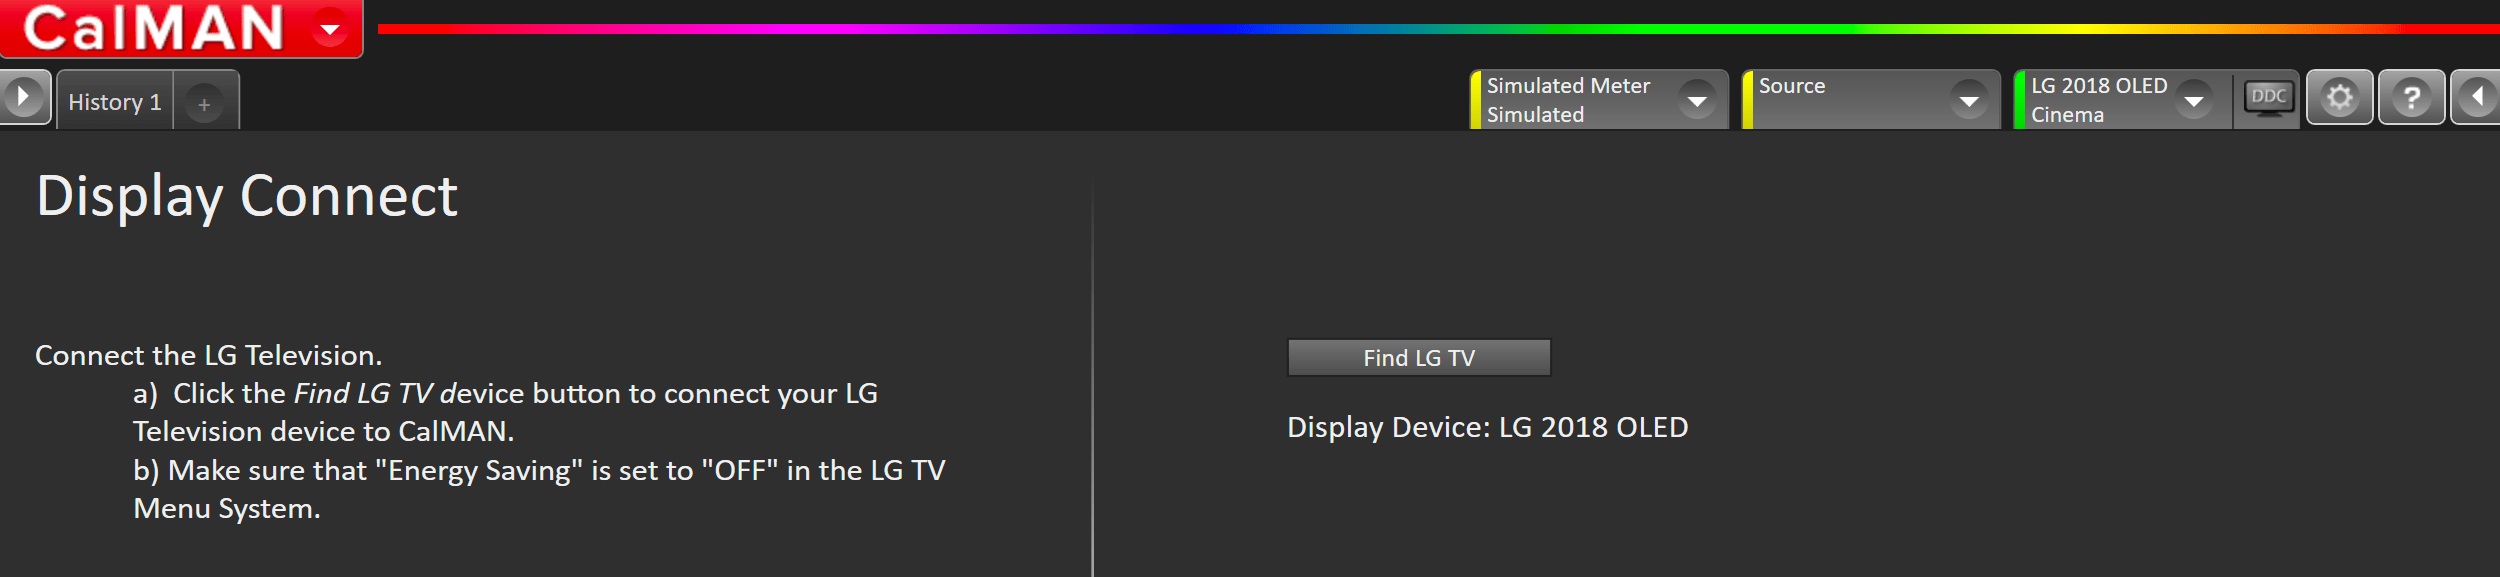
- Connect to your LG TV
- Click the Find LG TV Button
- Pick the LCD or OLED Model you are calibrating in the drop-down under Model.
- Enter your TV’s IP Address into the connection dialog box, and click Connect
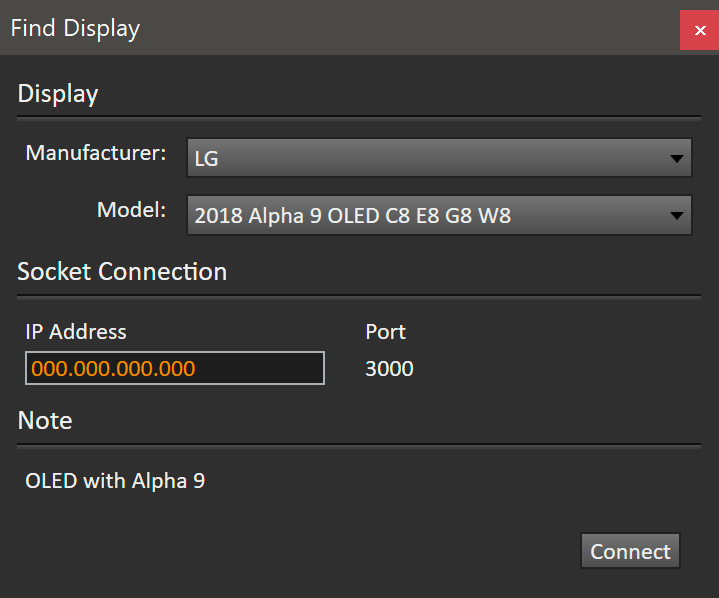
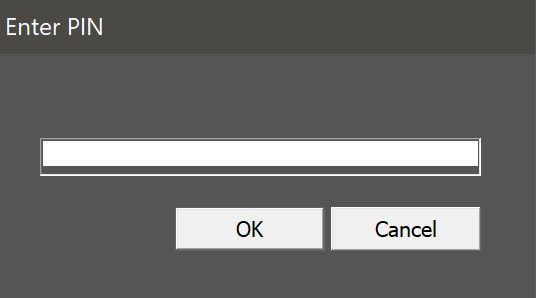
- When prompted, enter the 8 digit passcode displayed on the TV
Step 2
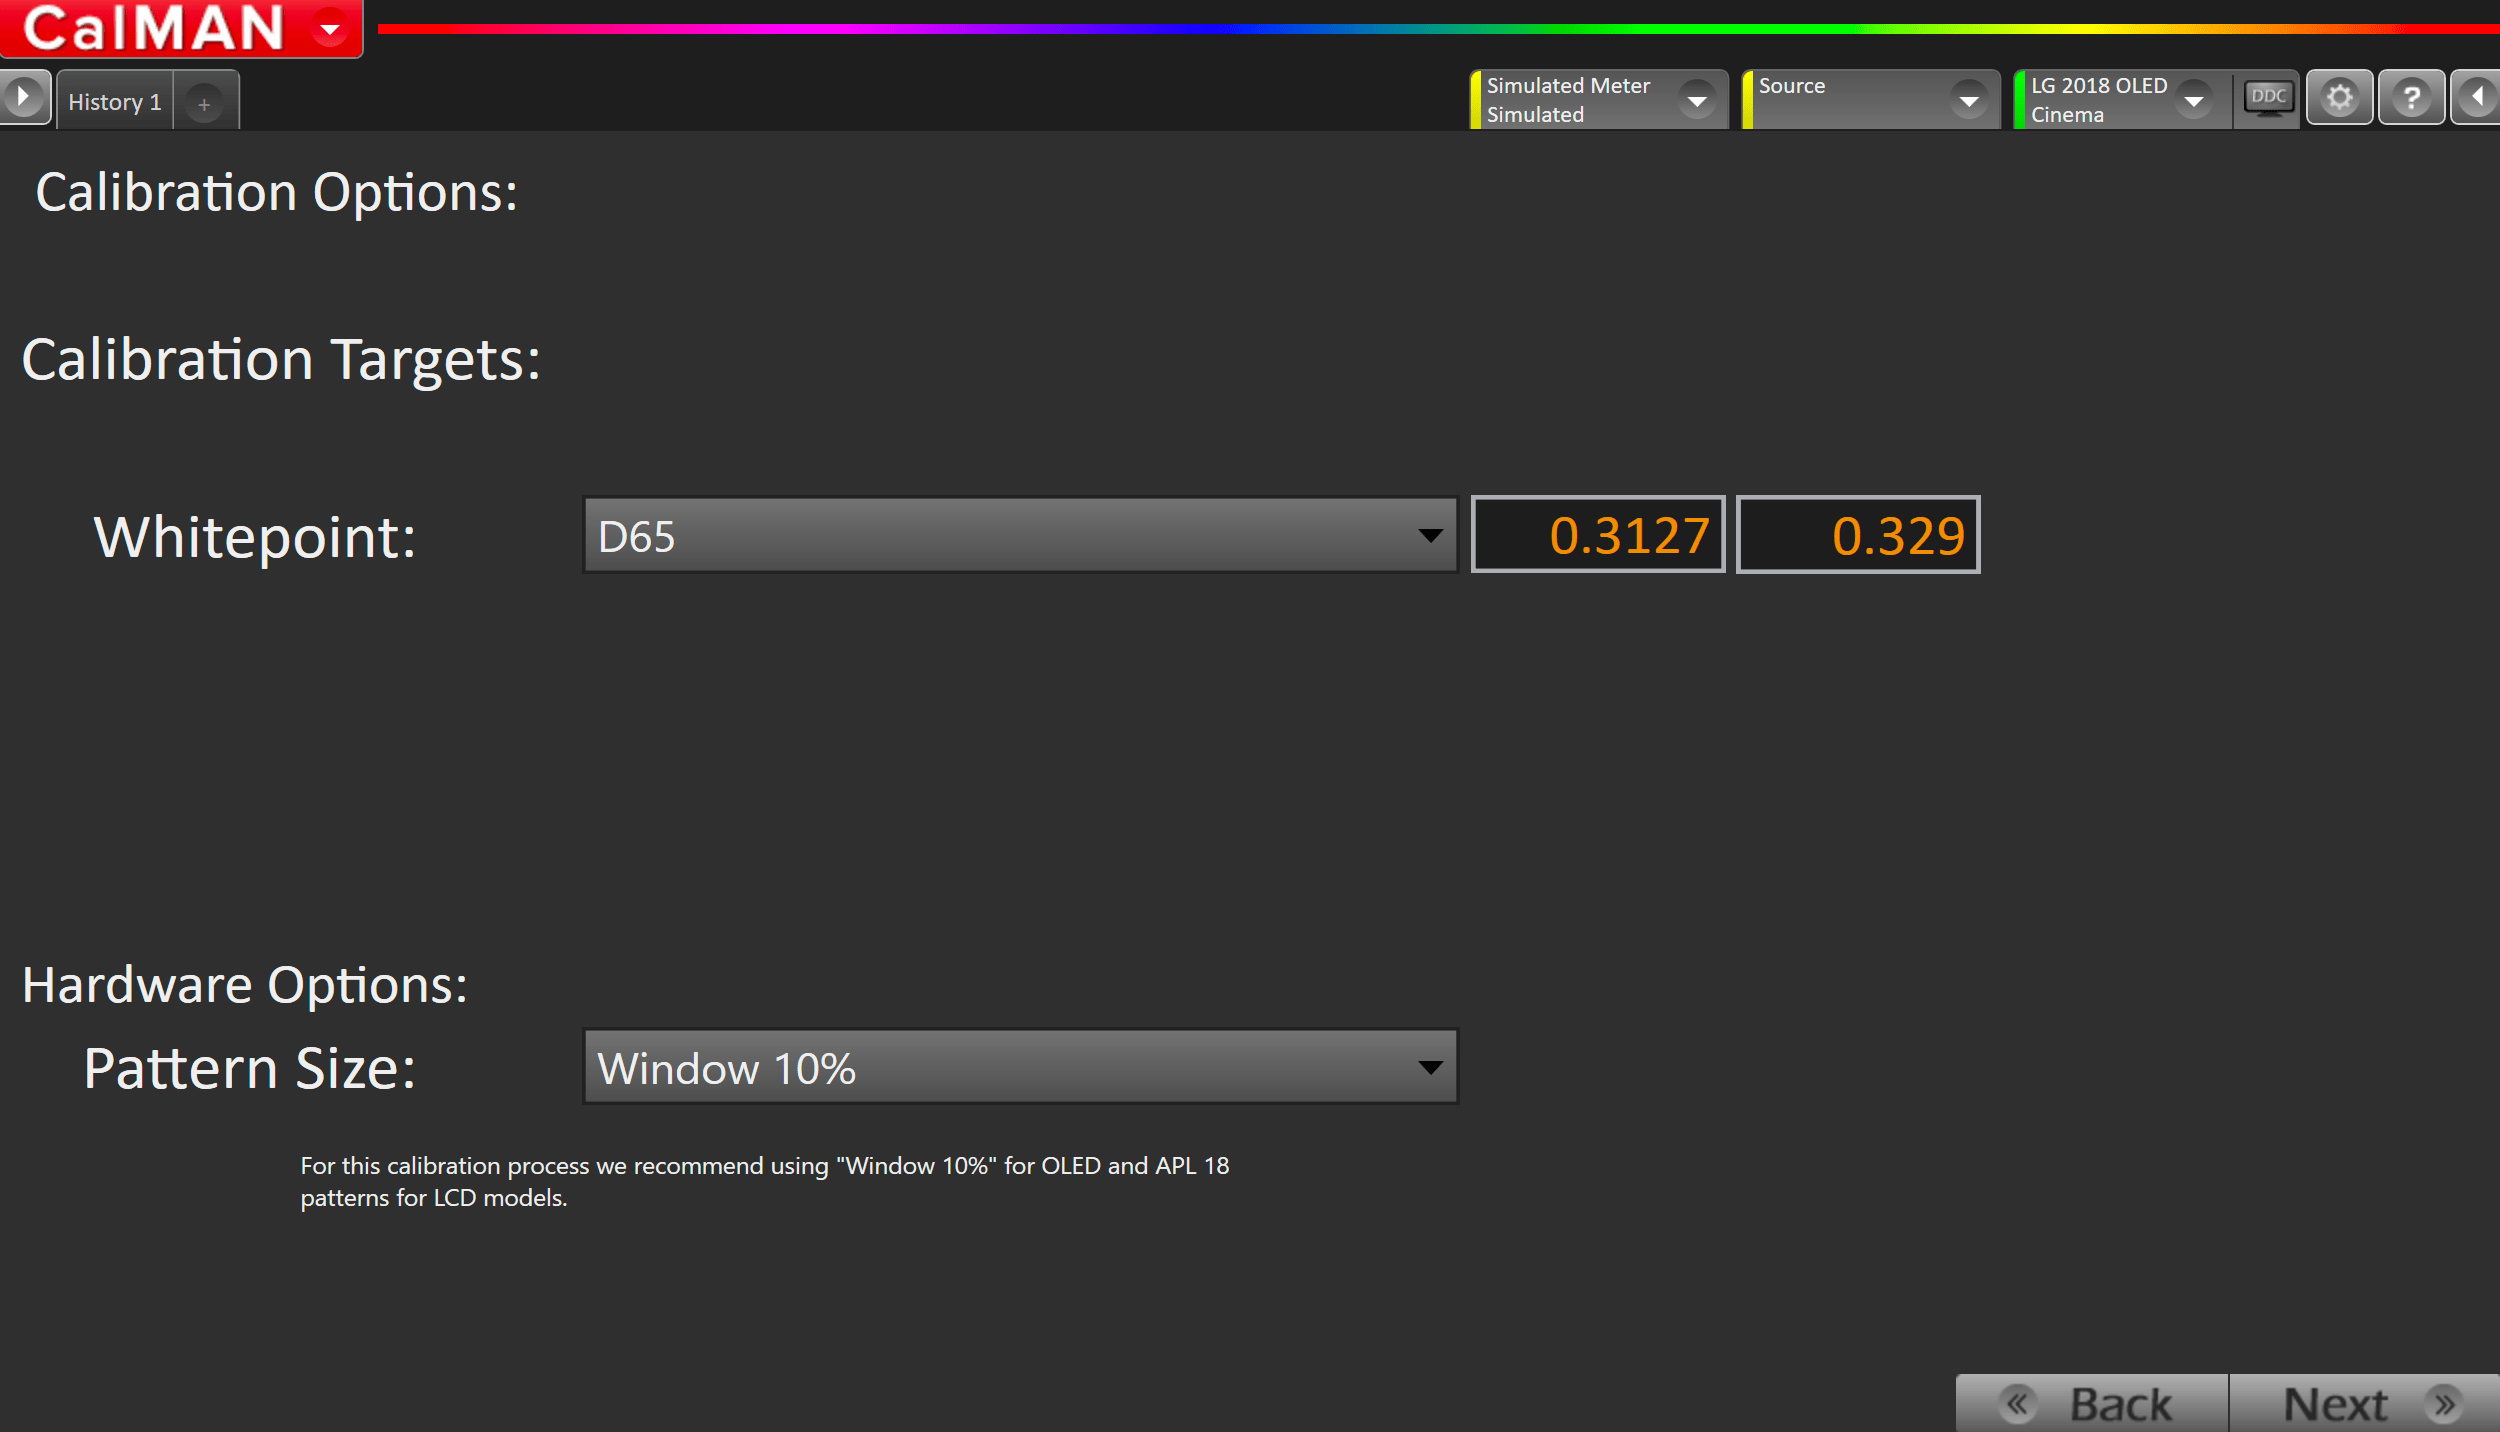
Confirm your calibration targets and prepare TV
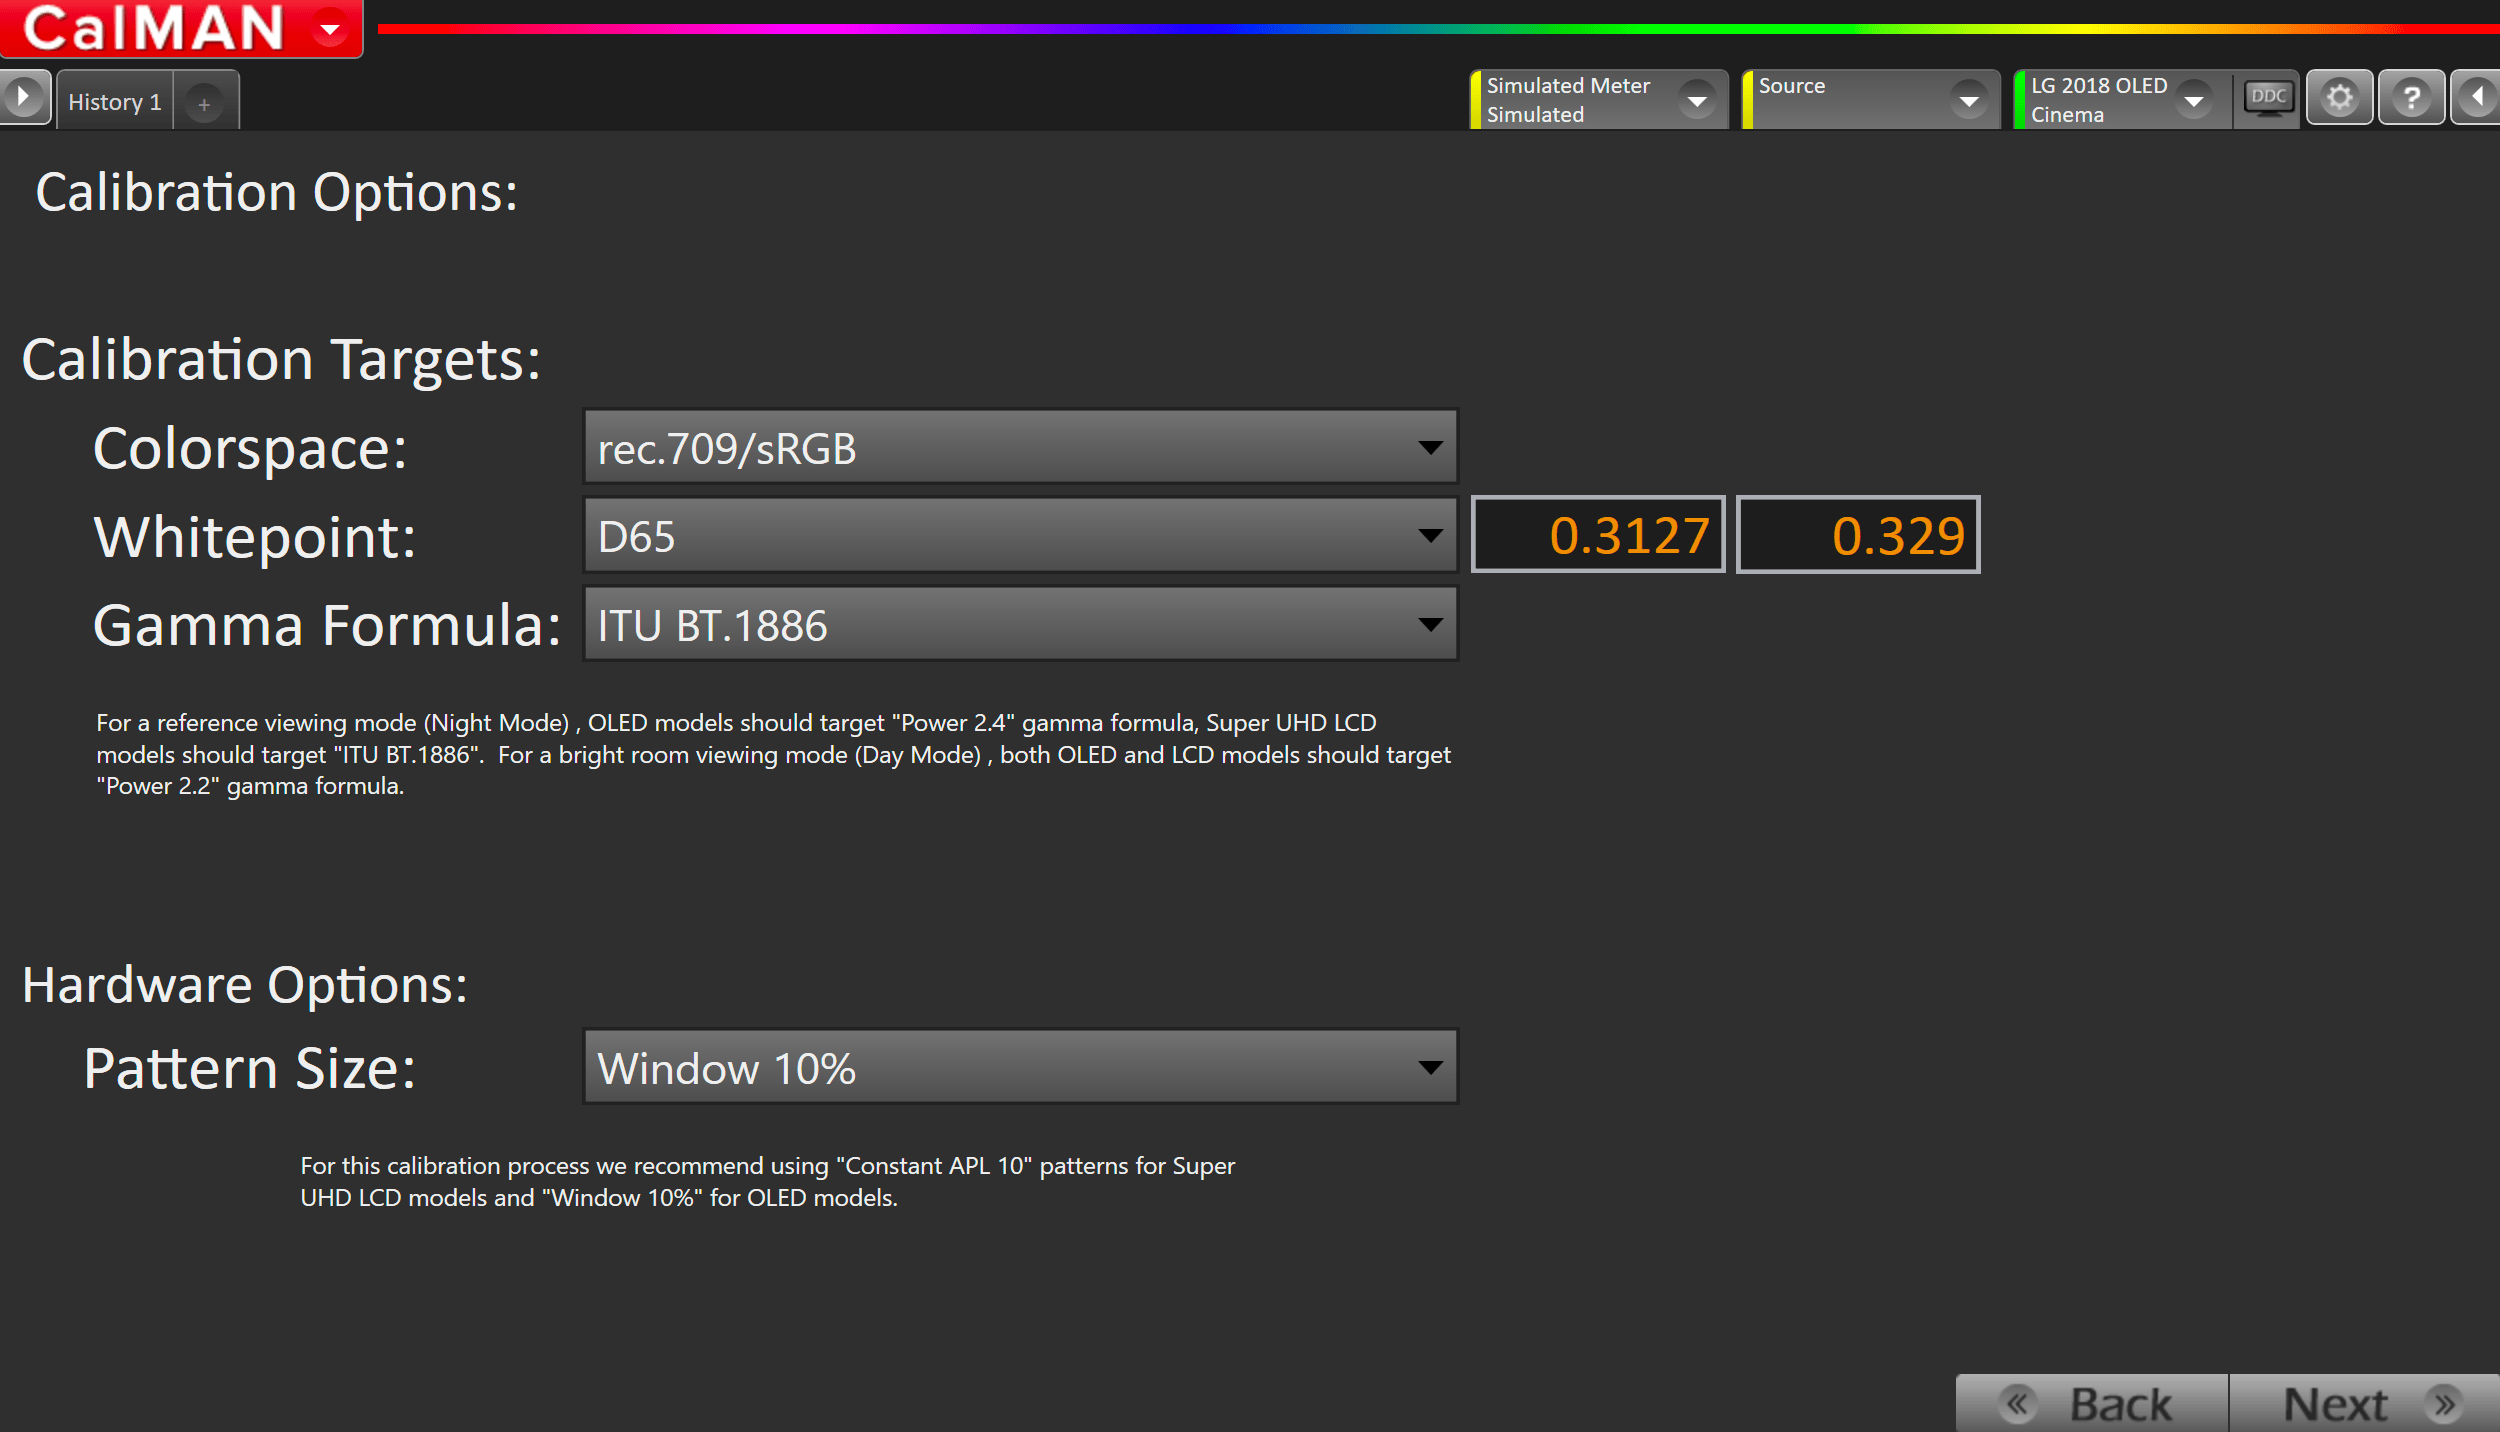
- For SDR, calibration targets should be:
- Rec709
- D65
- Gamma
- For a reference viewing mode (Night Mode)
- OLED models should target Power 2.4 gamma formula
- Super UHD LCD models should target ITU BT.1886
- For a bright room viewing mode (Day Mode), both OLED and LCD models should target Power 2.2 gamma formula.
- For a reference viewing mode (Night Mode)
- Hardware Options
- Pattern Size:
- OLED: Window 10
- LCD: Constant APL 10
- Pattern Size:
Step 3
For best results, please configure your Calman settings to match the configuration recommended below.
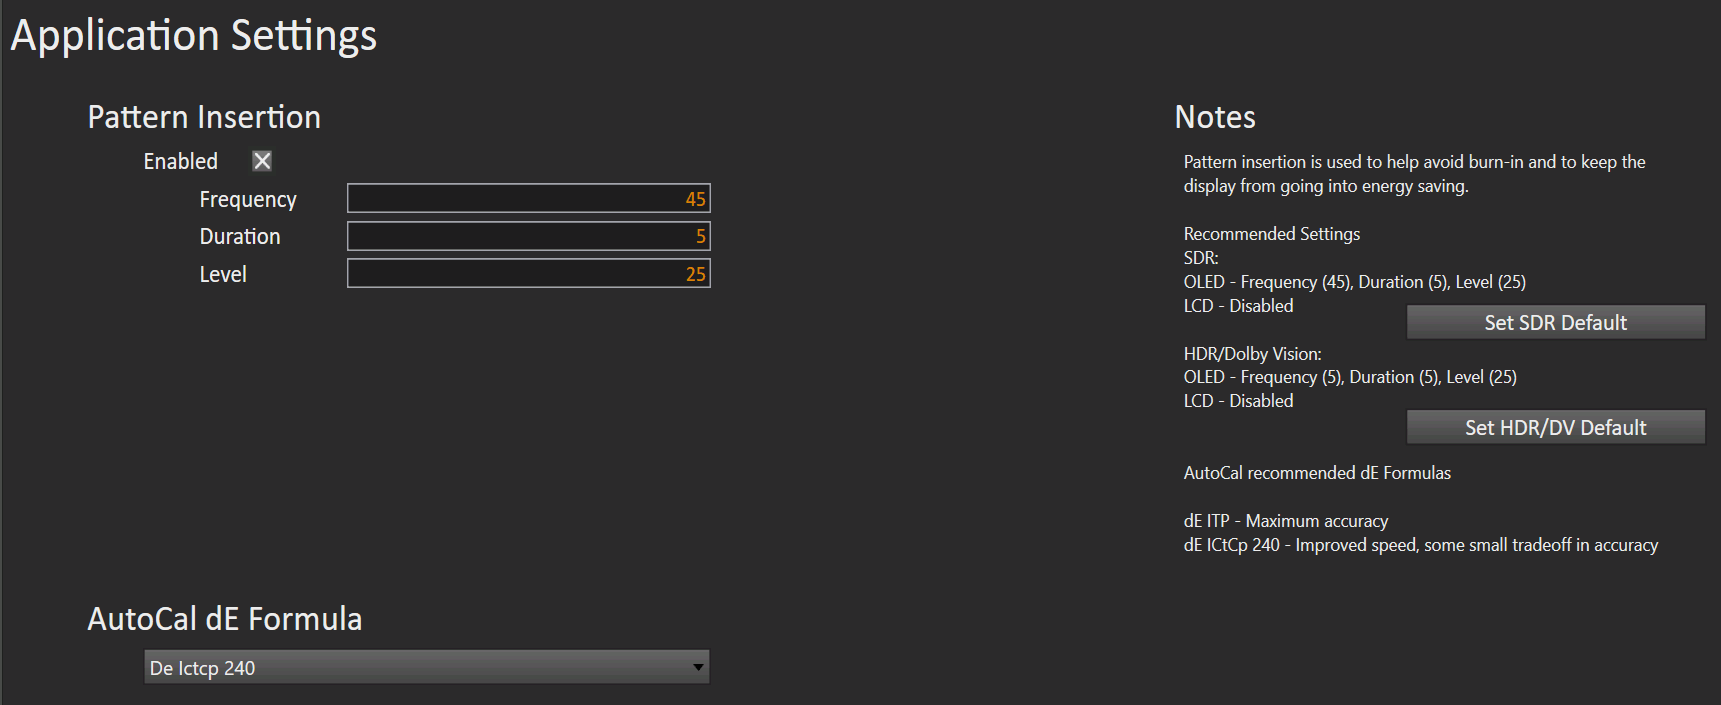
- To prevent an LG OLED display from entering its auto dimming mode during extended measurements, the Calman Pattern Insertion feature periodically inserts a different test pattern during extended test pattern measurements, to reset the display’s auto-dimming timer.
- Under Calman Settings > Application Measurement Options set the following Full Field Pattern Insertion options:
- Frequency: 45
- Duration: 5
- Pattern Level: 25
- Under Calman Settings > Application Measurement Options set the following Full Field Pattern Insertion options:
- AutoCal dE Formula
- dE ITP
- Increases accuracy, but calibration time may be extended
- dE ICtCp 240
- Improved speed, with a small tradeoff in accuracy
- dE ITP
Step 4
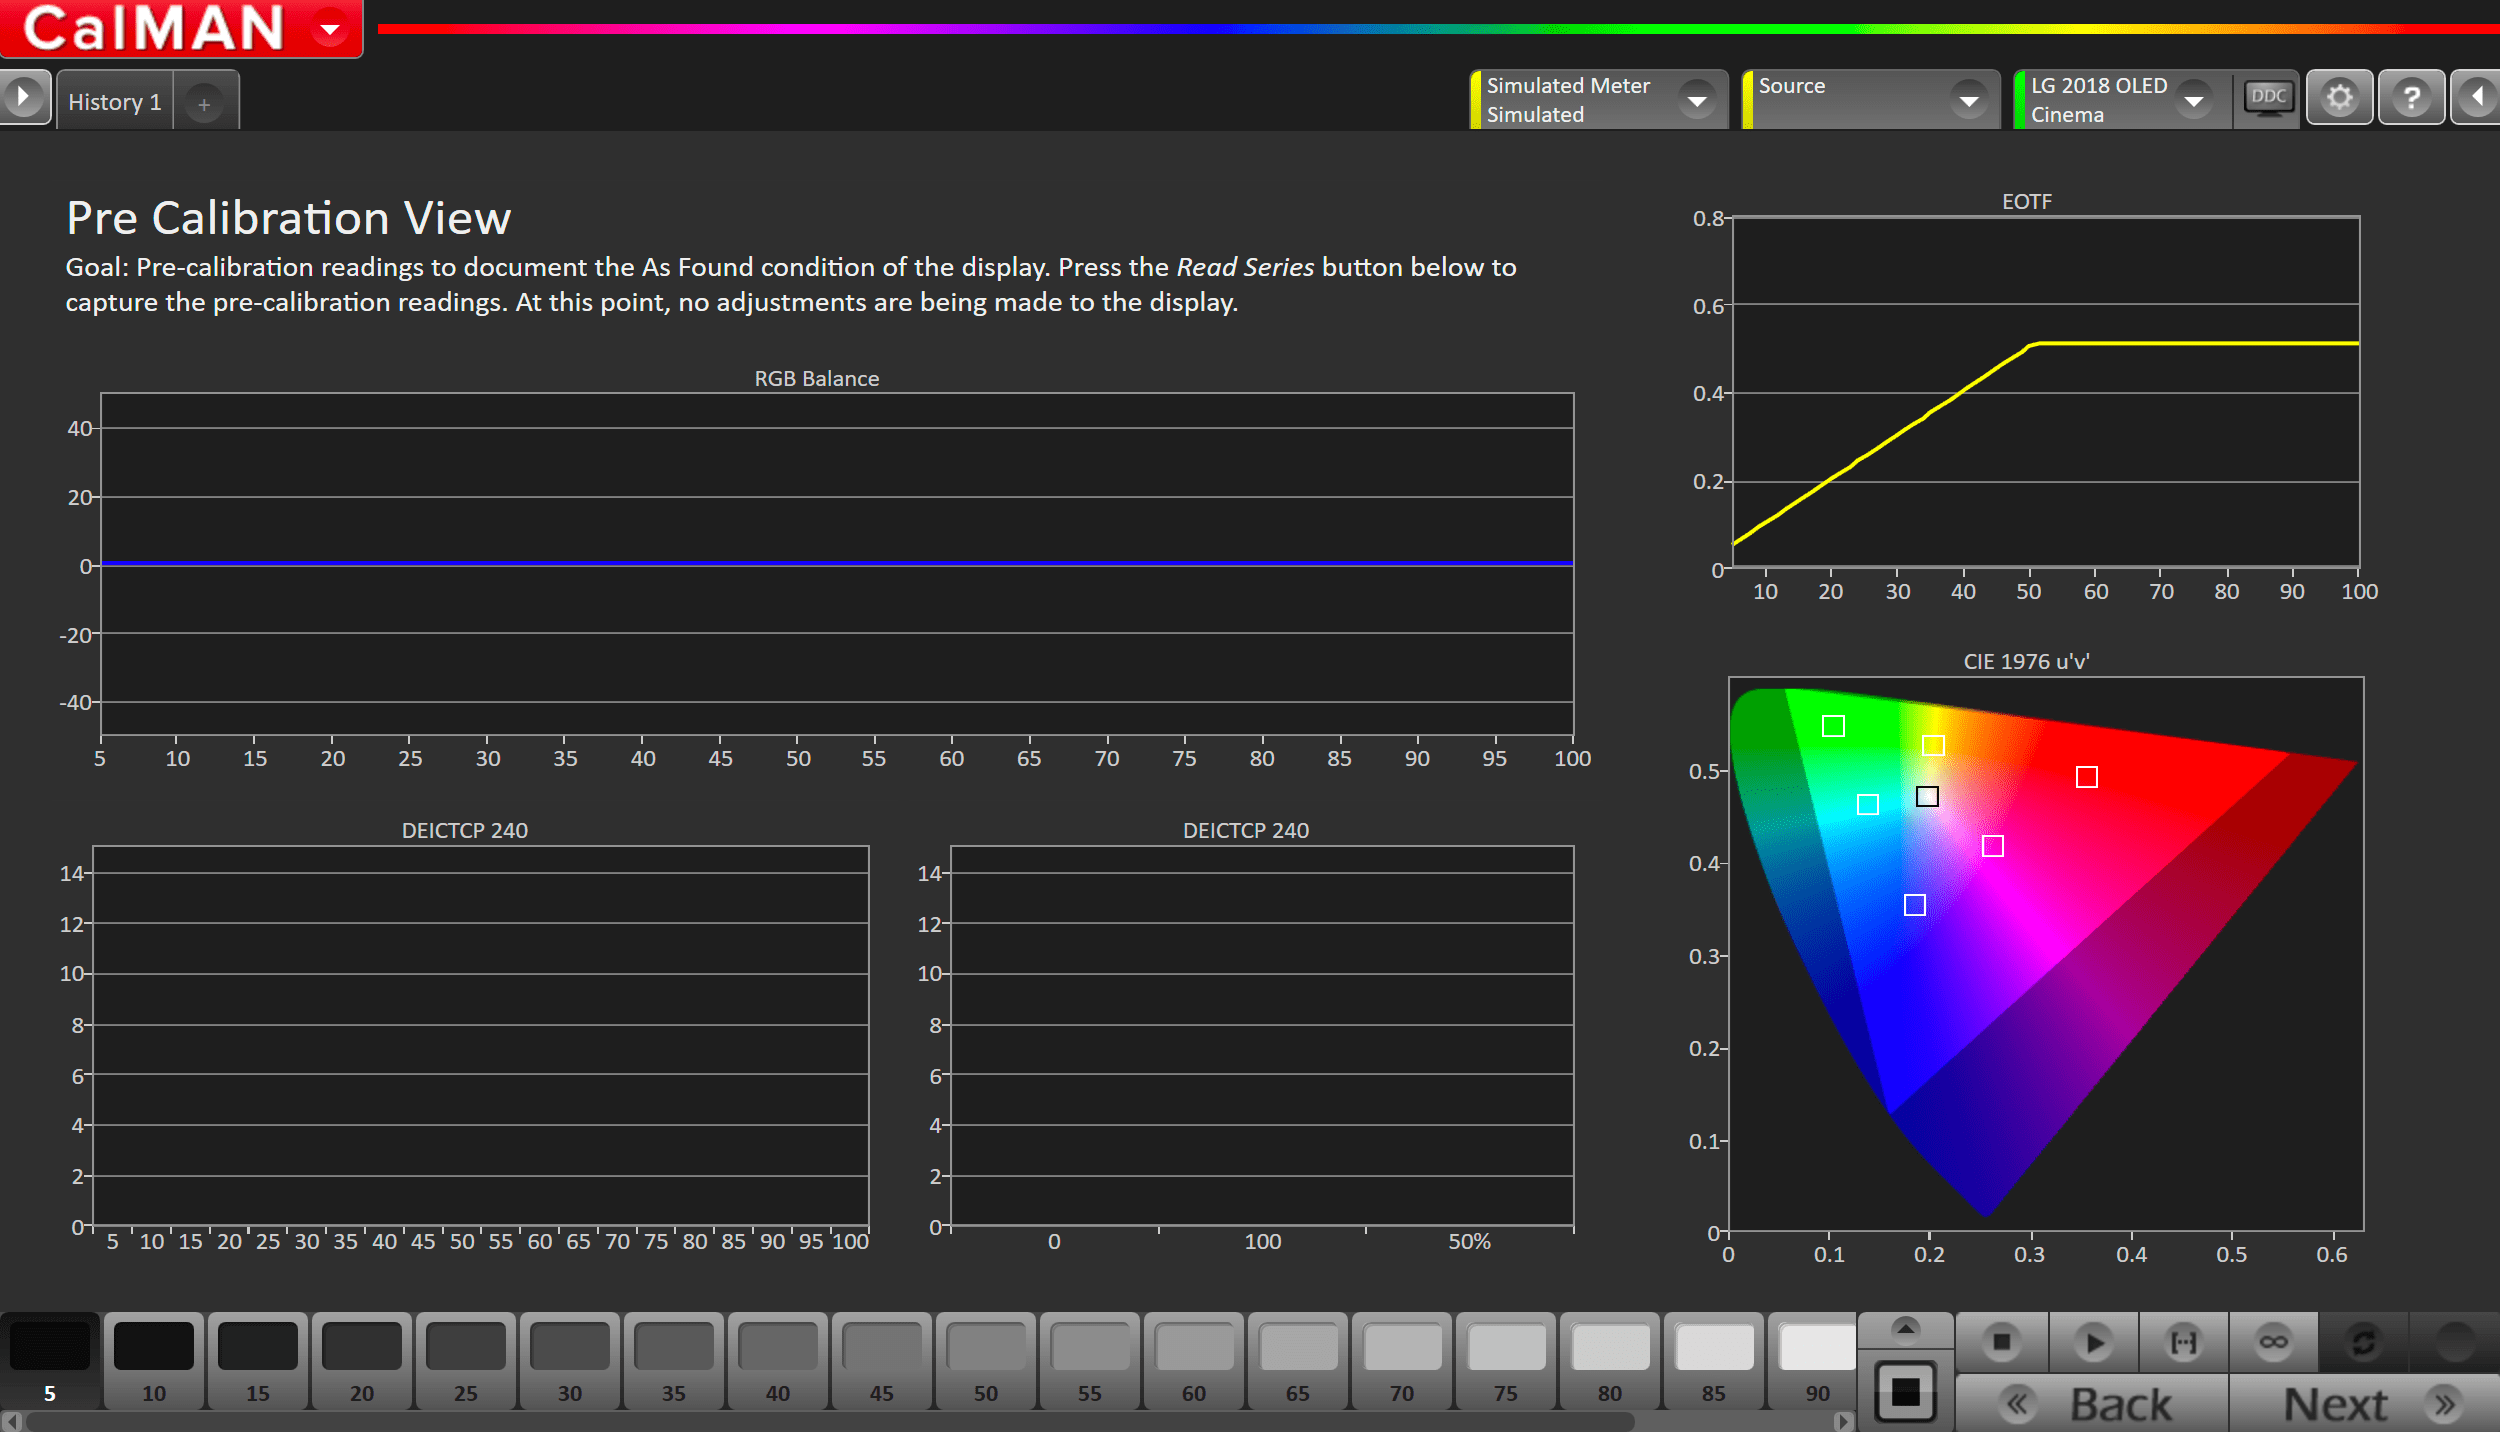
In this step, you’ll take readings of your display before the calibration. These will be used to compare your calibration results
- To take Pre-Calibration Measurements click the Read Series […] button to measure the display’s grayscale and ColorChecker response
- This will provide a point of reference to compare your calibration results
Step 5
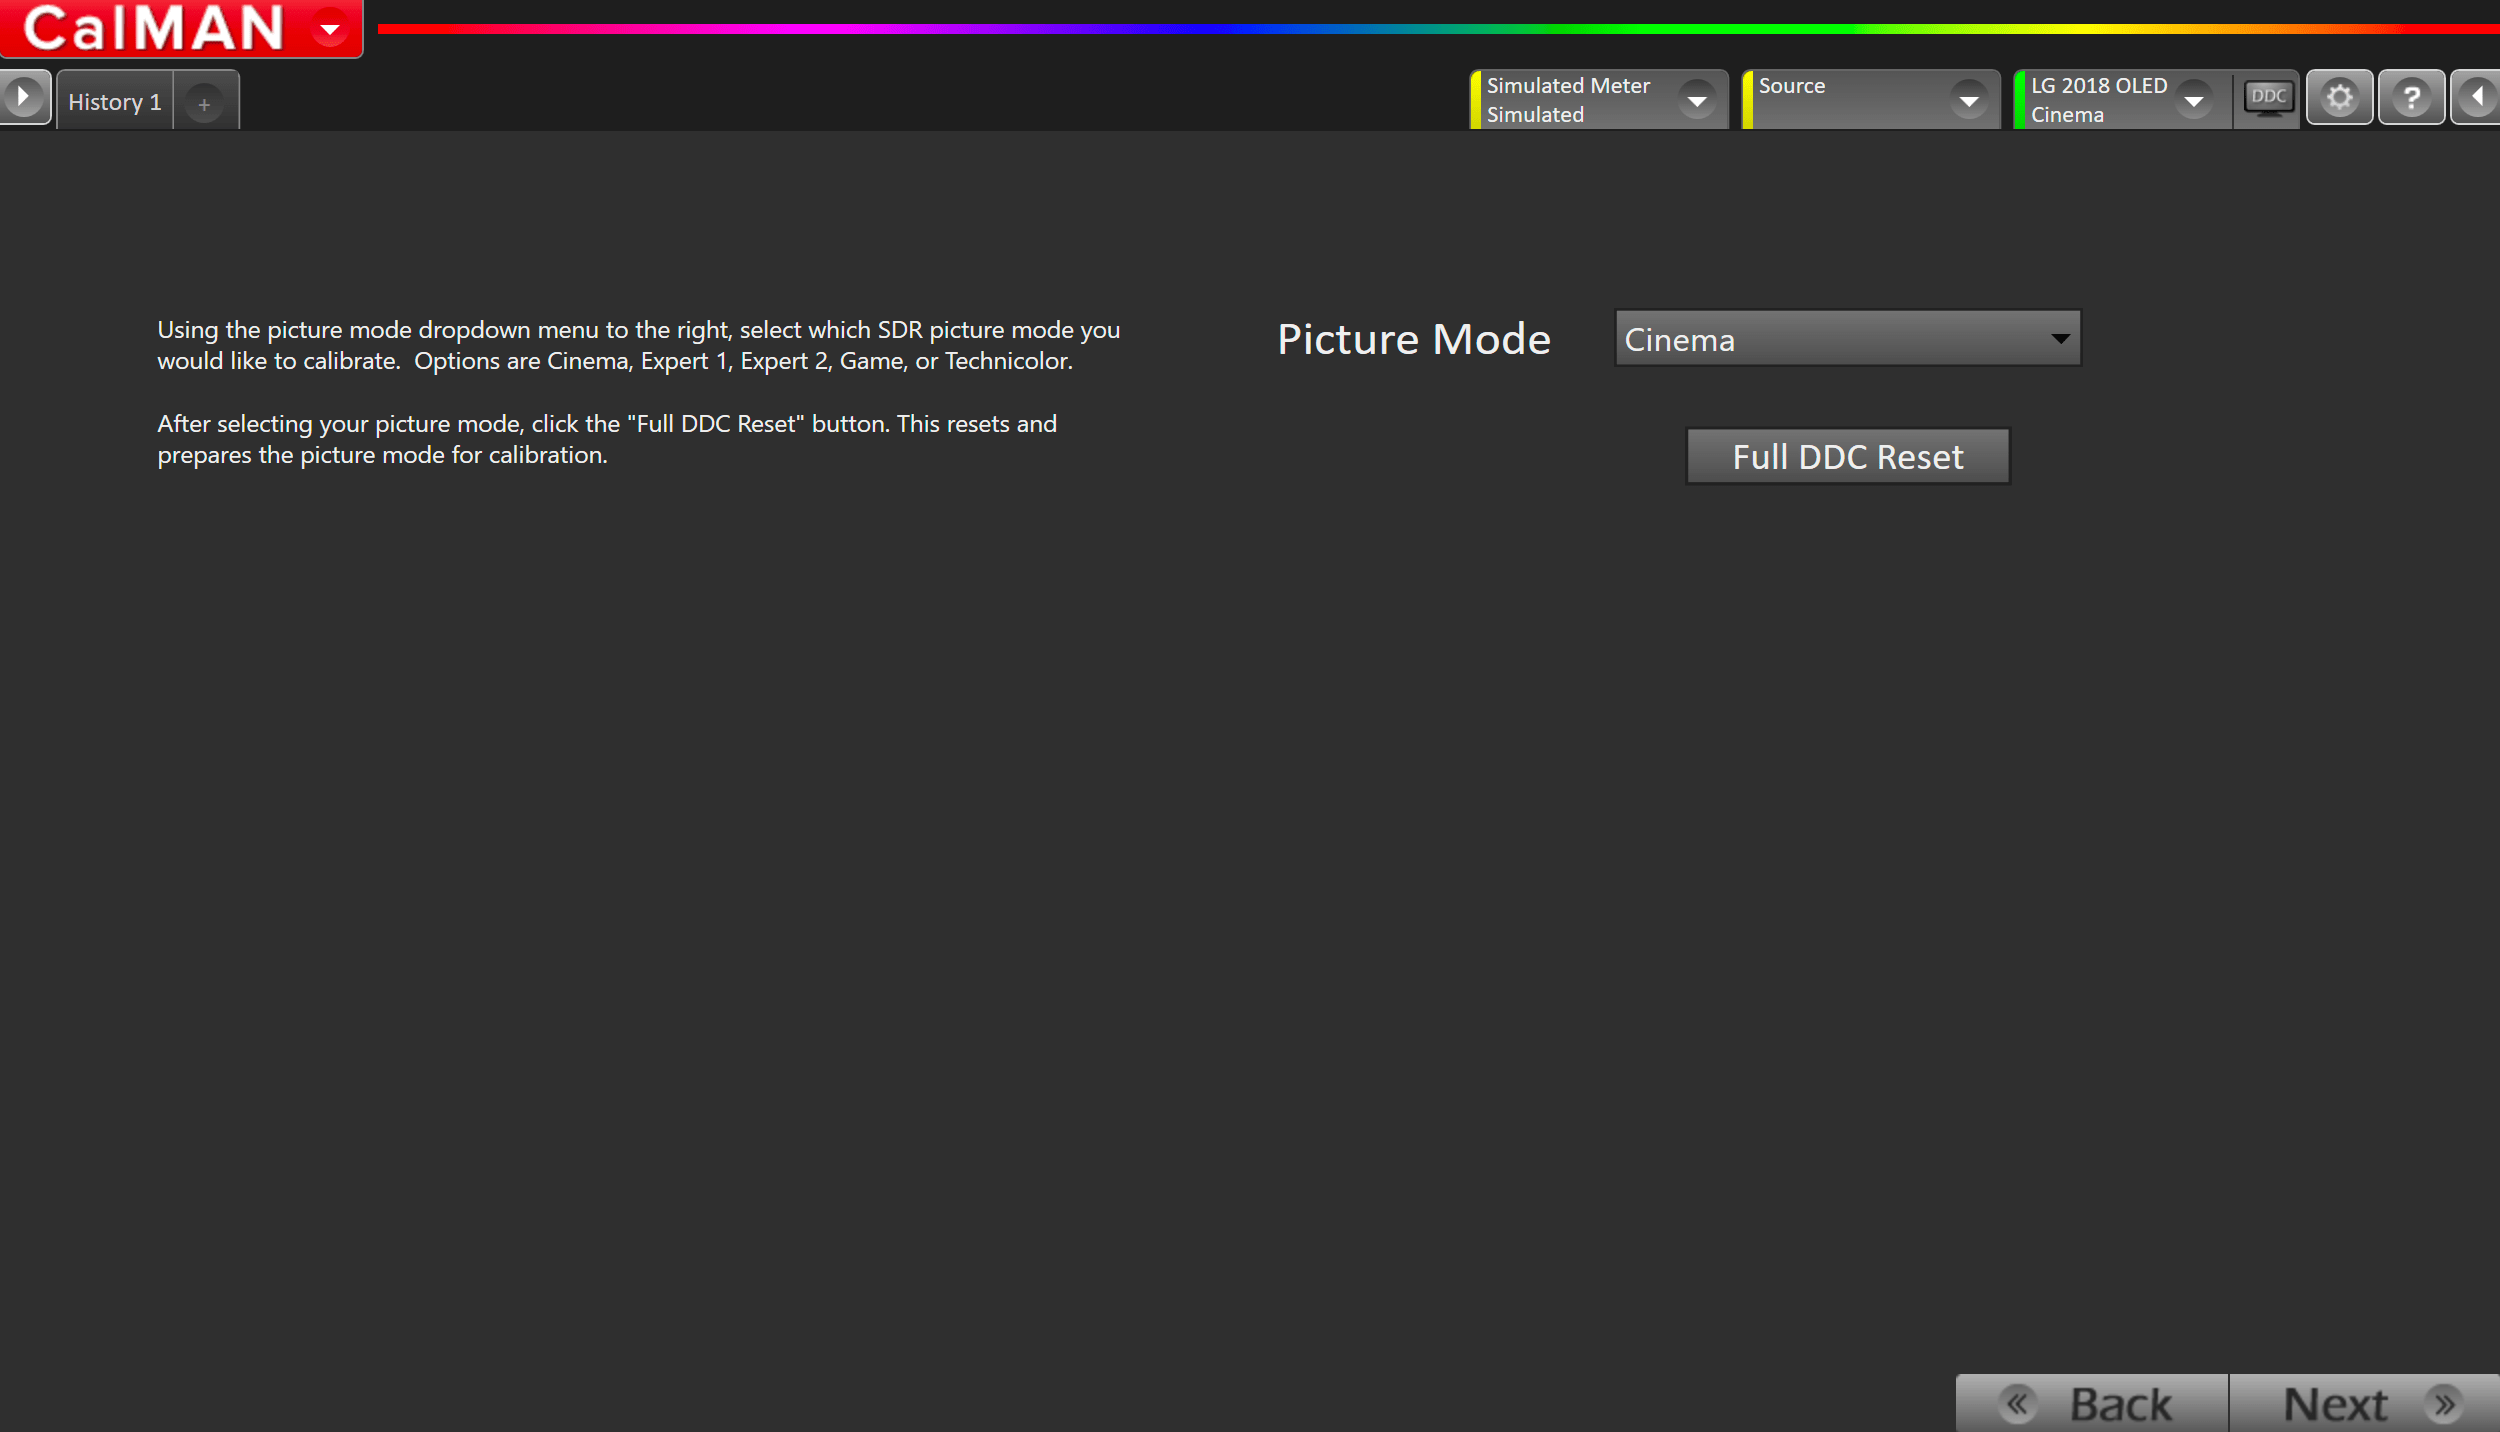
- Select Picture Mode to Calibrate.
- Each Picture Mode is a separate memory slot for calibration data. Calibrations to one mode and colorspace do not affect the other picture modes.
- Using the picture mode dropdown menu on the RIGHT, select which picture mode you would like to calibrate.
- SDR Picture Modes:
- Cinema
- Expert 1
- Expert 2
- Game (Low Latency)
- Technicolor (2018/2019)
- Filmmaker (2020)
- SDR Picture Modes:
- After selecting your picture mode, click the Full DDC Reset button. This resets and prepares the picture mode for calibration.
- Click Next after the DDC reset is complete
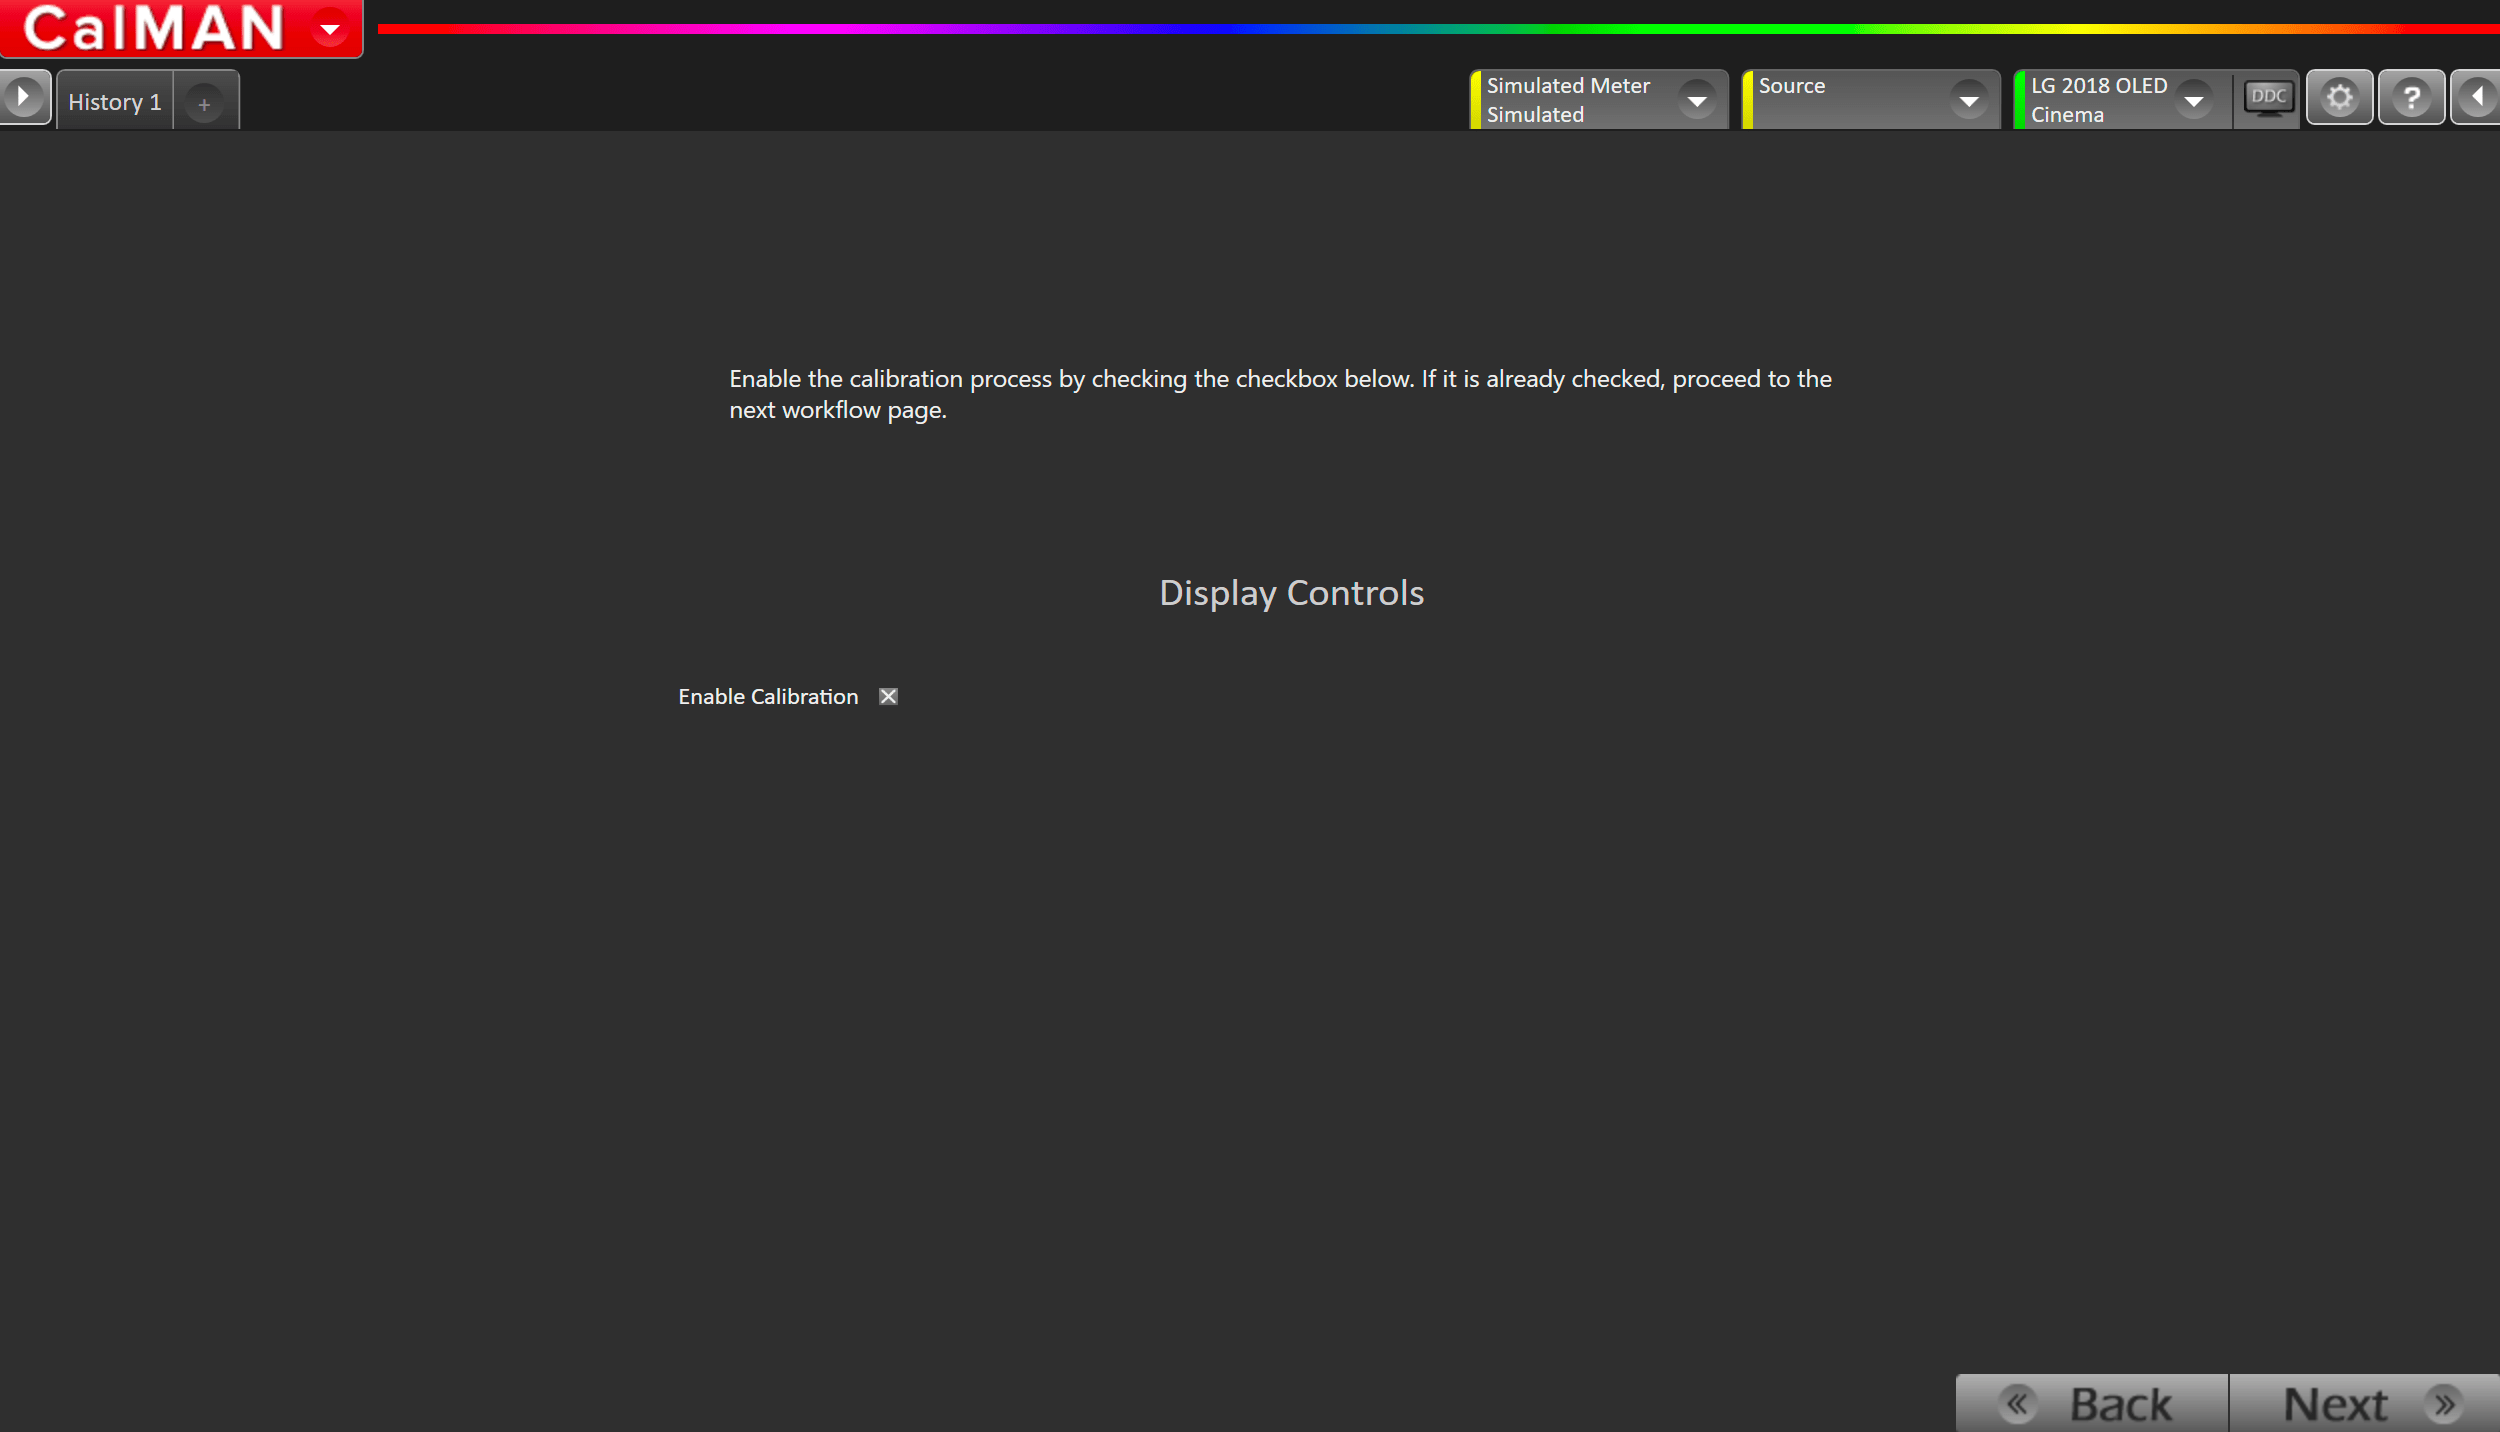
- Enable the calibration process by checking the checkbox on this page. If it is already checked, proceed to the next workflow page.
Step 6
In this step, you will be able to adjust the Luminance of your display to match your desired target. Luminance is a subjective target. SDR reference luminance is 100cd/m2, but you may need to target higher to account for the ambient light in your environment
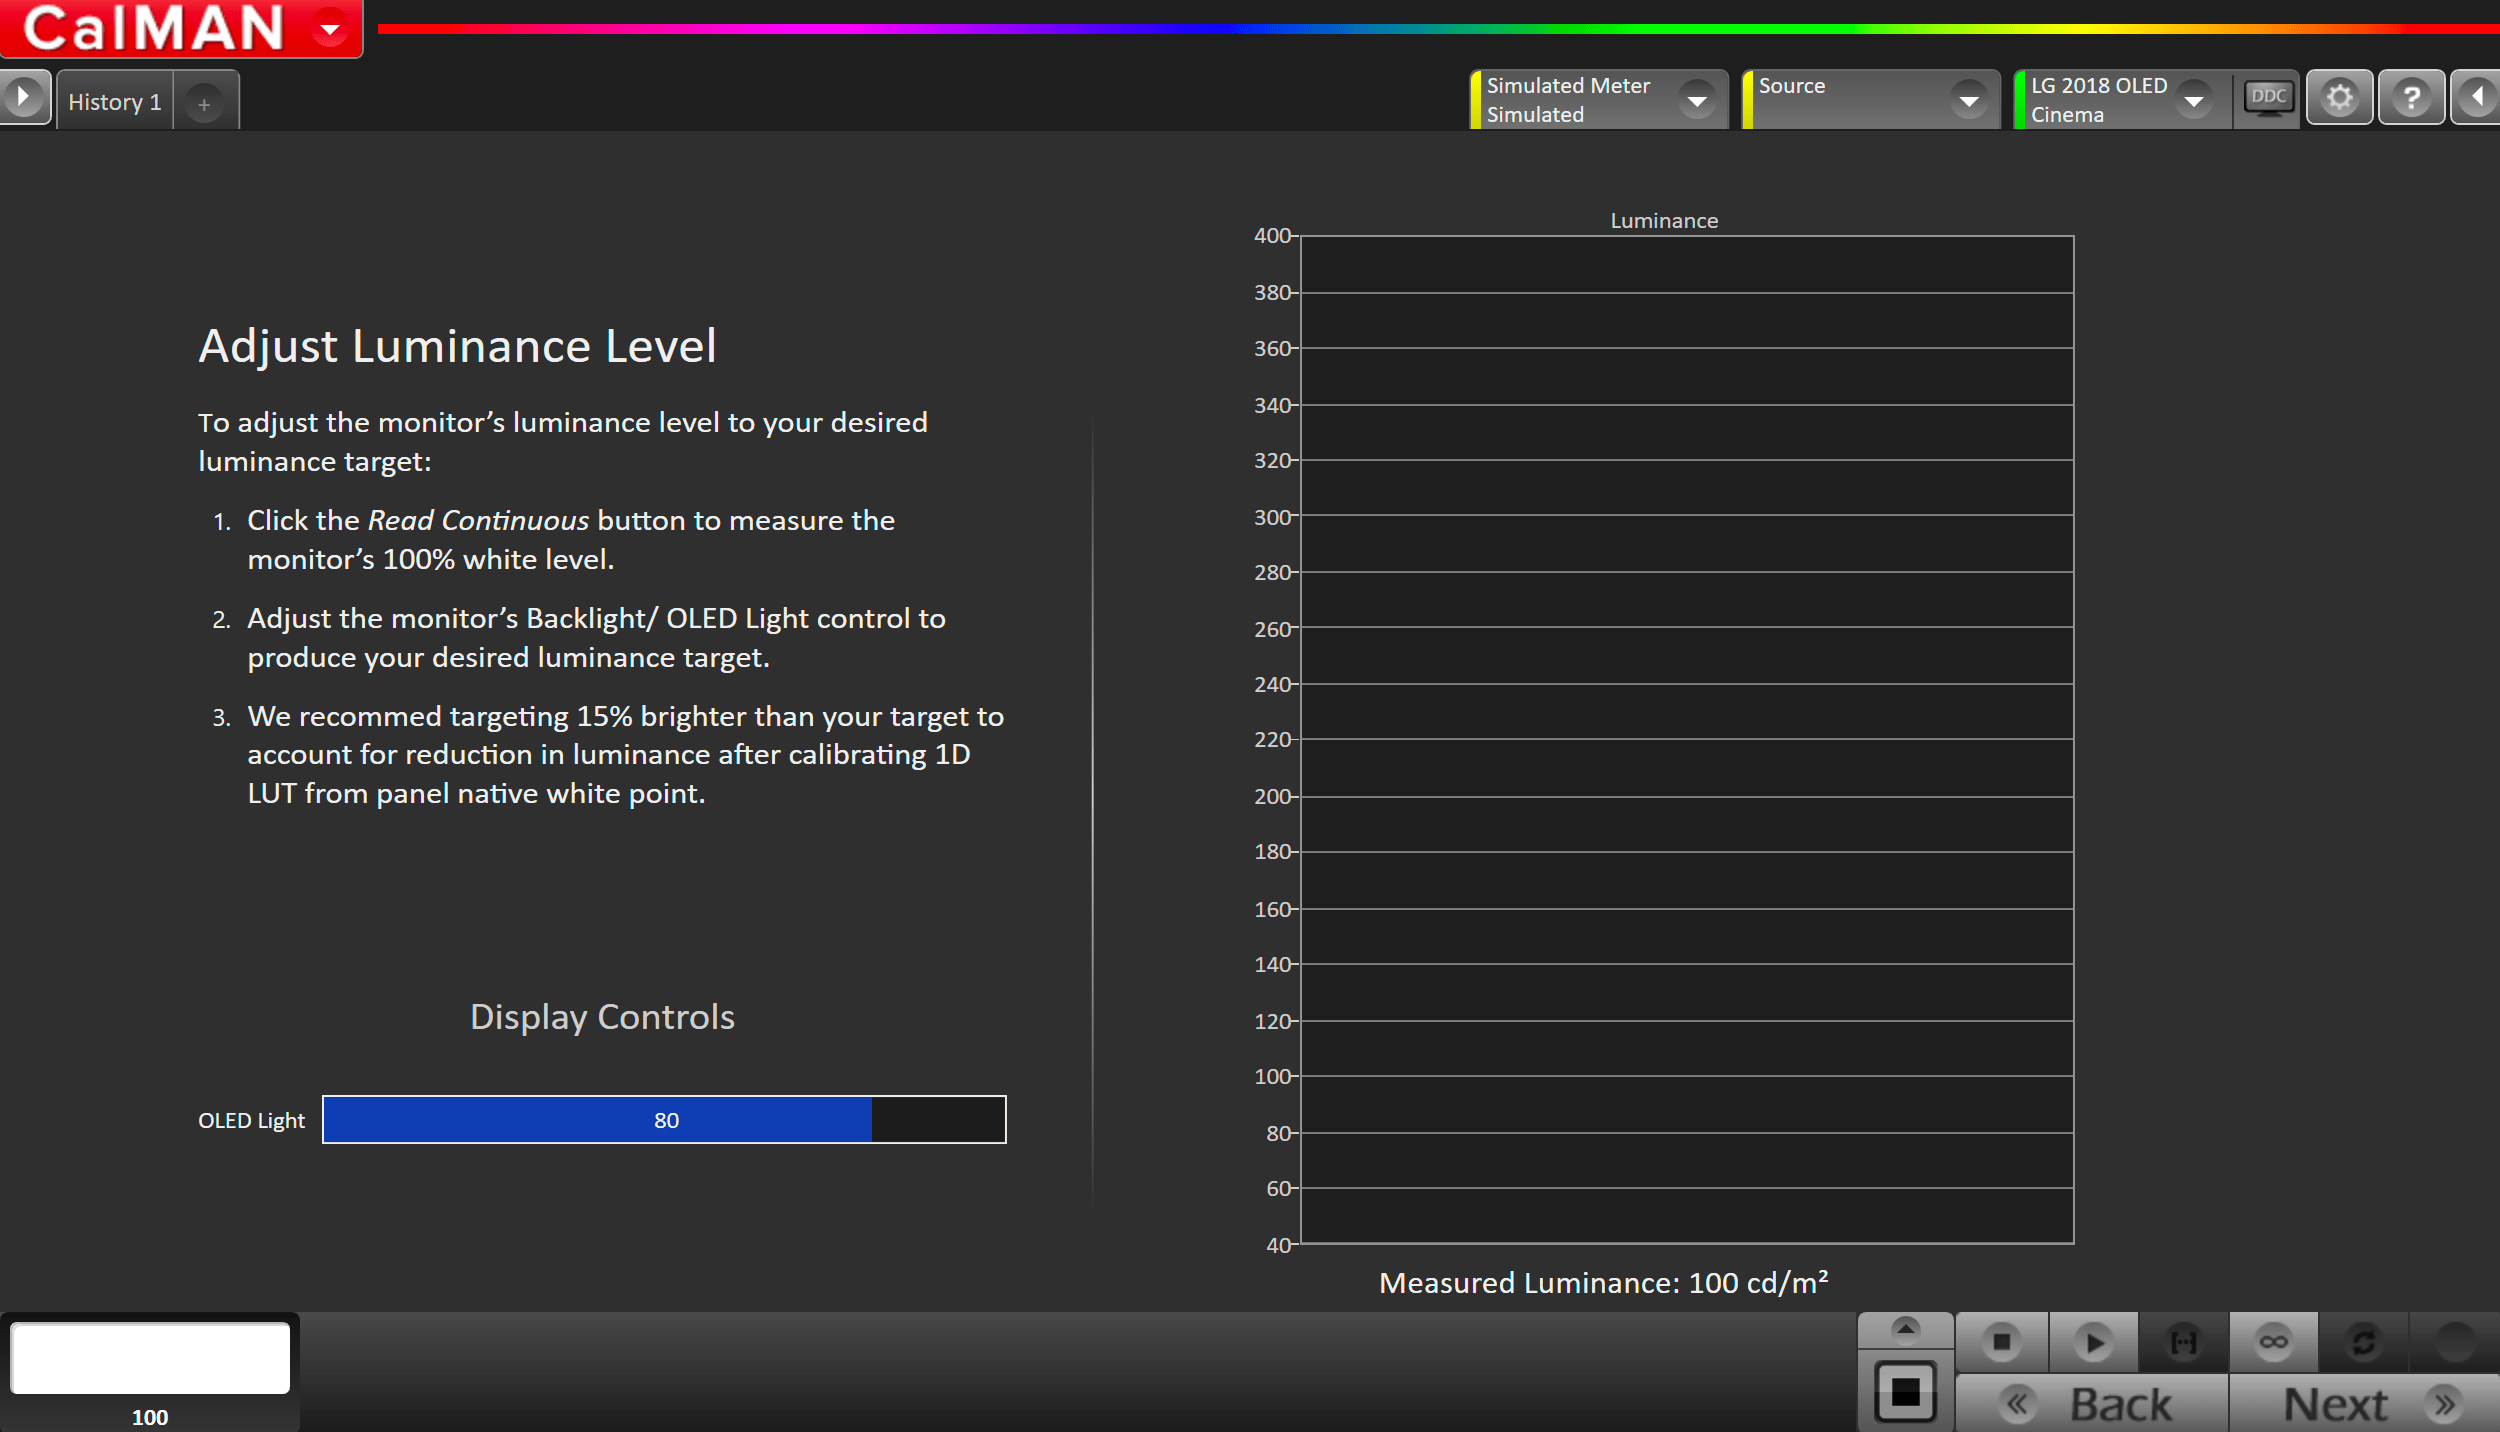
- Click the Read Continuous button to measure your TV’s light output at 100% white and adjust the display’s peak white to the desired luminance.
- Luminance is a subjective target. SDR reference luminance is 100nits, but you may need to target higher to account for the ambient light in your environment.
- Adjust your TV’s backlight/OLED light control so your TV is about 15% brighter than your final target to account for a reduction in luminance when calibrating the 1D LUT in the next step
- Press Stop when luminance adjustment is complete
Step 7
Here Calman will adjust the Multipoint Greyscale of your display using a 1D LUT
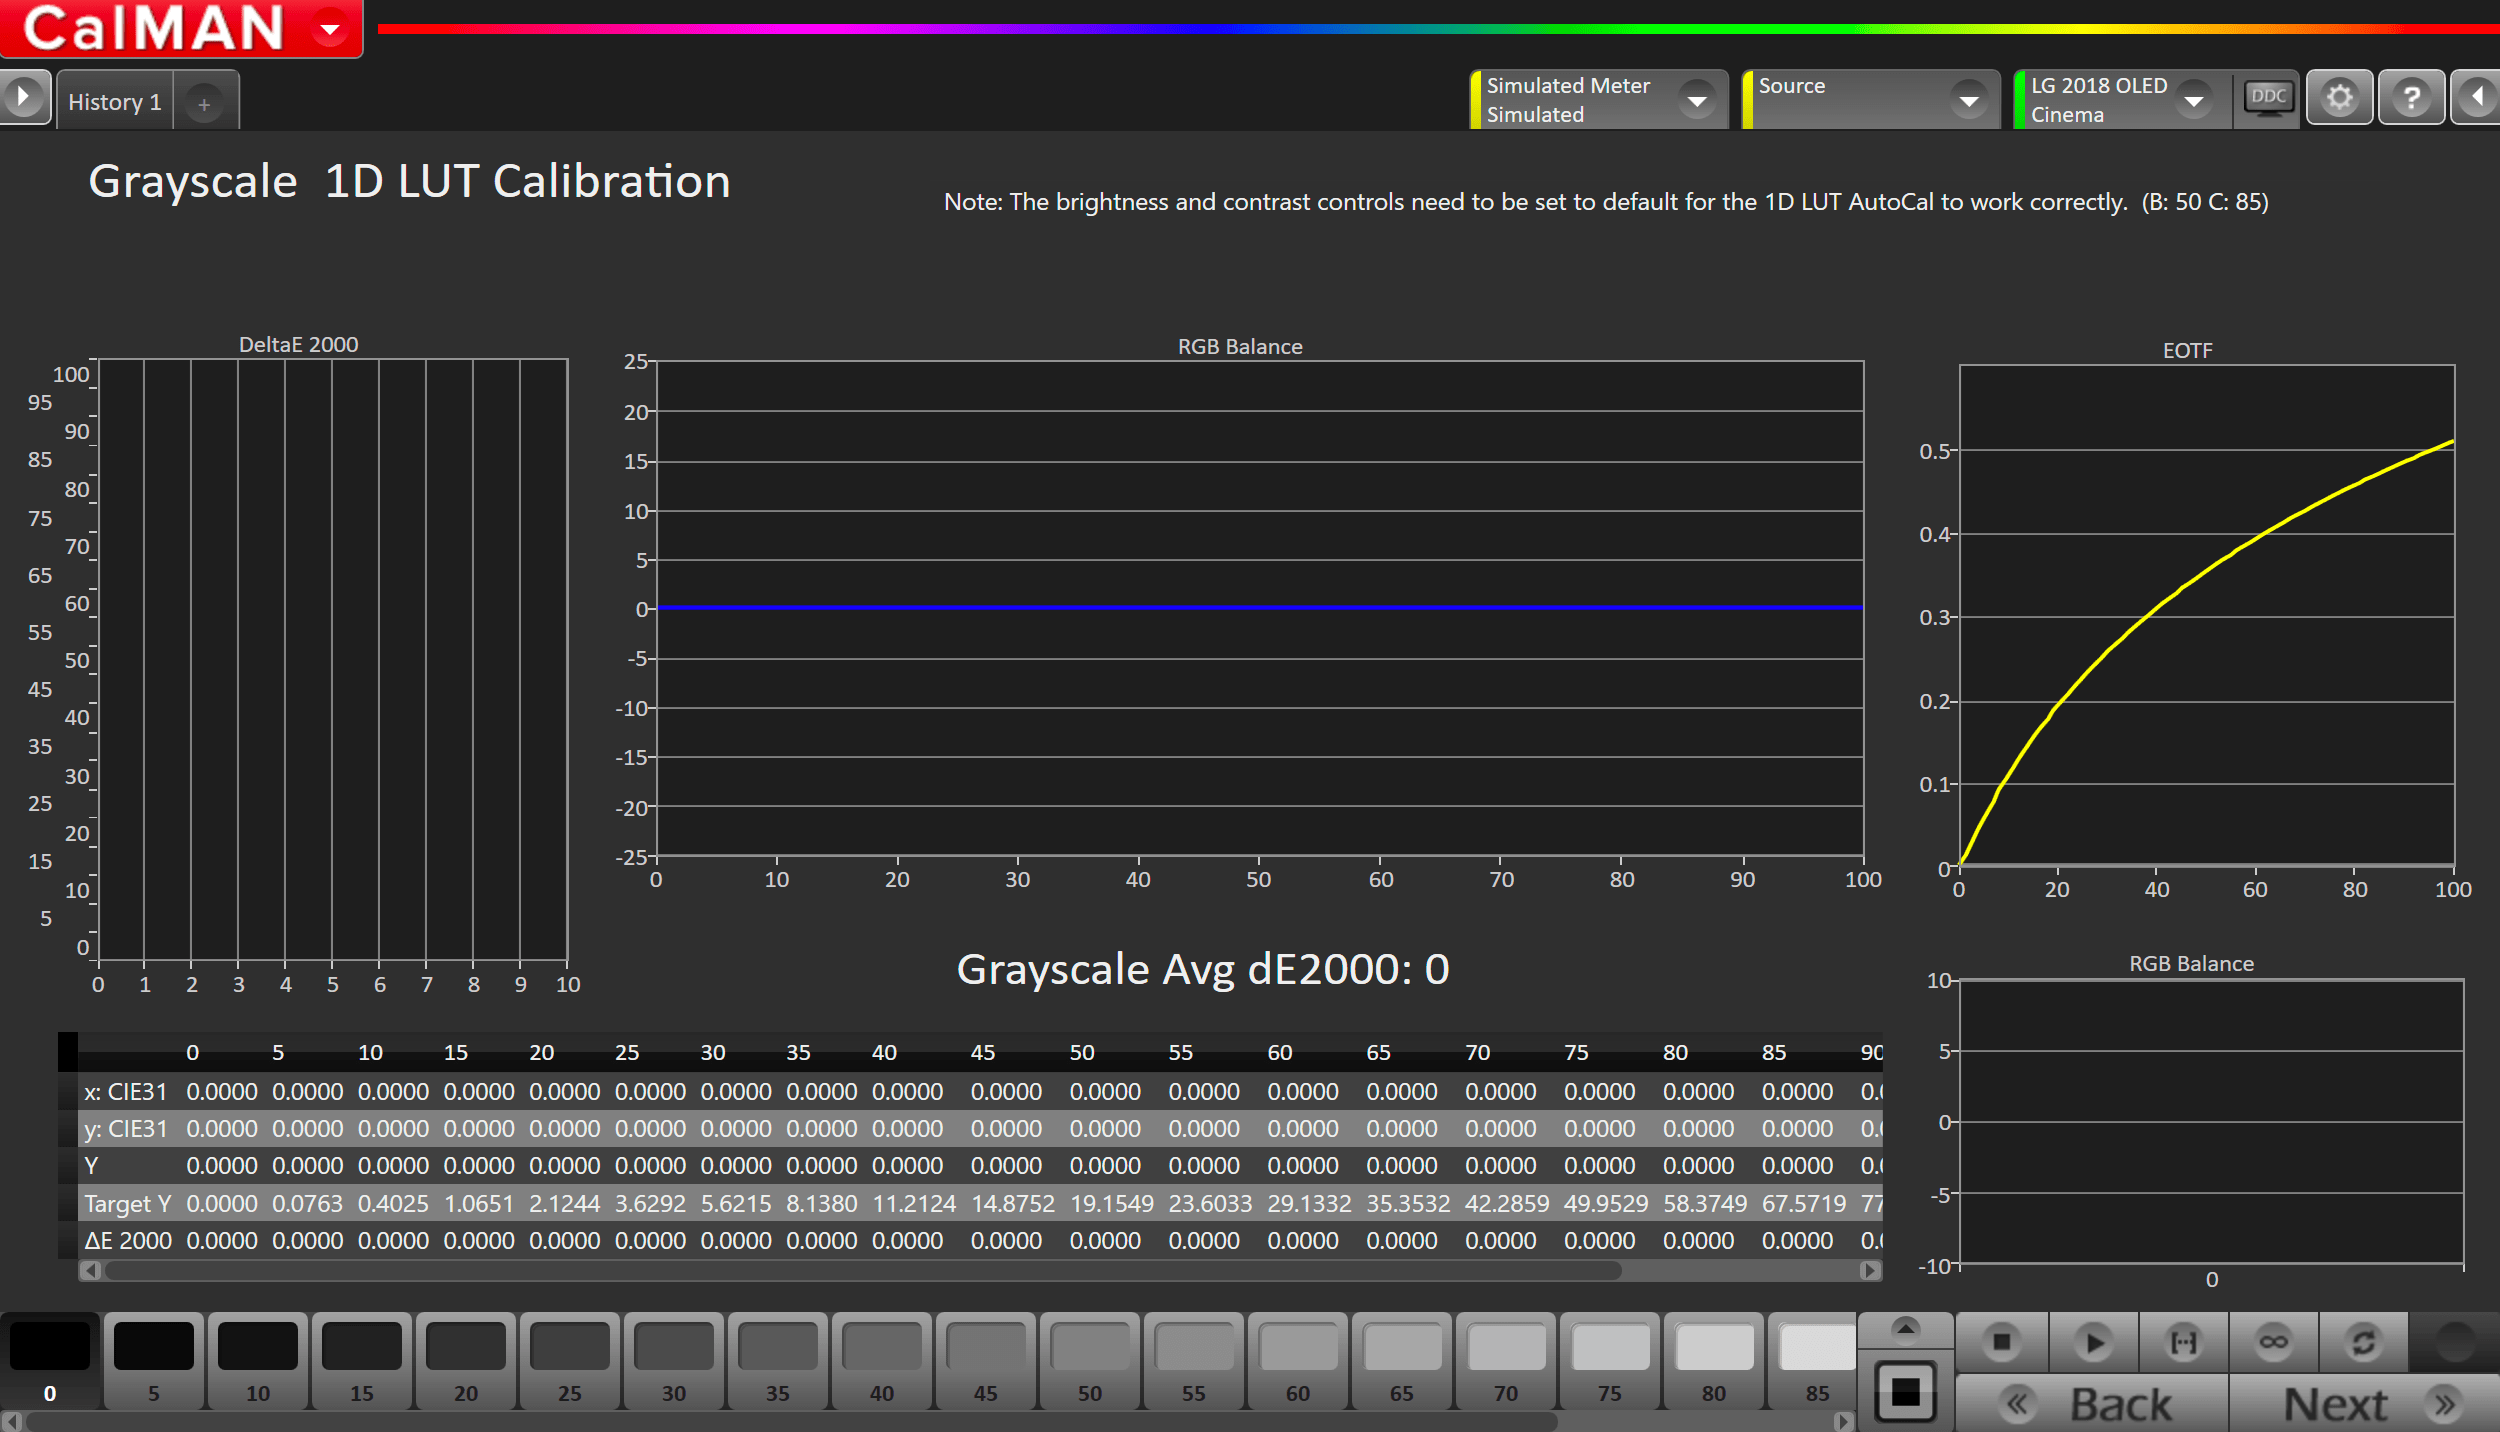
- Press the AutoCal button and select the correct data points in the AutoCal Dialog to auto-calibrate the Grayscale/Luminance response on your display.
- There are several SDR Greyscale Point options. Choose the one that best fits your video levels. In most case 26pts SDR 16-255 is appropriate
- The brightness and contrast controls need to be set to default for the 1D LUT AutoCal to work correctly. (B: 50 C: 85)
- Click OK to begin greyscale AutoCal
Step 8
It’s common to lose some overall luminance after the 1D LUT calibration. Use step this to adjust back to your luminance target if it has changed
- Click the Read Continuous button to measure your TV’s light output at 100% white and adjust the display’s peak white to the desired luminance.
- Luminance is a subjective target. SDR reference luminance is 100nits, but you may need to target higher to account for the ambient light in your environment.
- Adjust your TV’s backlight/OLED light control so your TV is about 15% brighter than your final target to account for a reduction in luminance when calibrating the 1D LUT in the next step
- Press Stop when luminance adjustment is complete
Step 9
On this page, Calman will calibrate the Color Management using a 3D LUT
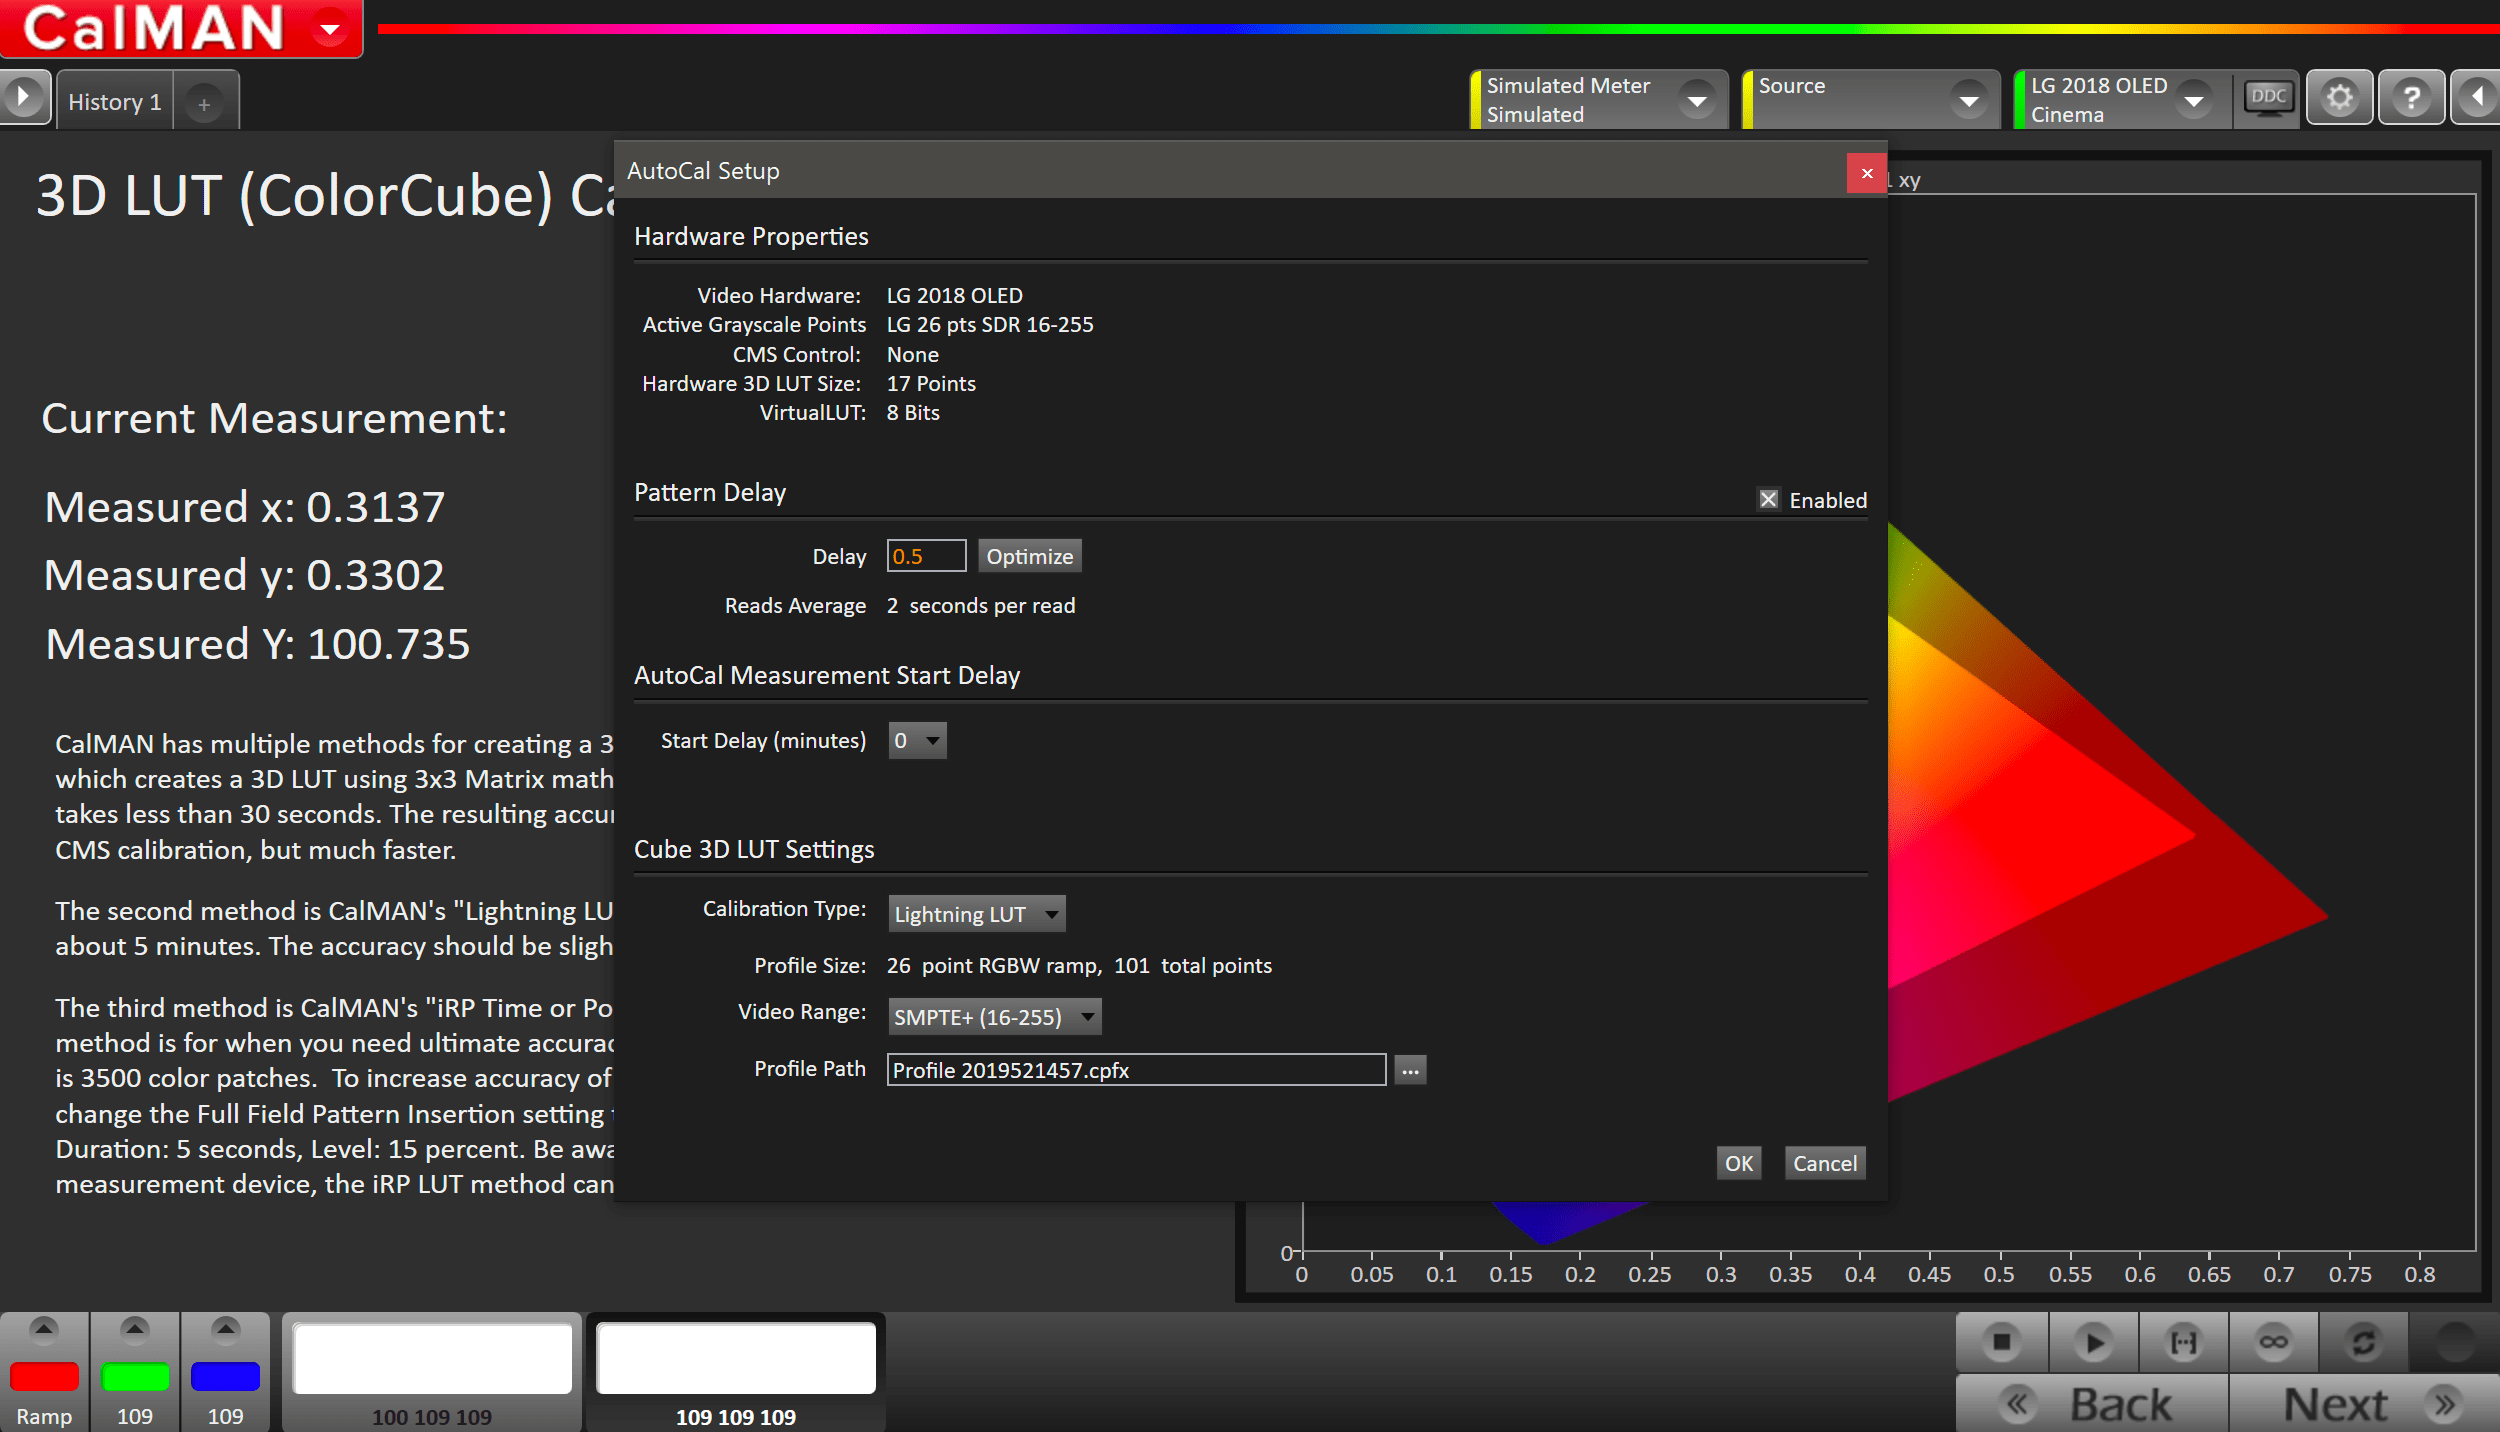
- Press the AutoCal button to open AutoCal dialog
- Calman has multiple methods for creating a 3D LUT. For information about these LUTs see THIS ARTICLE
- Choose the video range that matches your target and pattern generator settings
- Click OK to begin colorspace AutoCal process
- When AutoCal is complete, press the Next button to proceed
- Uncheck the Enable Calibration checkbox to apply the 3D LUT
- Press Next
Step 10
In this step, you’ll take readings of your display after the calibration using the Pantone ColorChecker patterns

- Measure the display with Pantone ColorChecker patterns. This provides an accurate assessment of the display following calibration and will be represented along with the pre-calibration readings on the next page
- Click the Read Series […] button to measure the display’s grayscale and ColorChecker® response.
- Click Next.
Step 11
In this step, you’ll take readings of your display after the calibration using Saturation Sweeps
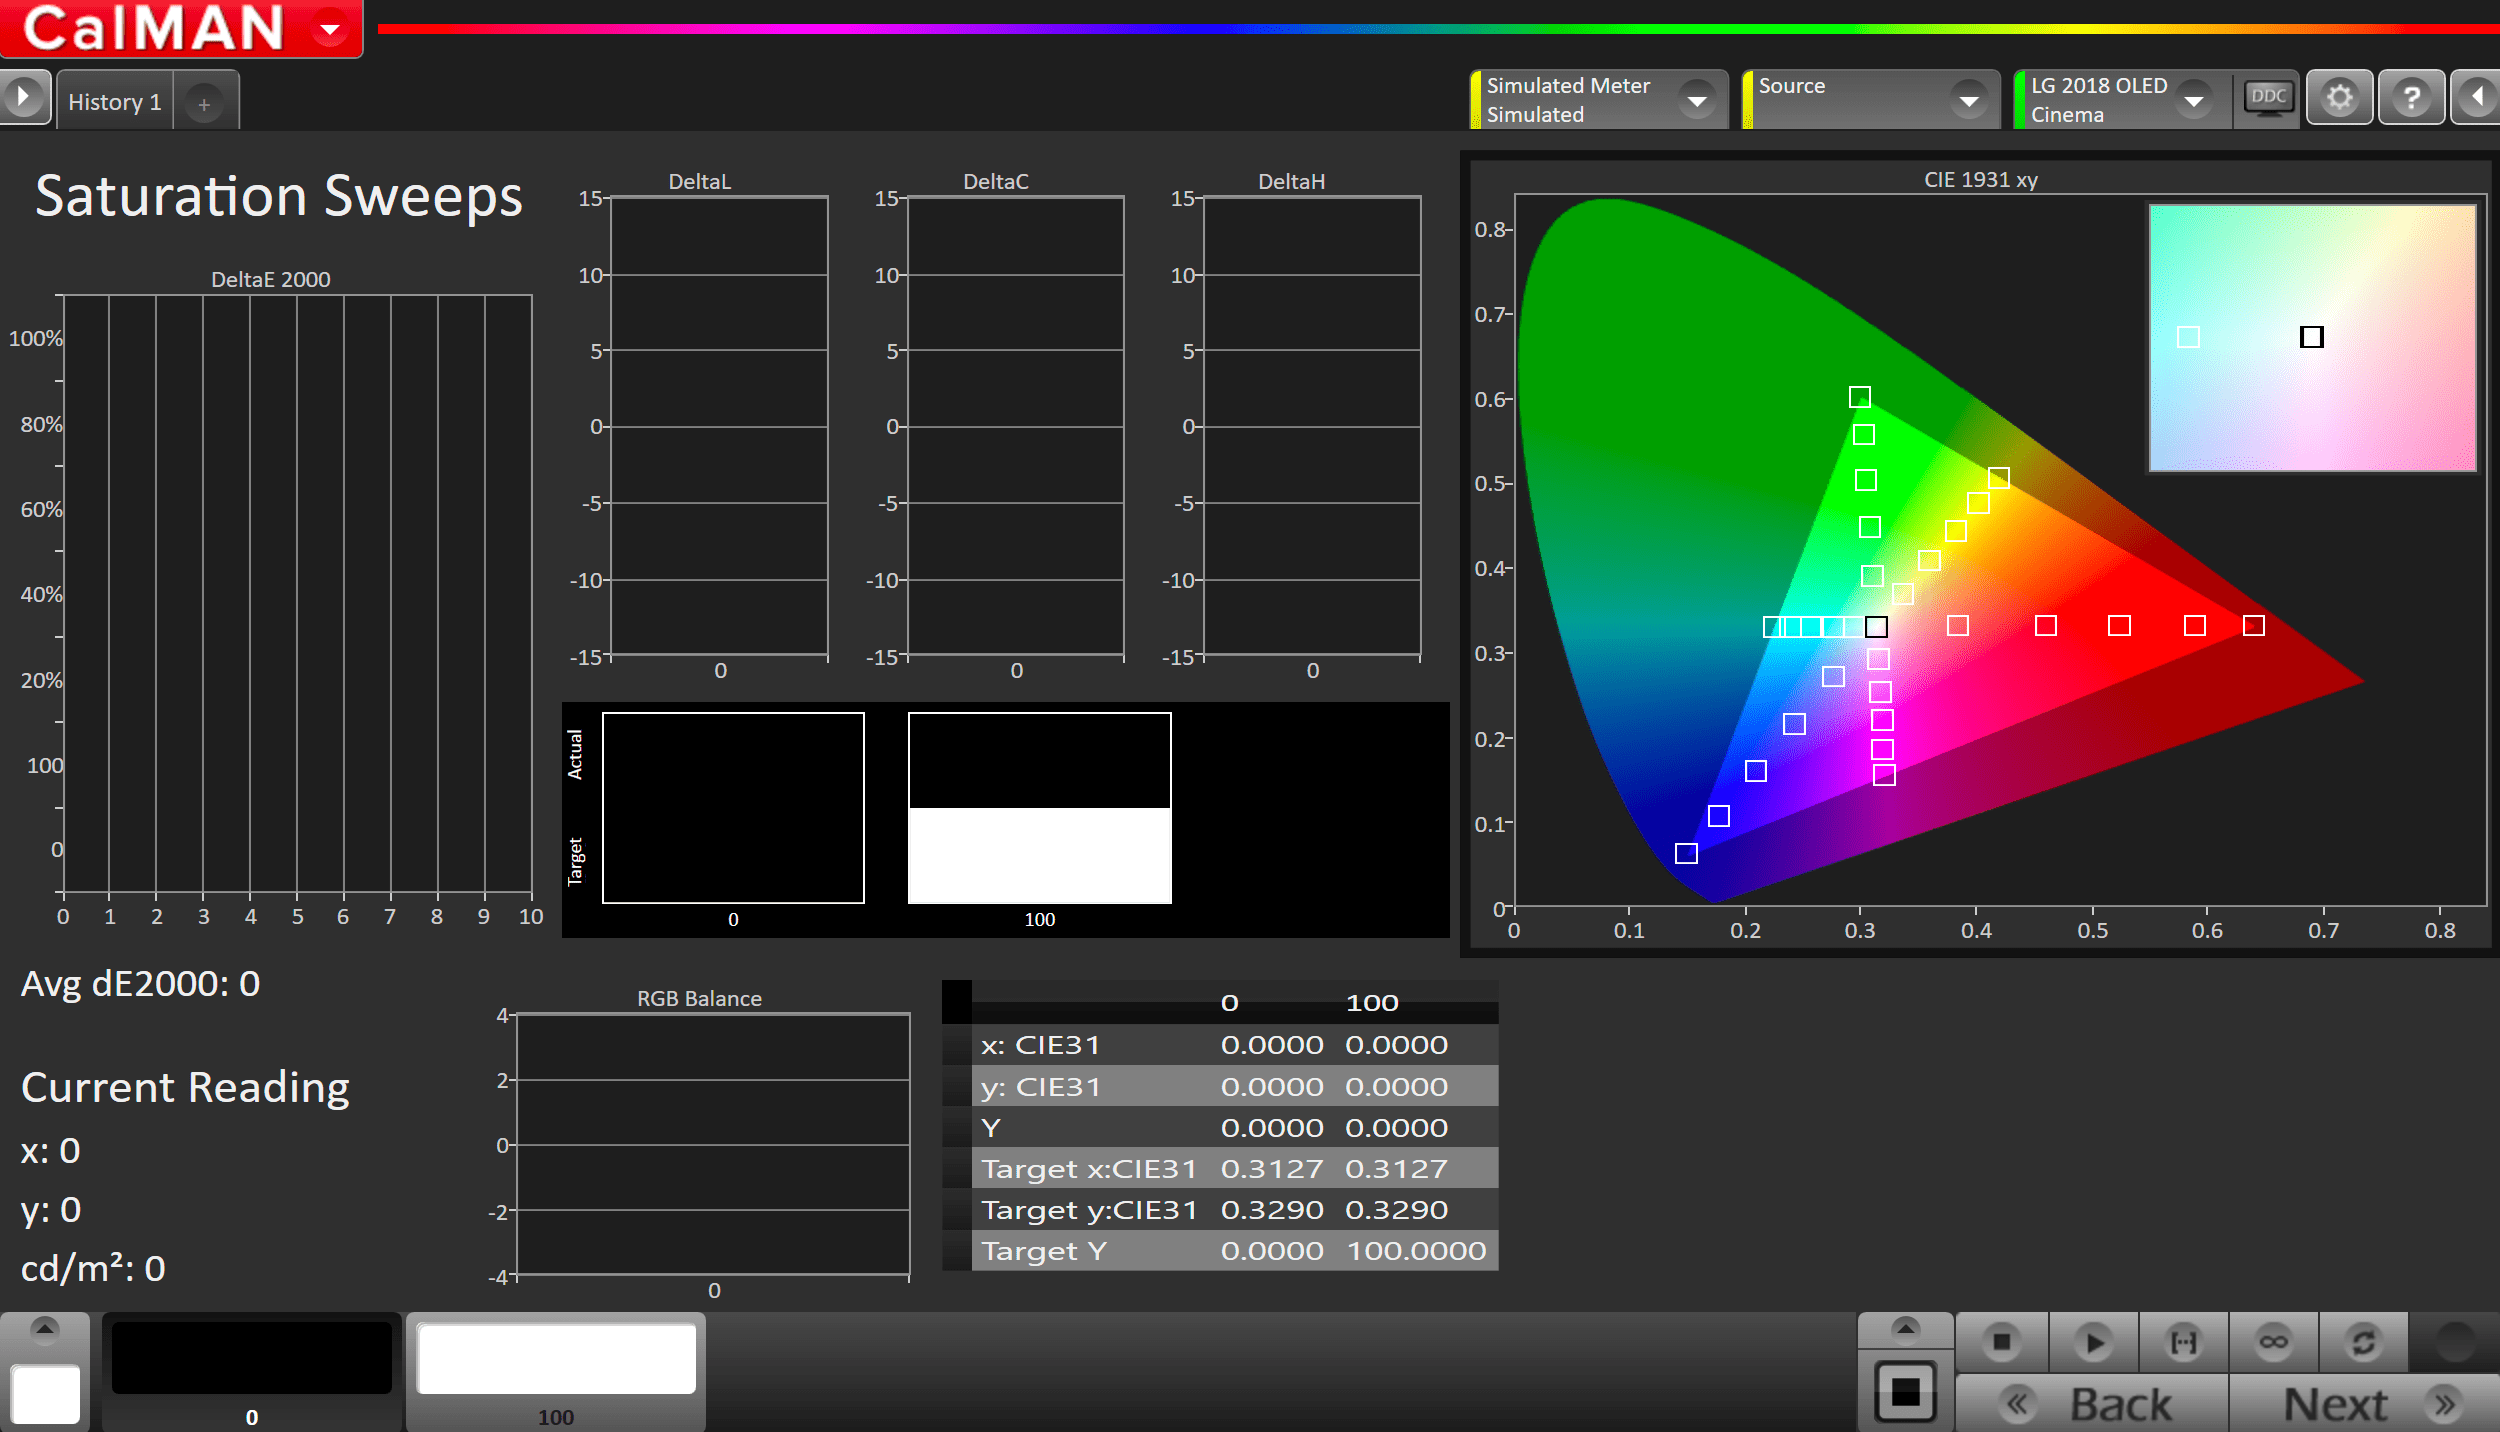
- Click the Read Series […] button
- Click Next to review calibration.
Step 12
Post-calibration readings to document the post-calibration condition of the display.
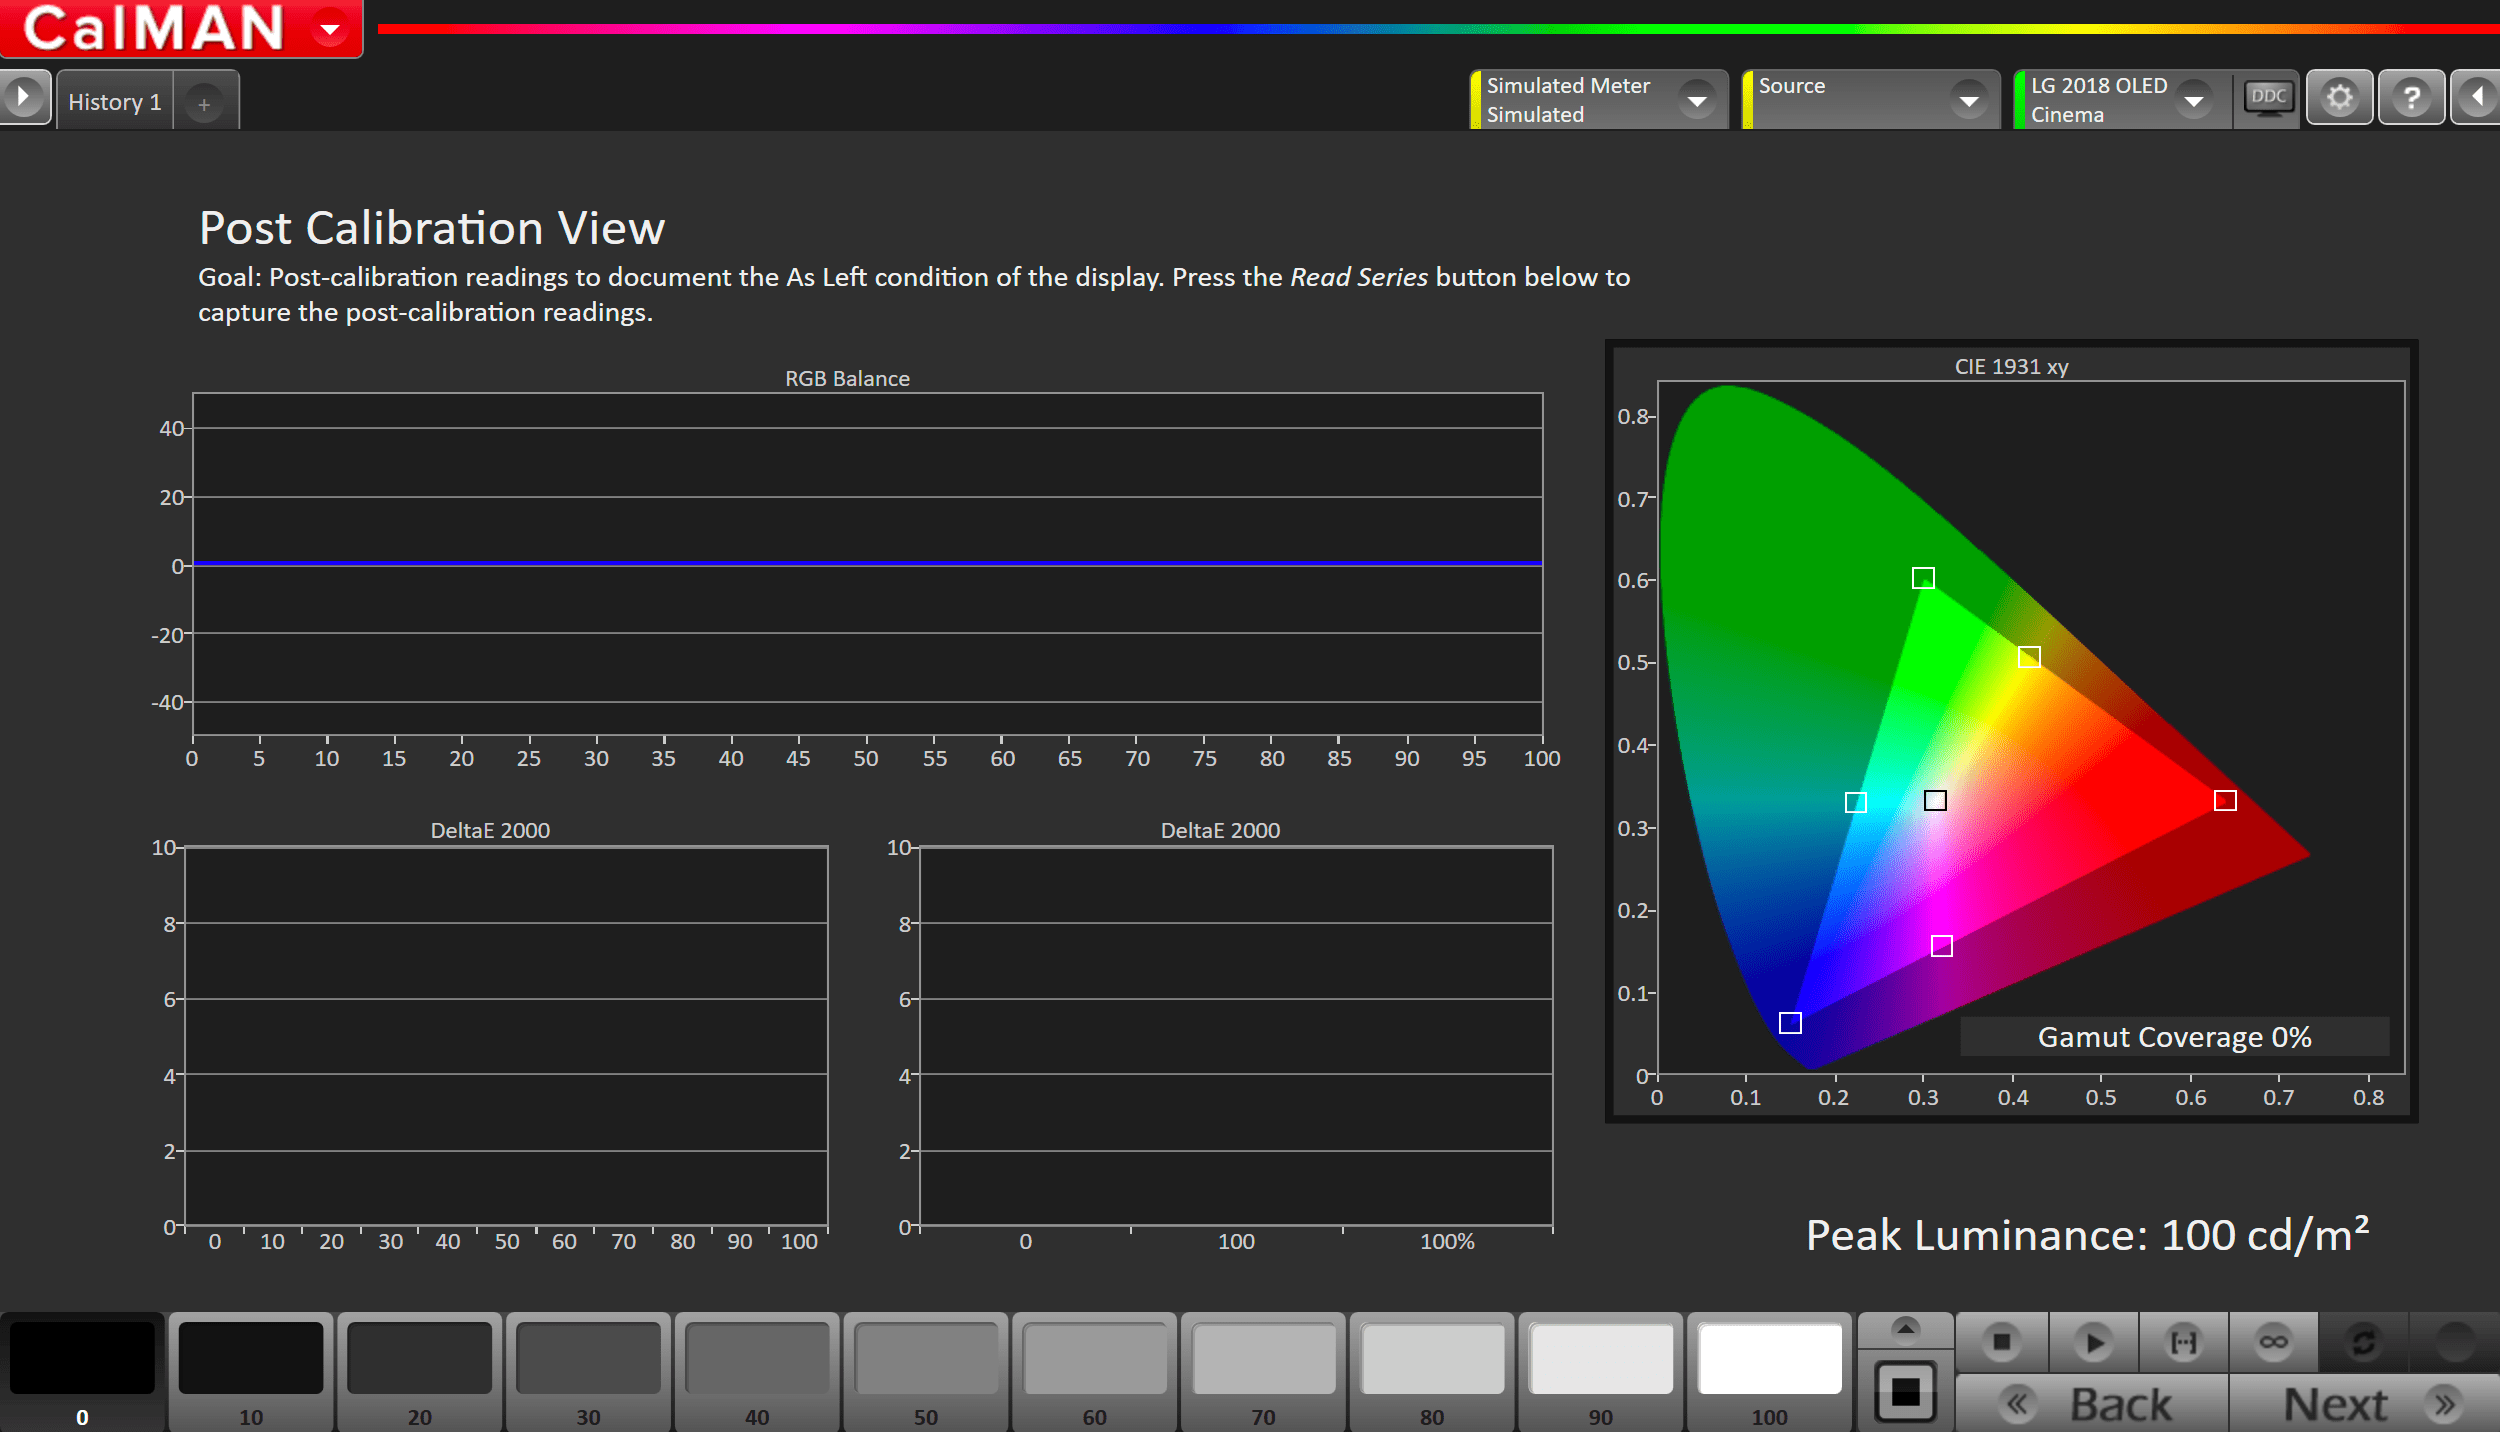
- Click the Read Series […] button
SDR Calibration is complete.
HDR Calibration
Step 1
- From the Calman Menu in the top-left, choose Open Workflow Template -> Display Specific and then AutoCal – LG
- On the introduction screen, click Next to proceed to the hardware connect page
- Plug your meter into a USB port on the computer and press the Find Meter button on the left
- When your meter is connected, select your display type from the dropdown (this will vary by meter)
- OLED: White-OLED (OLED (White) LG, Panasonic, FSI 2018 for C6 Meter)
- SuperUHD LCD – LCD LED Blue-Green (2018 LG SuperUHD LCD for C6 Meter)
- When your meter is connected, select your display type from the dropdown (this will vary by meter)

- Connect to your LG TV
- Click the Find LG TV Button
- Pick the LCD or OLED Model you are calibrating in the drop down under Model.
- Enter your TV’s IP Address into the connection dialog box, and click Connect
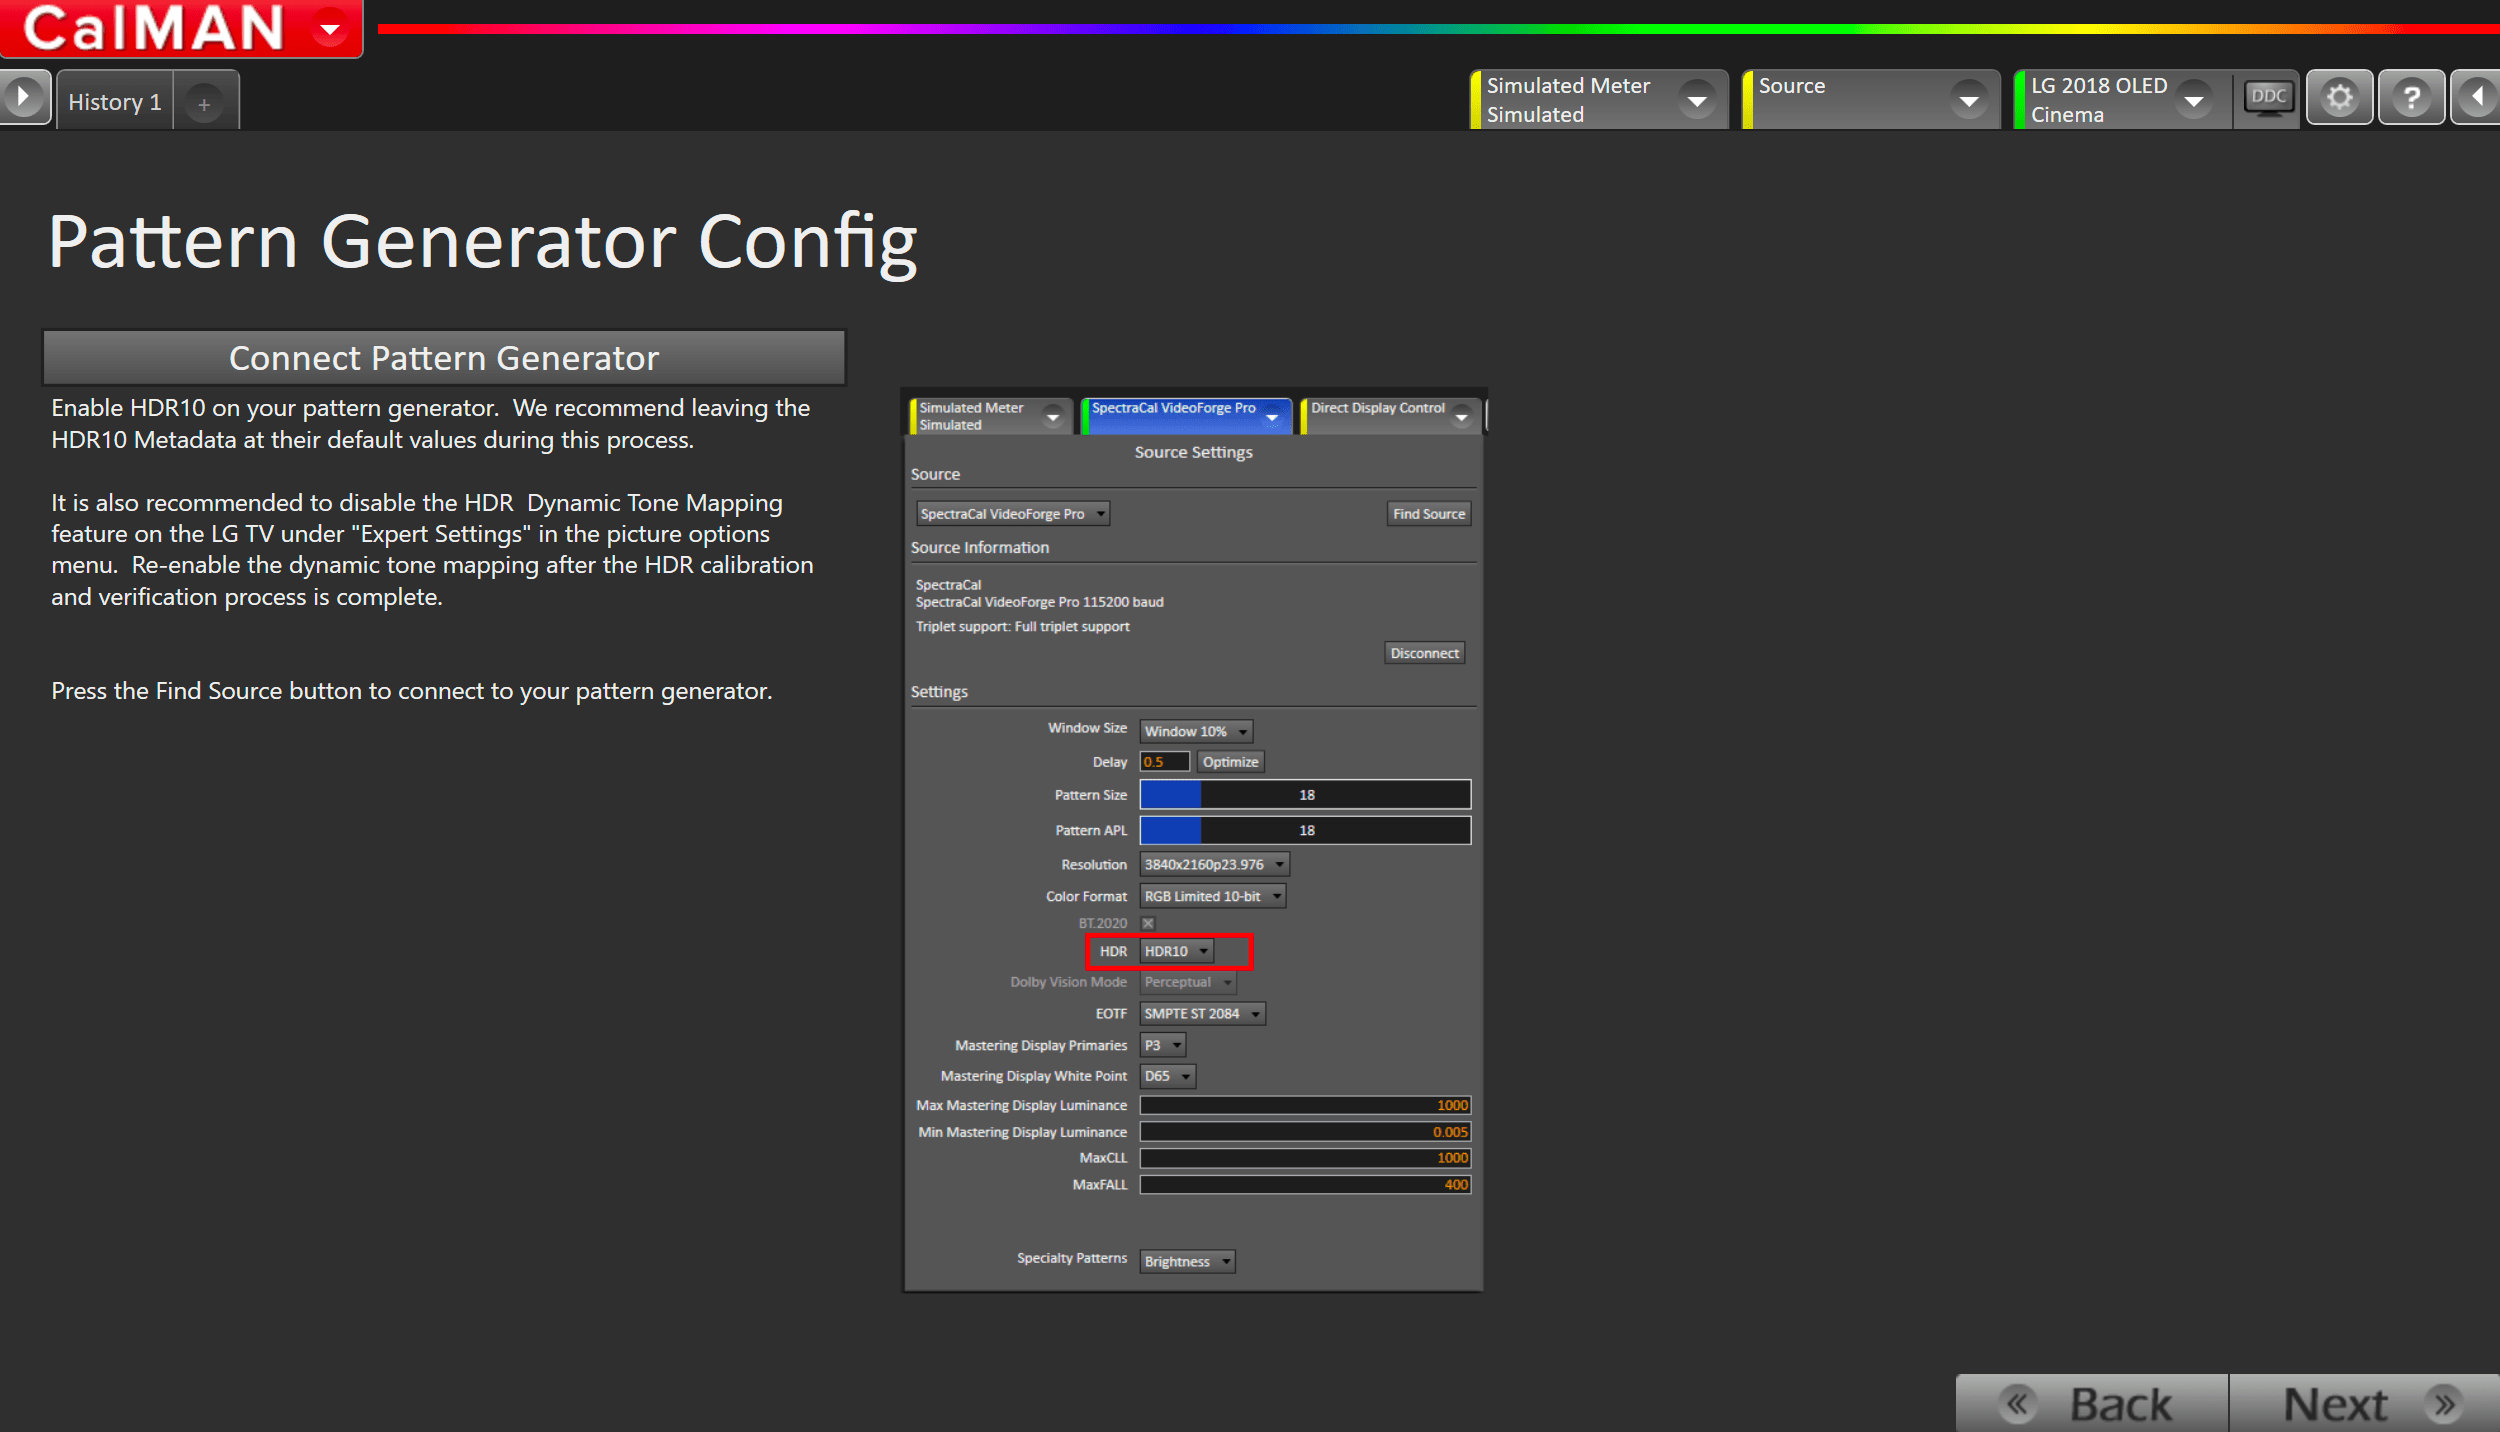
- Connect Pattern Source to your computer. If you’re using the internal pattern generator in 2019 TVs, see this article for connection steps
-
- Click the Find Source button then select your source
- Select the pattern window size
- OLED: Window 10%
- 2018 SuperUHD LCD: Constant APL 10
- 2019 NanoCell: Constant APL 25
- Ensure HDR is enabled
-
Step 2
For best results, please configure your Calman settings to match the configuration recommended below.
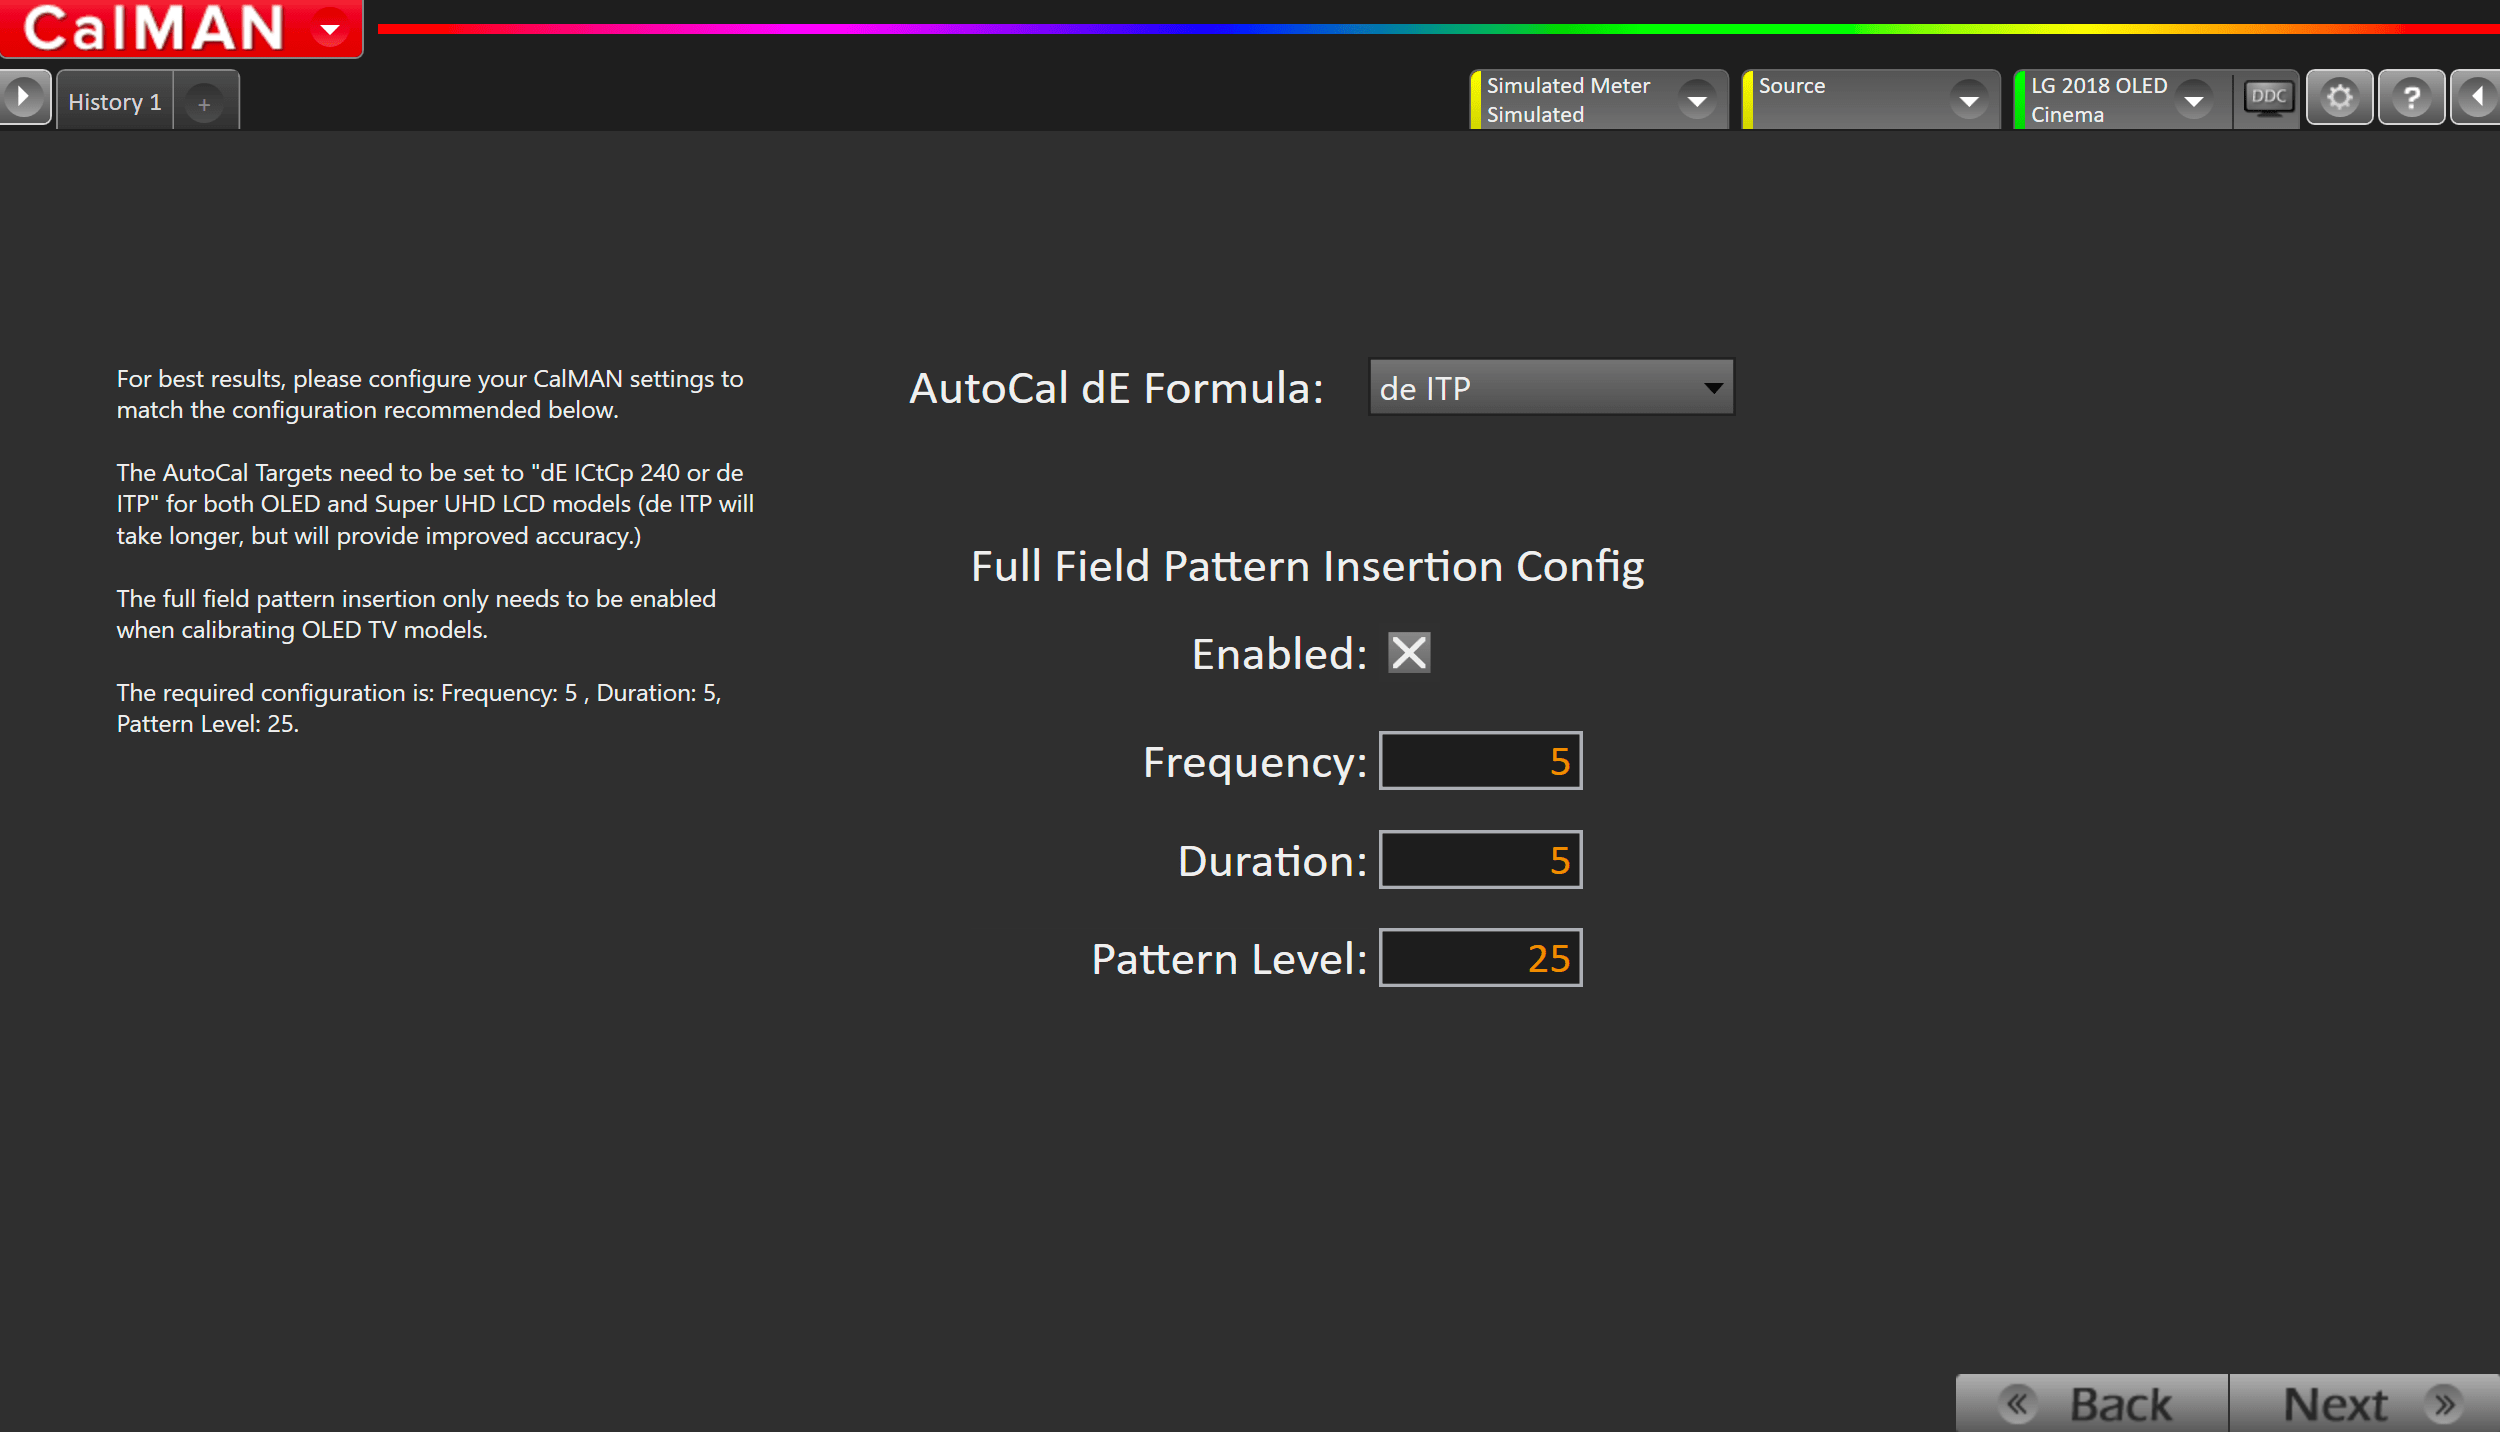
- The AutoCal Targets need to be set to dE ICtCp 240 or de ITP for both OLED and Super UHD LCD models (de ITP will take longer, but will provide improved accuracy.)
- To prevent an LG OLED display from entering its auto dimming mode during extended measurements, the Calman Pattern Insertion feature periodically inserts a different test pattern during extended test pattern measurements, to reset the display’s auto-dimming timer.
- Under Calman Settings > Application Measurement Options set the following Full Field Pattern Insertion options:
- Frequency: 5
- Duration: 5
- Pattern Level: 25
- Under Calman Settings > Application Measurement Options set the following Full Field Pattern Insertion options:
Step 3
Confirm your calibration targets and prepare TV
- For HDR, calibration targets have been preconfigured as
- BT.2020
- D65
- Gamma ST.2084
- Hardware Options
- Pattern Size:
- OLED: Window 10%
- 2018 SuperUHD LCD: Constant APL 10
- 2019 NanoCell: Constant APL 25
- Pattern Size:
Step 4
In this step, you’ll take readings of your display before the calibration. These will be used to compare your calibration results
- To take Pre-Calibration Measurements click the Read Series […] button to measure the display’s grayscale and ColorChecker response
- This will provide a point of reference to compare your calibration results
Step 5
Using the Picture Mode dropdown menu to the right, select which HDR picture mode you would like to calibrate
- Select Picture Mode to Calibrate.
- Each Picture Mode is a separate memory slot for calibration data. Calibrations to one mode and colorspace do not affect the other picture modes.
- Using the picture mode dropdown menu on the right, select which picture mode you would like to calibrate.
- HDR Picture Modes:
- Cinema HDR
- Game HDR (Low Latency)
- Technicolor HDR (2019/2018)
- Filmmaker HDR (2020)
- HDR Picture Modes:
- After selecting your picture mode, click the Full DDC Reset button. This resets and prepares the picture mode for calibration.
- Click Next after the DDC reset is complete
- Enable the calibration process by checking the checkbox on this page. If it is already checked, proceed to the next workflow page.
Step 6
Here Calman will adjust the Multipoint Greyscale of your display using a 1D LUT
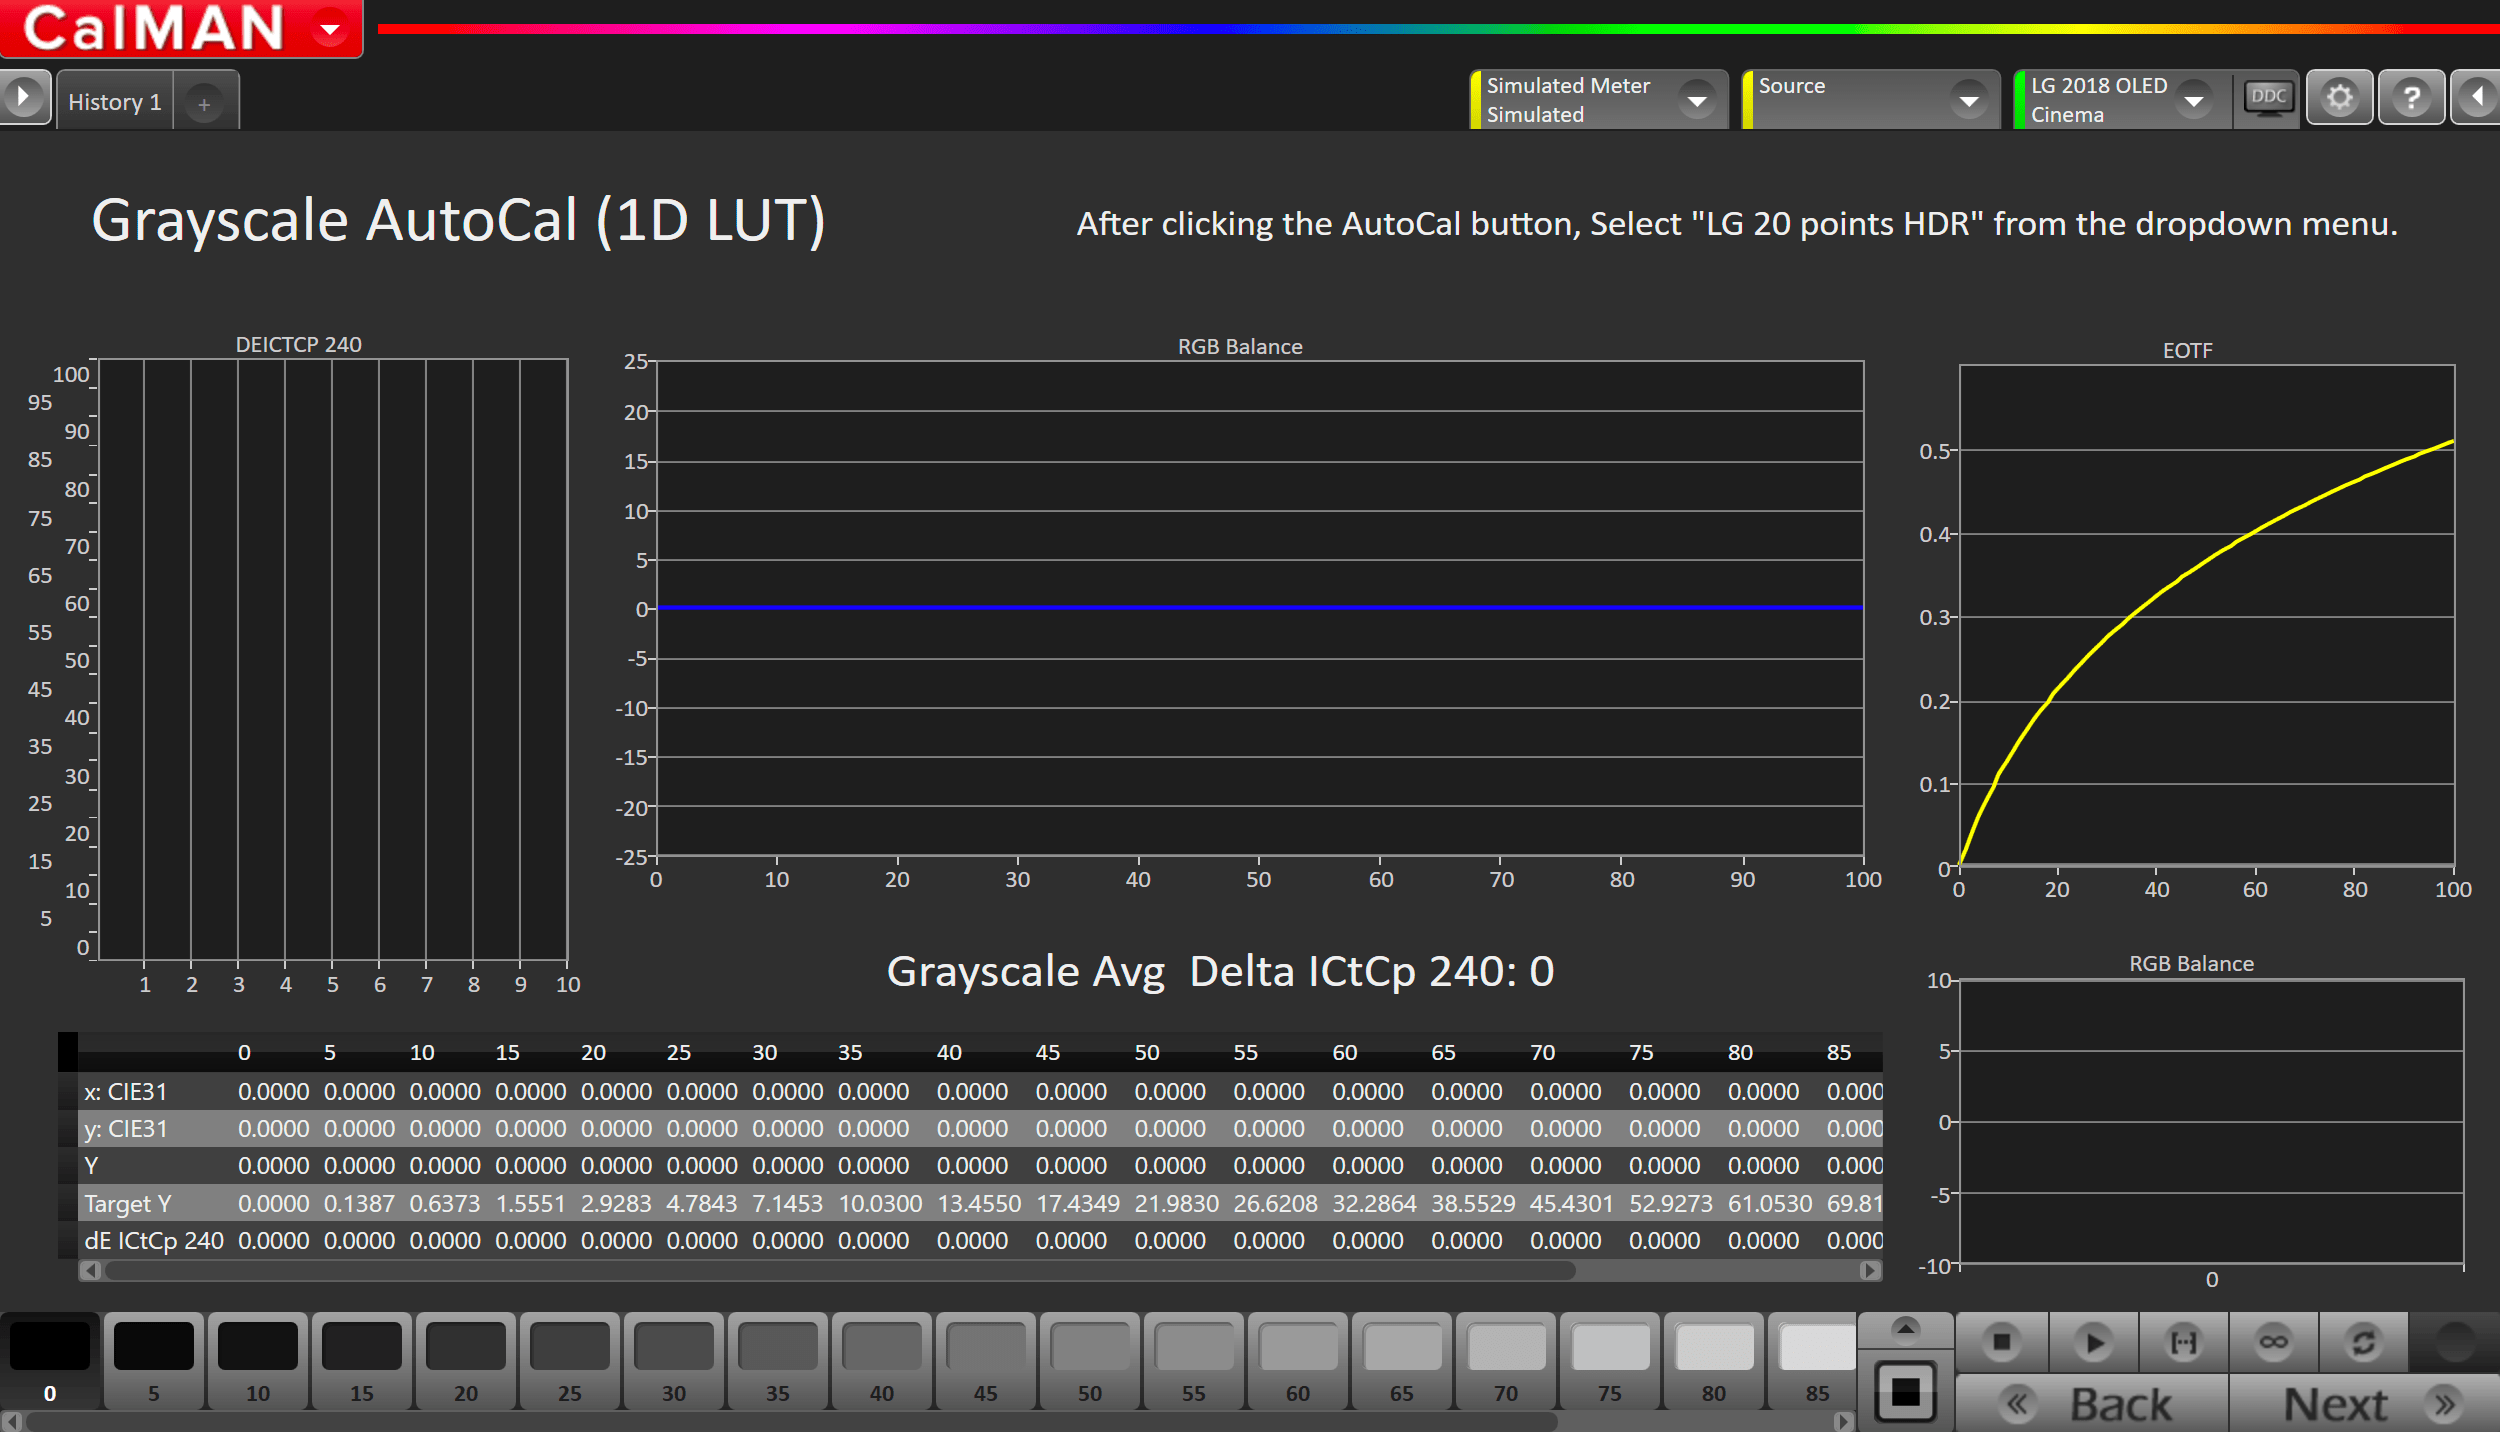
- Press the AutoCal button and select the correct data points in the AutoCal Dialog to auto-calibrate the Grayscale/Luminance response on your display.
- Select LG 20 Points HDR
- The brightness and contrast controls need to be set to default for the 1D LUT AutoCal to work correctly. (B: 50 C: 100)
- Click OK to begin greyscale AutoCal
Step 7
On this page, Calman will calibrate the Color Management using a 3D LUT
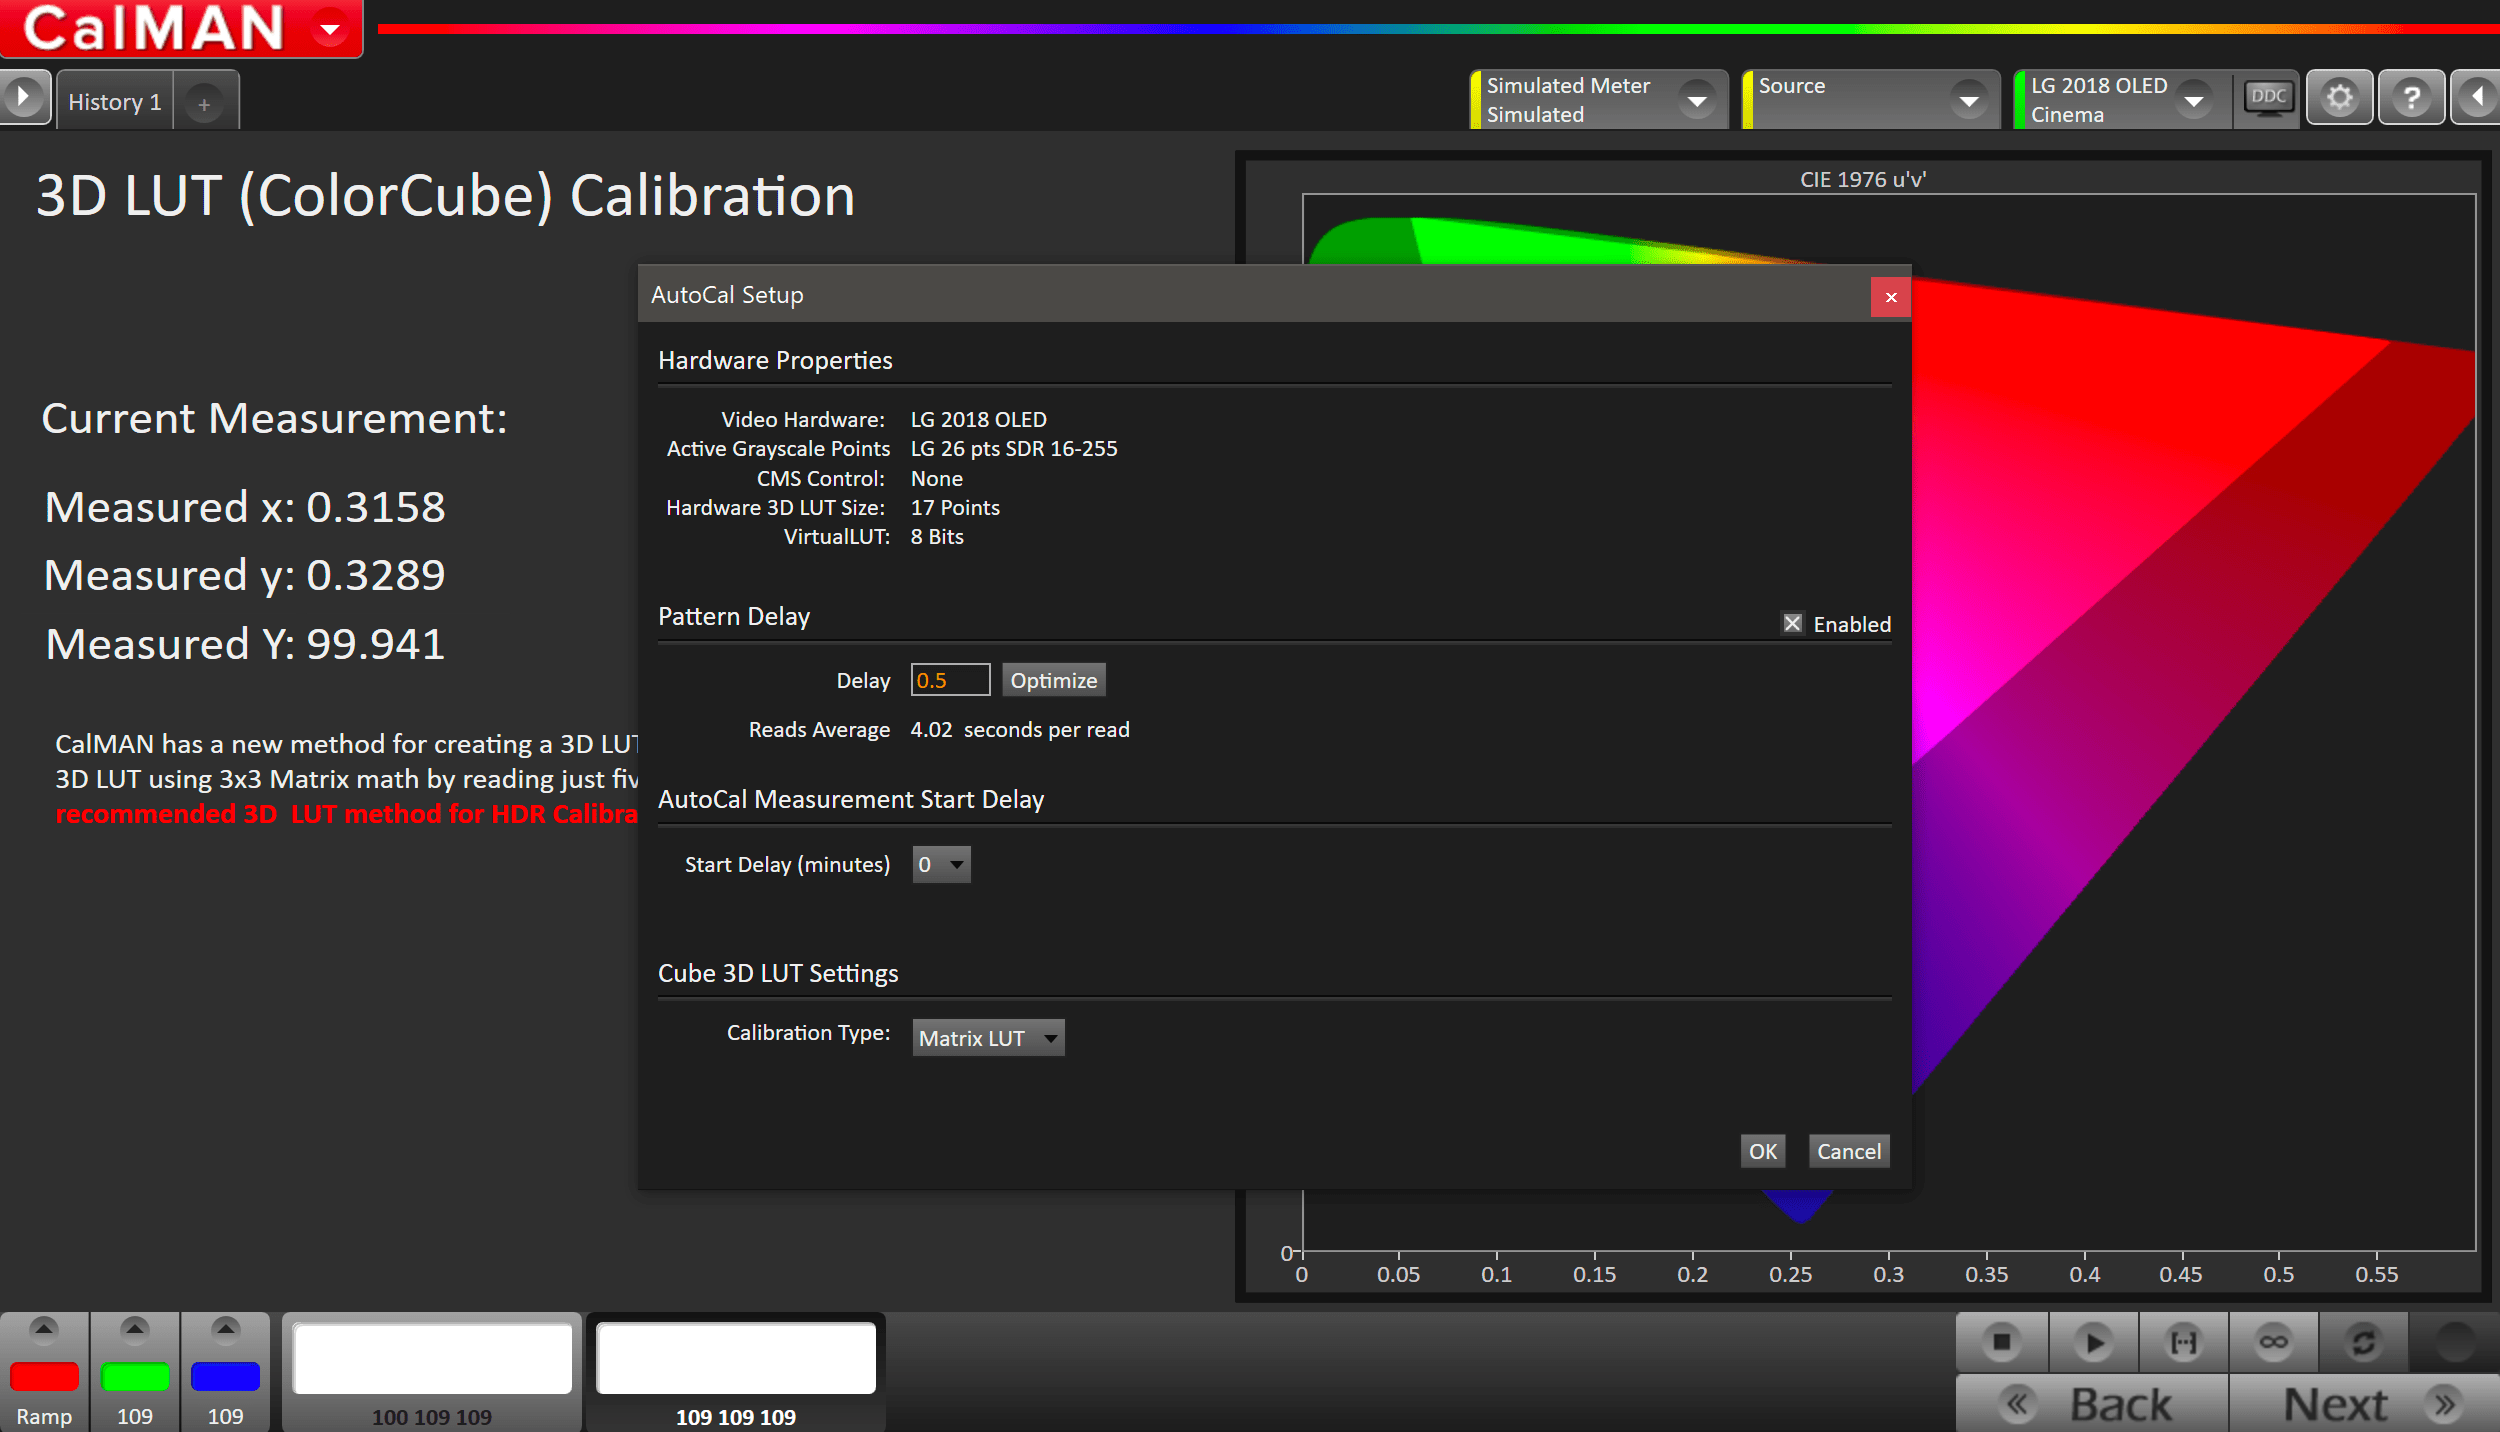
- Press the AutoCal button to open AutoCal dialog
- Calman has a new method for creating a 3D LUT. It is called the Matrix LUT which creates a 3D LUT using 3×3 Matrix math by reading just five color patches.
- This is the only recommended 3D LUT method for HDR Calibration.
- Click OK to begin colorspace AutoCal process
- When AutoCal is complete, press the Next button to proceed
- Uncheck the Enable Calibration checkbox to apply the 3D LUT
- Press Next
Step 8
Note: This step will only be present when connected to 2019 LG TVs with Calman 2019. For more info on the Custom Tone Map feature see this article
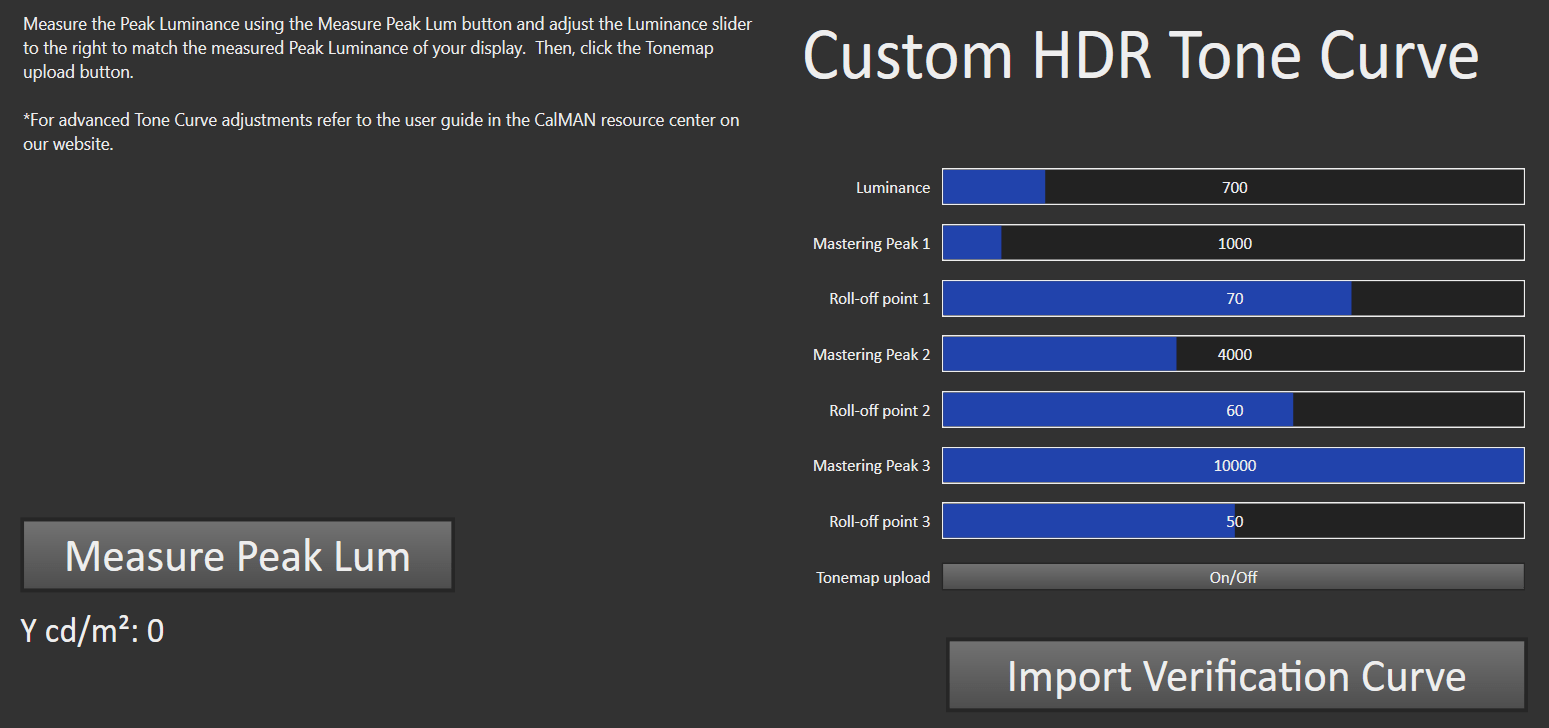
To set a custom tone map:
- Measure the peak luminance for the display in HDR mode
- Enter the Luminance field in the workflow
- This is also available in the Display DDC tab
- Press the Tone Curve Upload button in the workflow to load the tone curve values into the display
- Use the Import Tone Curve button to upload the custom tone curve targets into Calman
Step 9
In this step, you’ll take readings of your display after the calibration using a Greyscale Ramp
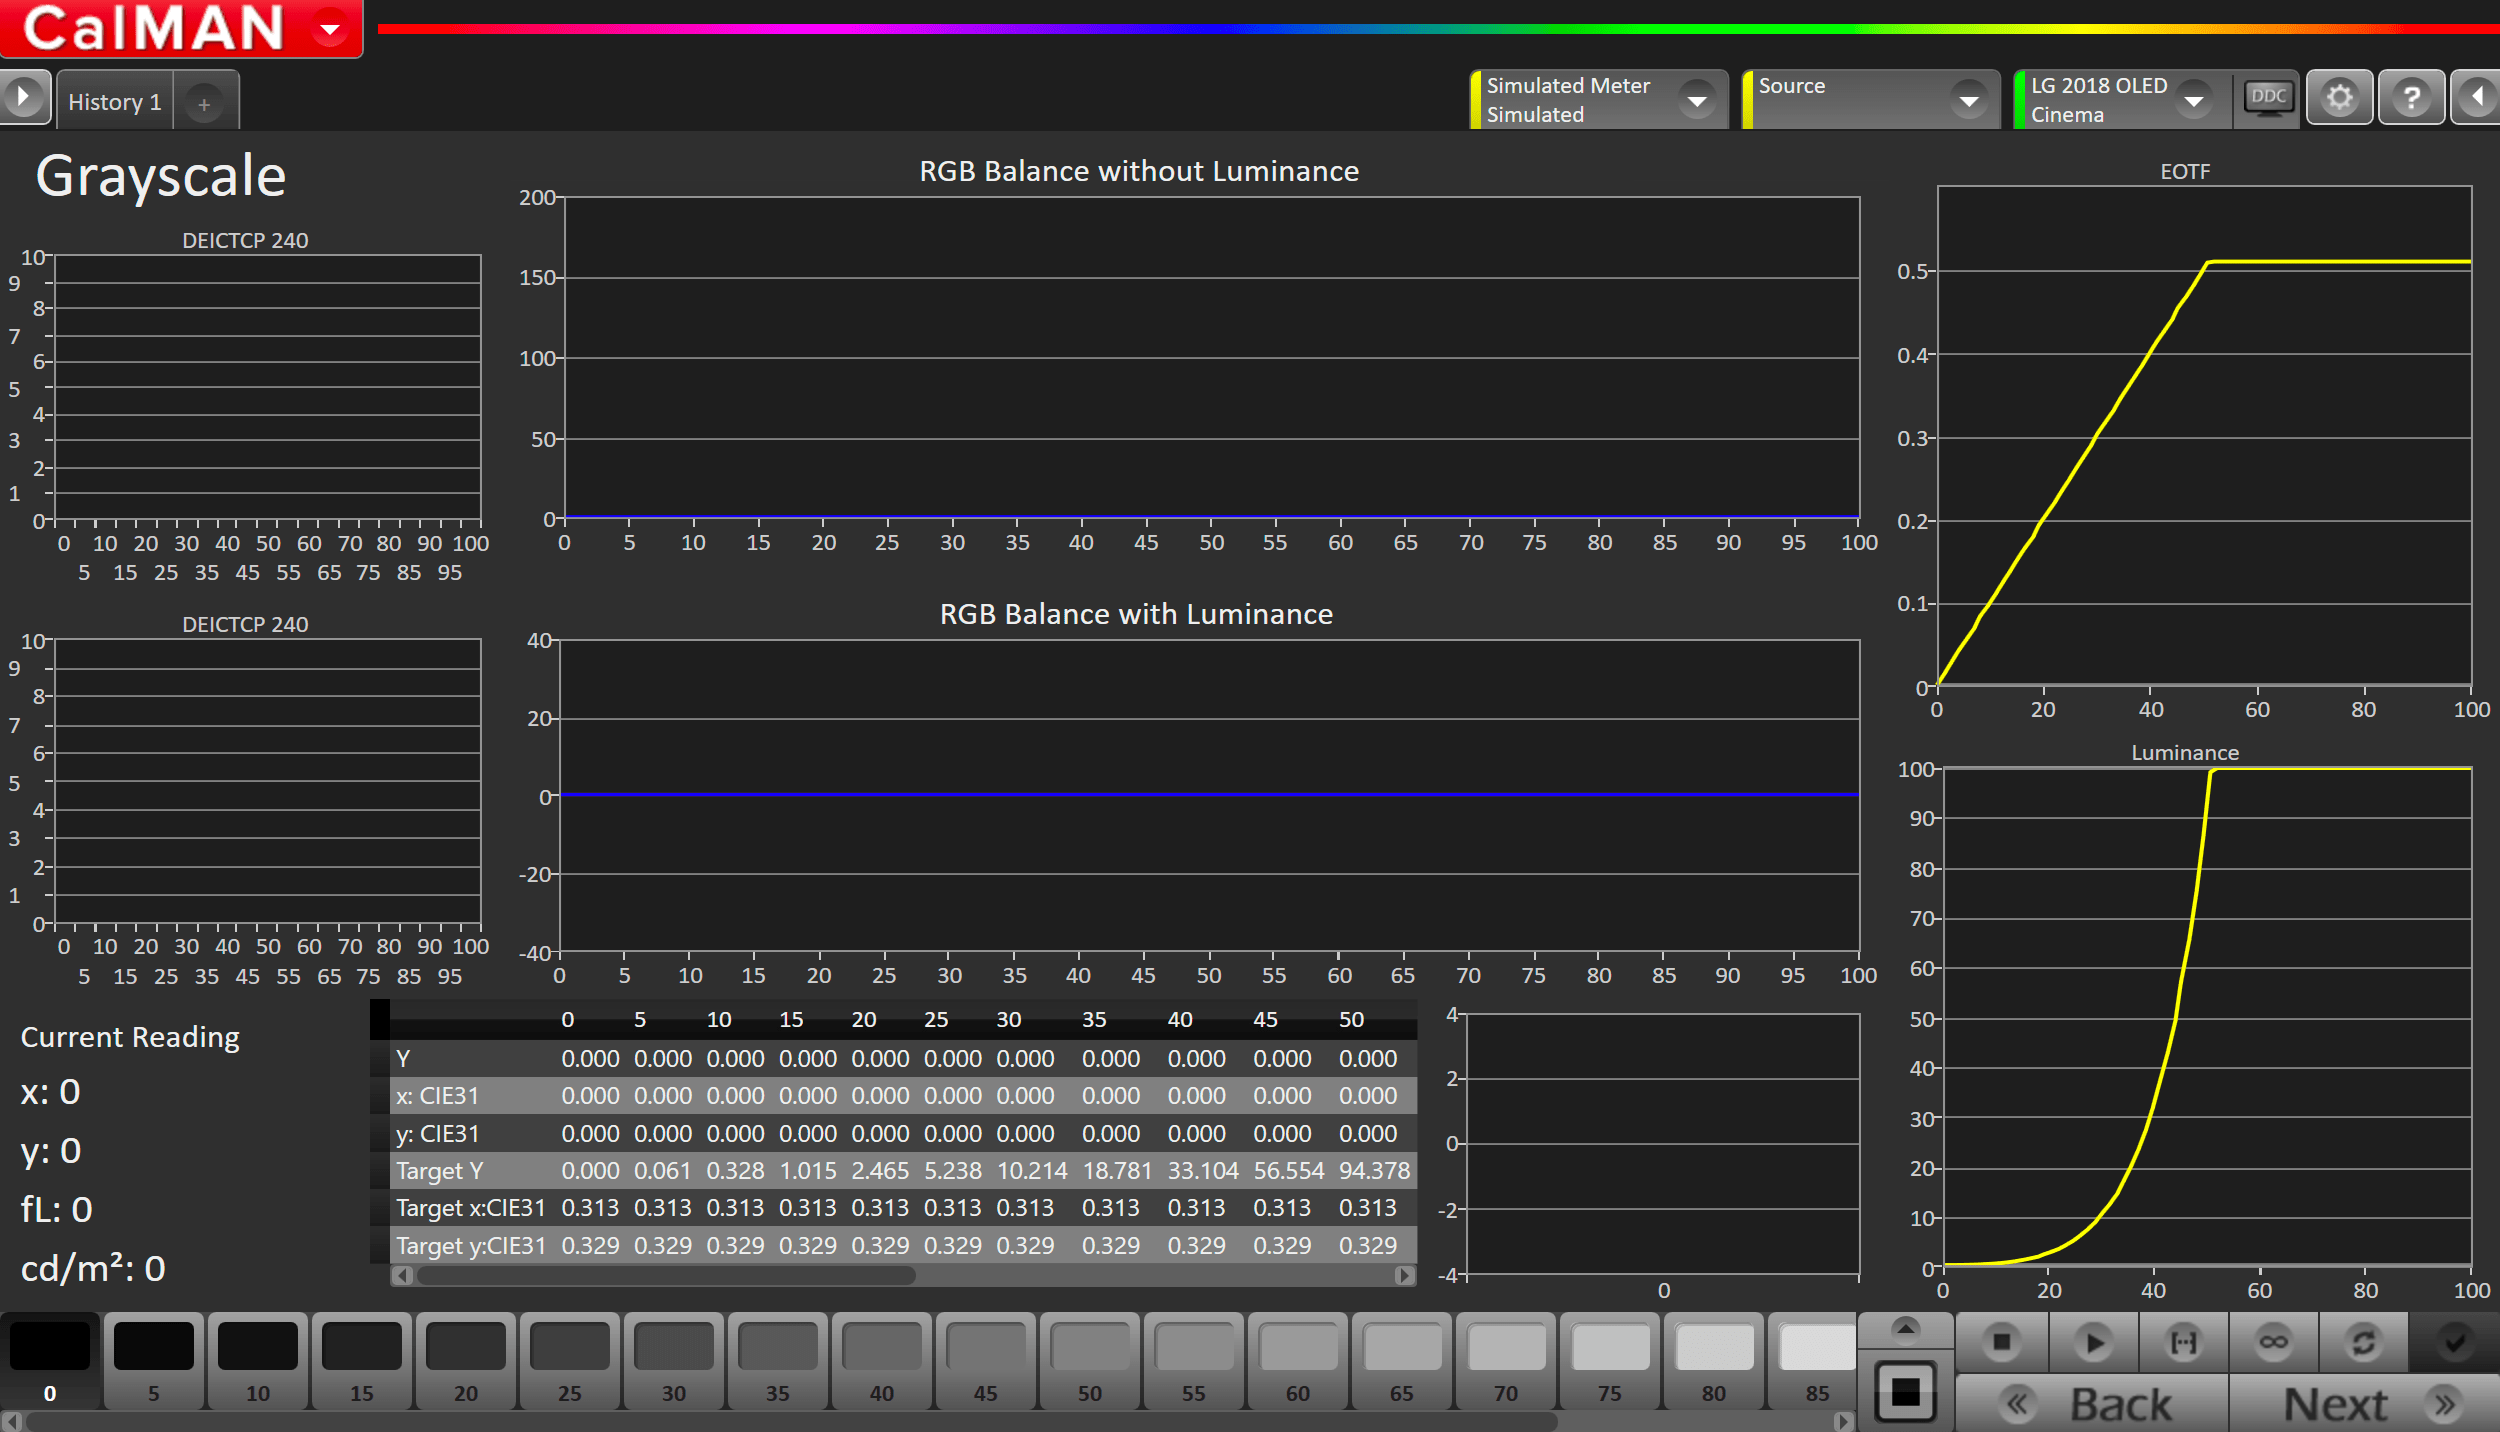
- Click the Read Series […] button to take readings
- The RGB Charts display they greyscale error with only chromaticity taken into account (top) or with chroma and luminance taken into account (bottom)
- Click Next to review calibration.
Step 10
In this step, you’ll take readings of your display after the calibration using the Pantone ColorChecker patterns
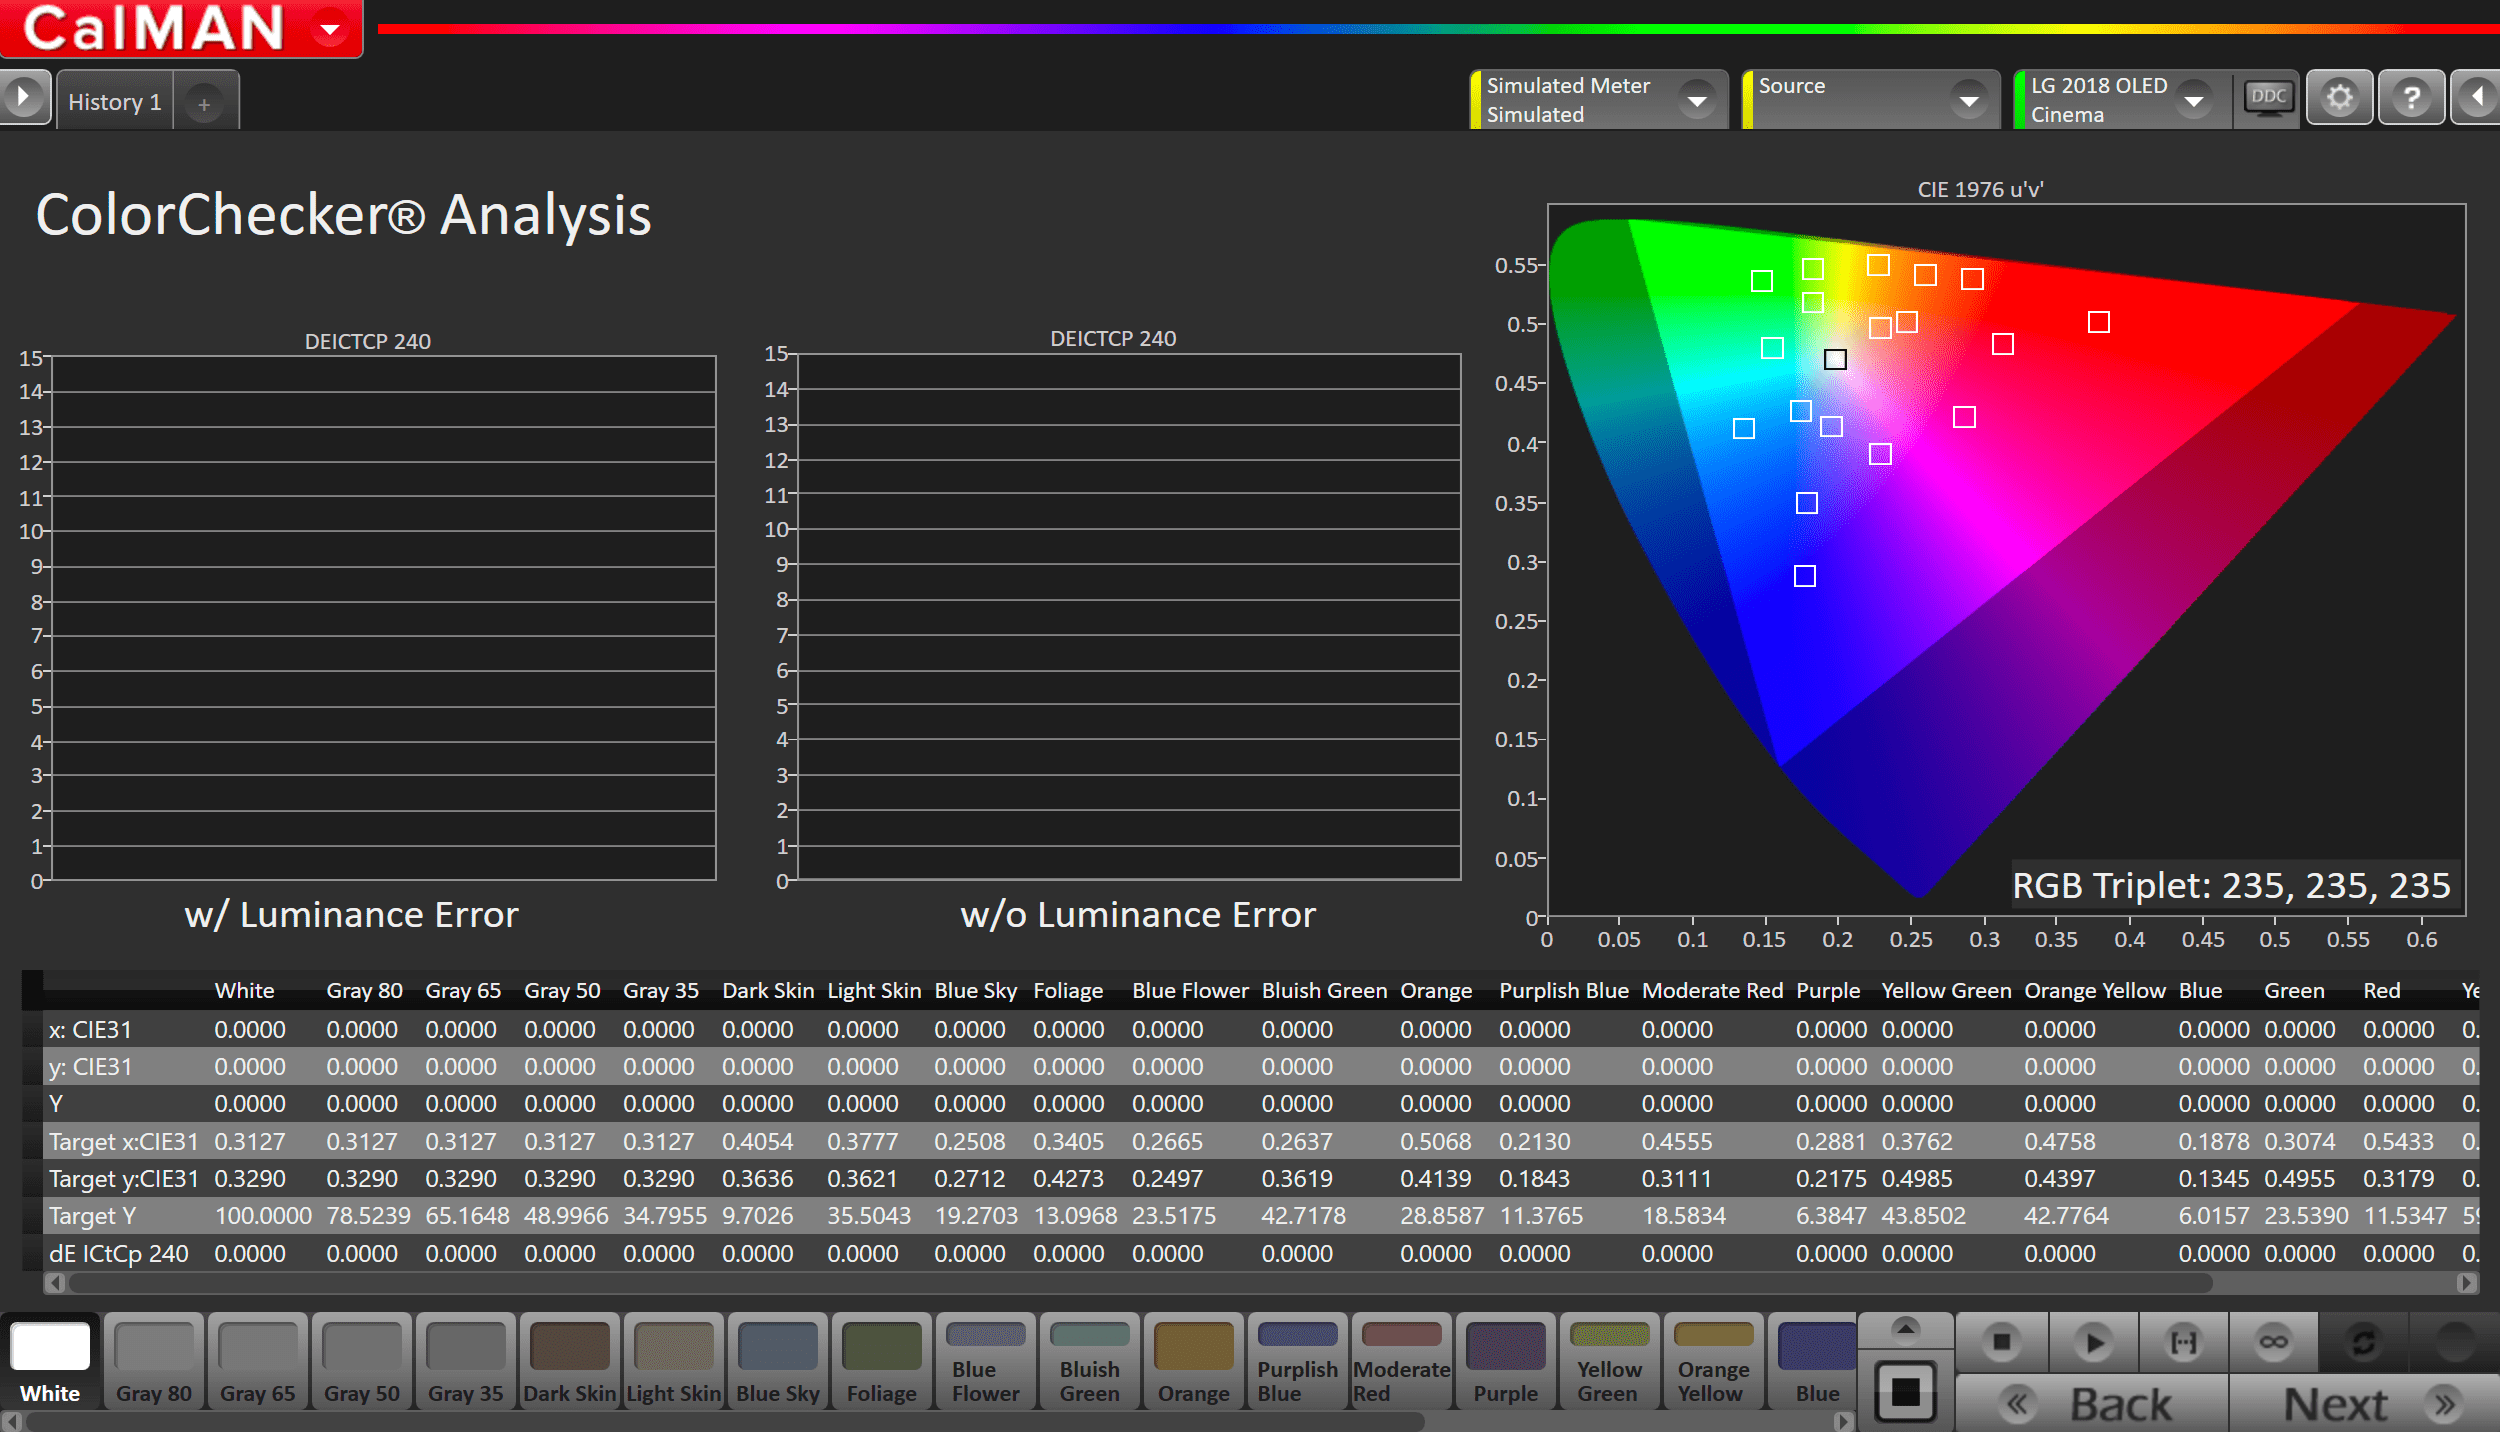
- Measure the display with Pantone ColorChecker patterns. This provides an accurate assessment of the display following calibration and will be represented along with the pre-calibration readings on the next page
- Click the Read Series […] button to measure the display’s grayscale and ColorChecker® response.
- Click Next.
Step 11
In this step, you’ll take readings of your display after the calibration using Saturation Sweeps
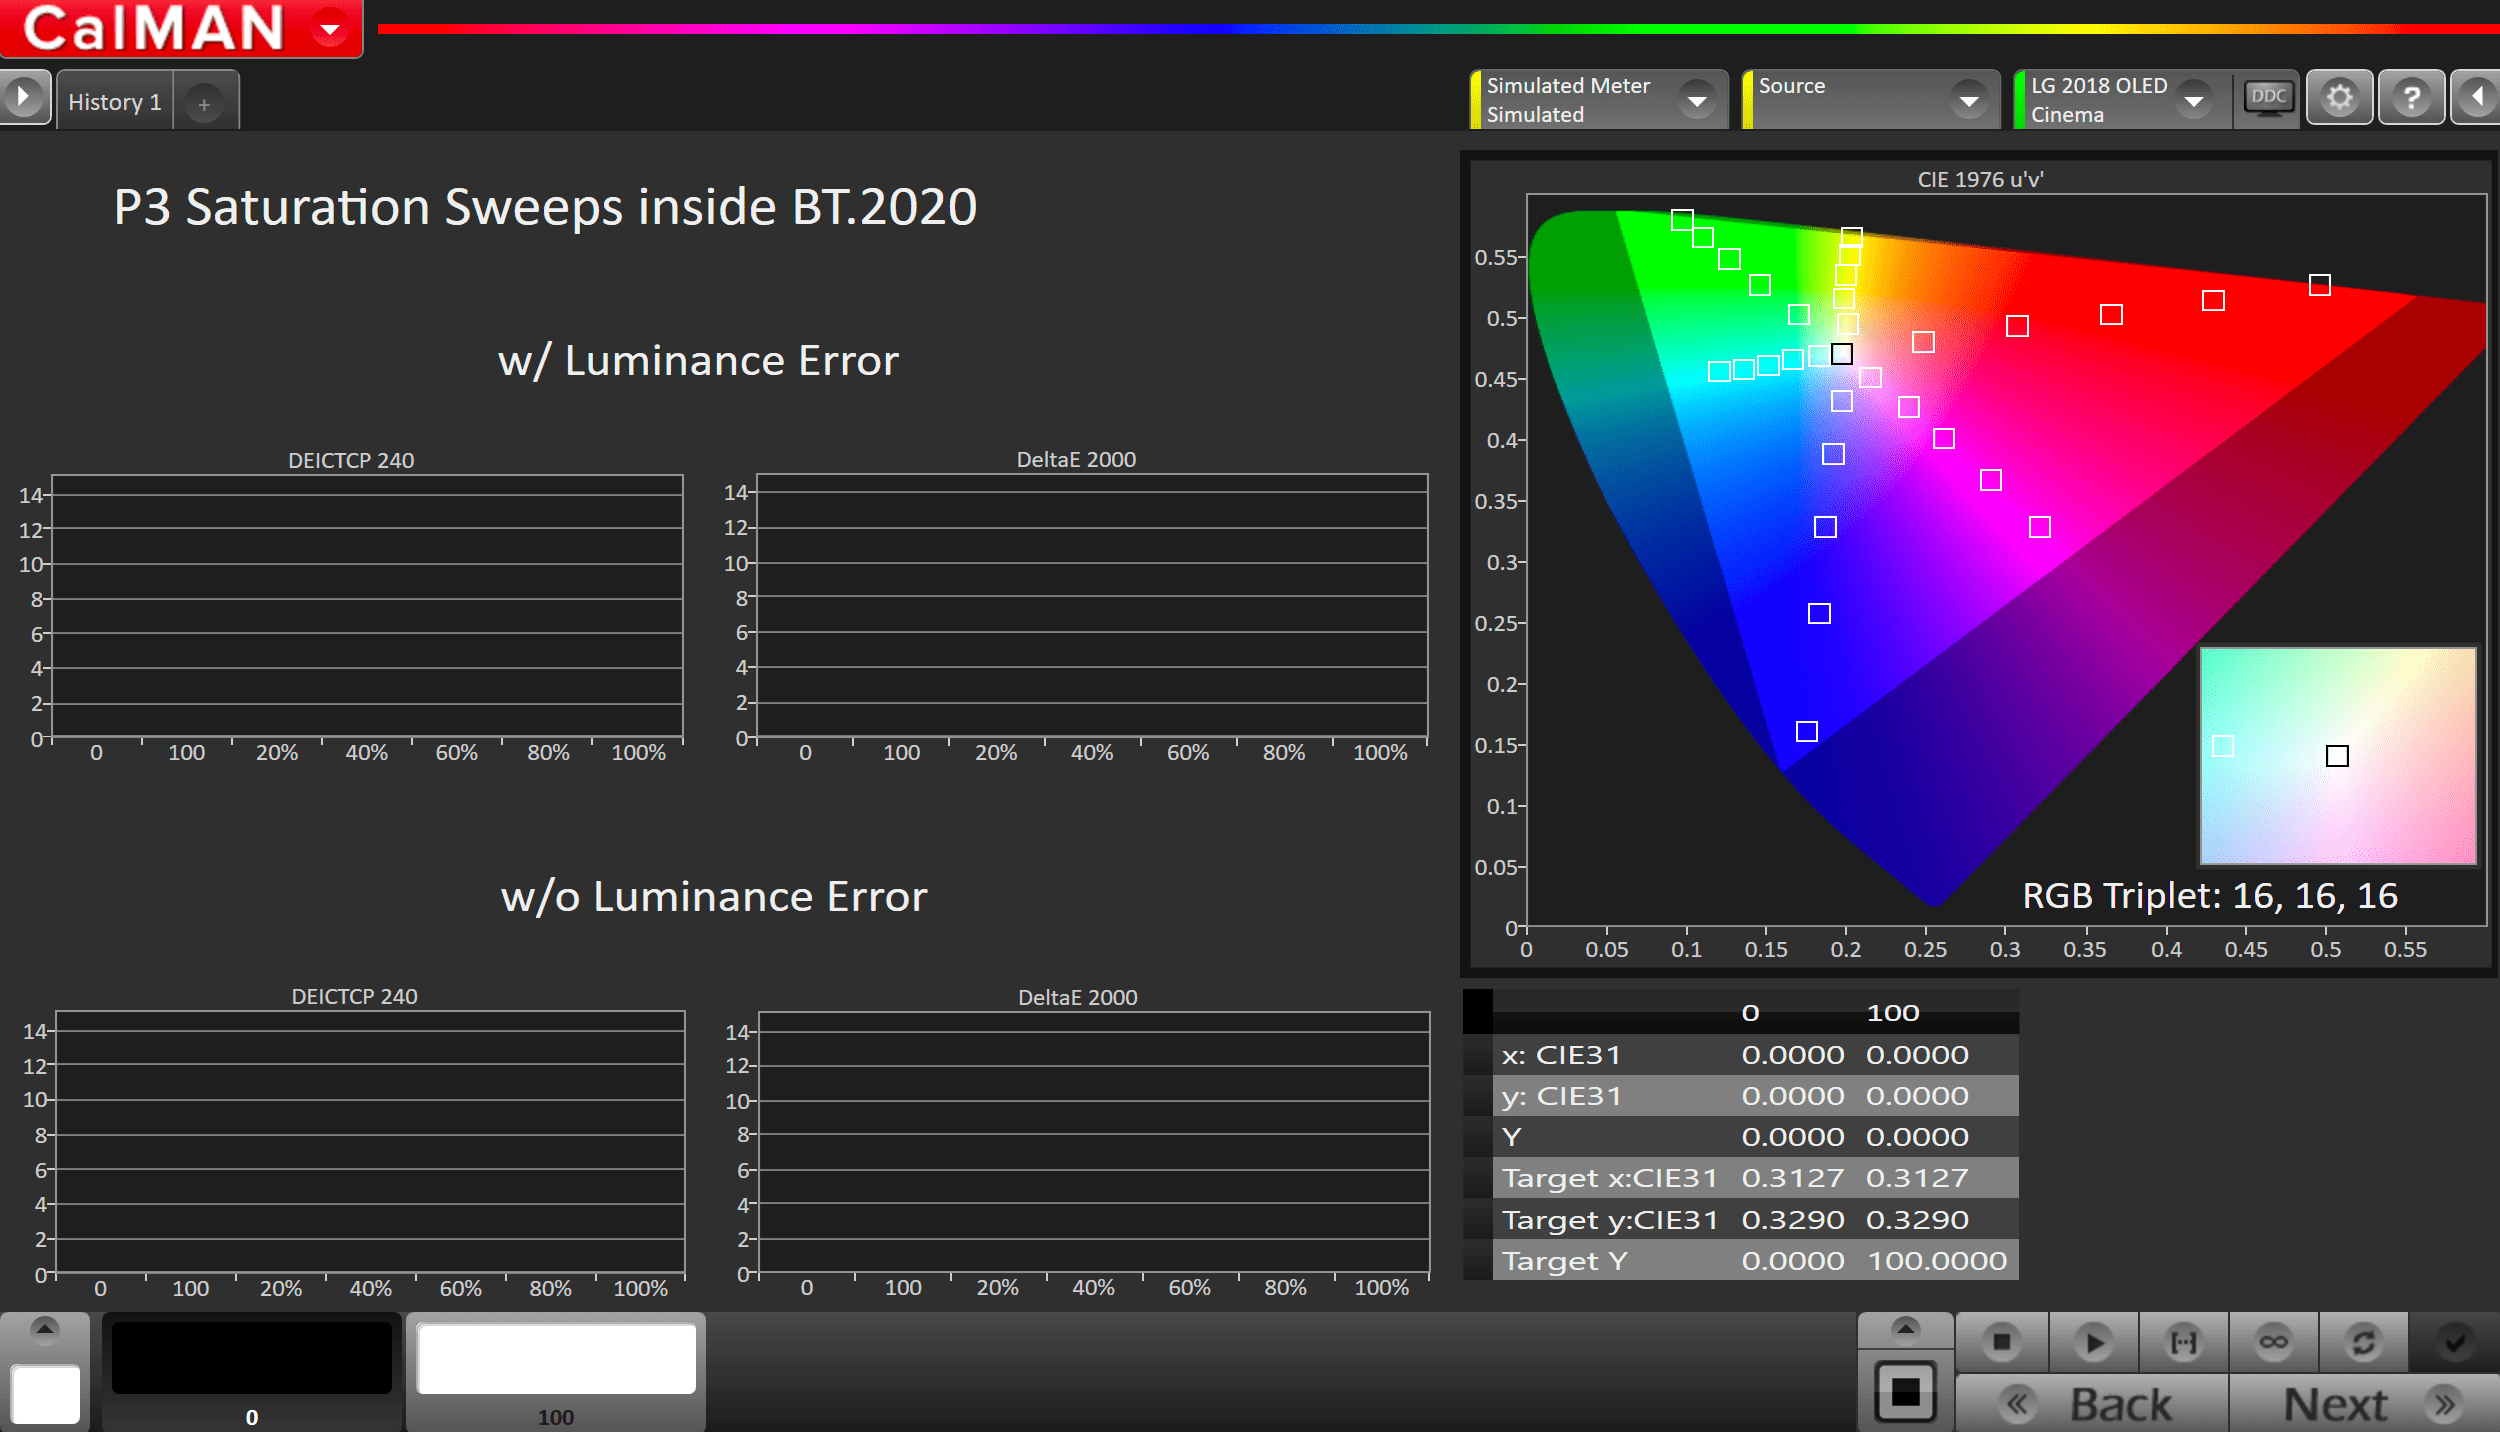
- Click the Read Series […] button
- Click Next to review calibration.
Step 12
Post-calibration readings to document the post-calibration condition of the display.
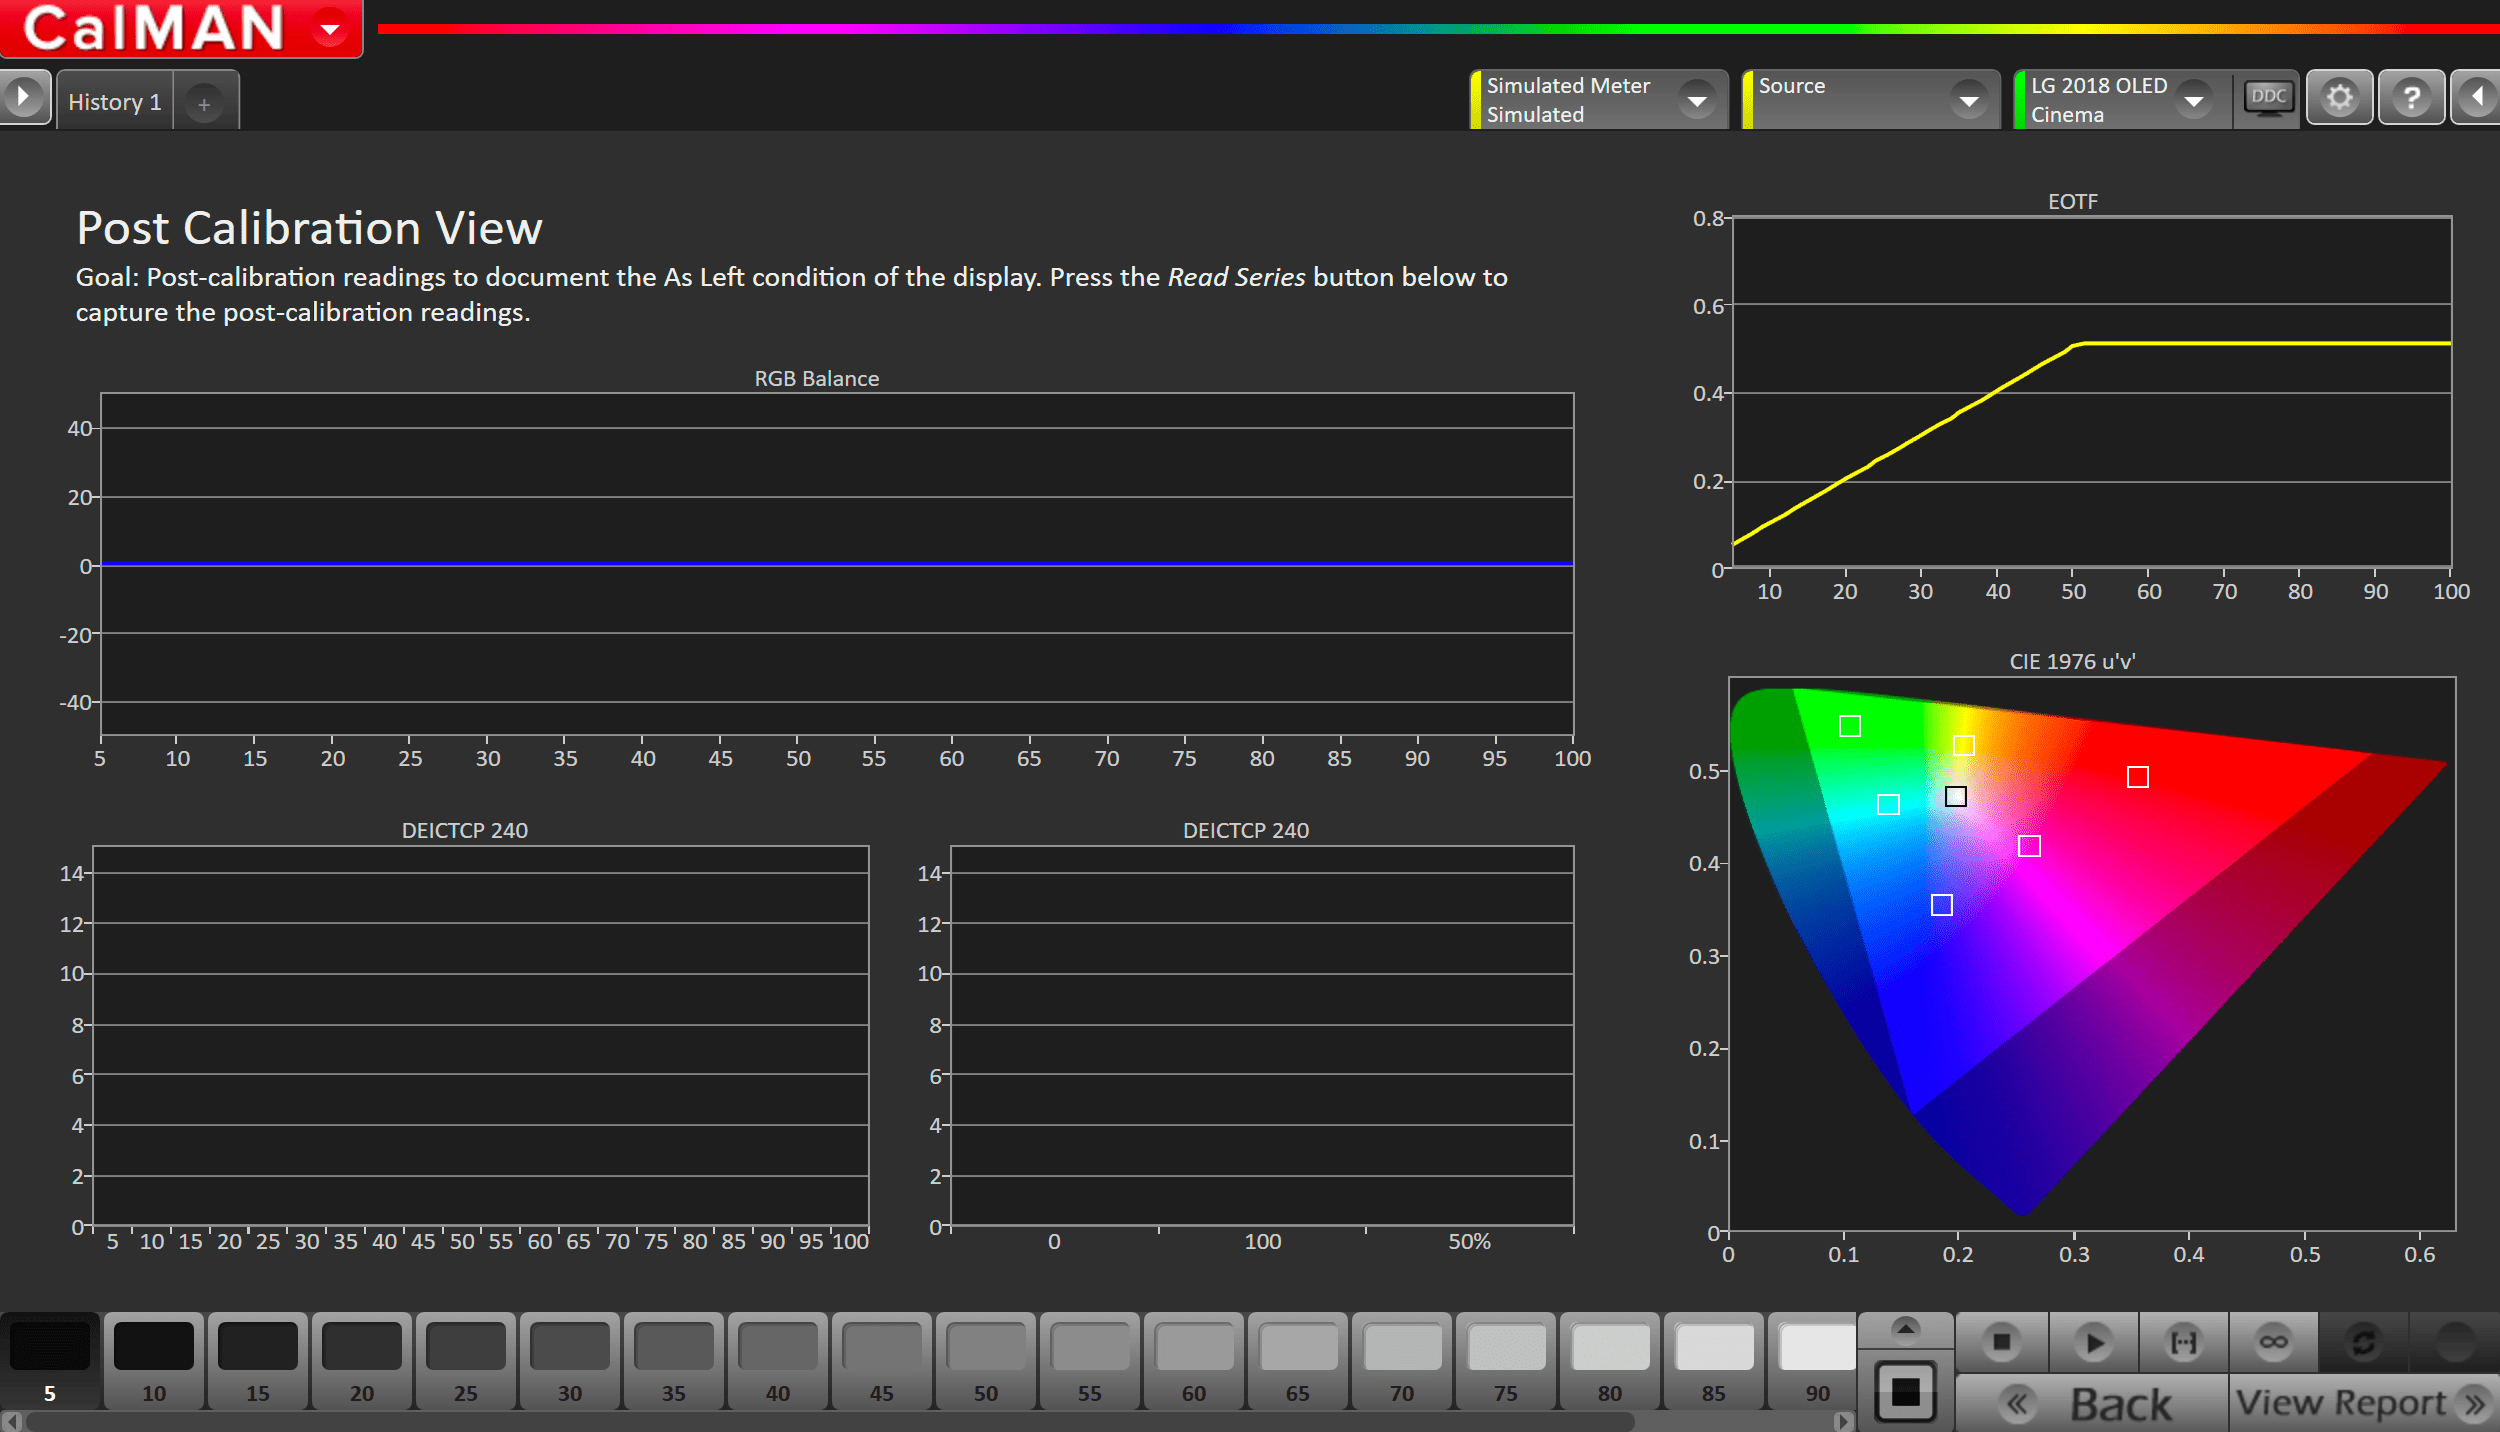
- Click the Read Series […] button
HDR Calibration is complete.
Dolby Vision Calibration
This new Dolby Vision calibration process is quite different than any previous calibration process for TVs.
First, some background information. Current HDR-compatible televisions are still based on 2.2 gamma at the panel level. The HDR EOTF (ST 2084 or HLG) is then mapped onto the native panel response of 2.2 gamma.
Working with LG and Dolby, Calman sends special Dolby Vision “Relative Mode” metadata to put the TV’s Dolby Vision engine into pass-through mode. You then calibrate the grayscale 1D LUT to 2.2 gamma and D65 white point using AutoCal.
After you calibrate the grayscale to 2.2 gamma and D65, you will use Calman to create a custom Dolby Vision config file, by taking White, Black, Red, Green, and Blue measurements.
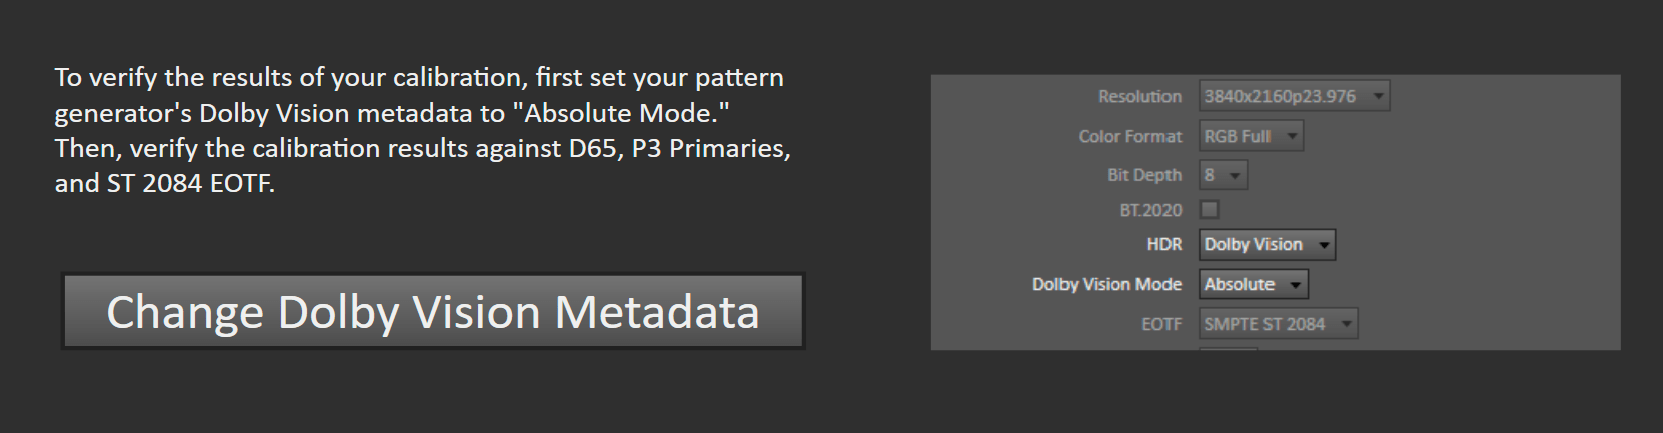
To verify the results of your calibration, you will set your pattern generator’s Dolby Vision metadata to “Absolute Mode.” Then, verify the calibration results against D65, P3 Primaries, and ST 2084 EOTF.
Step 1
- From the Calman Menu in the top-left, choose Open Workflow Template -> Display Specific and then AutoCal – LG
- On the introduction screen, click Next to proceed to the hardware connect page
- Plug your meter into a USB port on the computer and press the Find Meter button on the left
- When your meter is connected, select your display type from the dropdown (this will vary by meter)
- OLED: White-OLED (OLED (White) LG, Panasonic, FSI 2018 for C6 Meter)
- SuperUHD LCD – LCD LED Blue-Green (2018 LG SuperUHD LCD for C6 Meter)
- When your meter is connected, select your display type from the dropdown (this will vary by meter)
- Connect to your LG TV
- Click the Find LG TV Button
- Pick the LCD or OLED Model you are calibrating in the drop down under Model.
- Enter your TV’s IP Address into the connection dialog box, and click Connect
- Connect Pattern Source to your computer. If you’re using the internal pattern generator in 2019 TVs, see this article for connection steps
- Click the Find Source button then select your source
- Select the pattern window size
- OLED: Window 10%
- 2018 SuperUHD LCD: Constant APL 10
- 2019 NanoCell: Constant APL 25
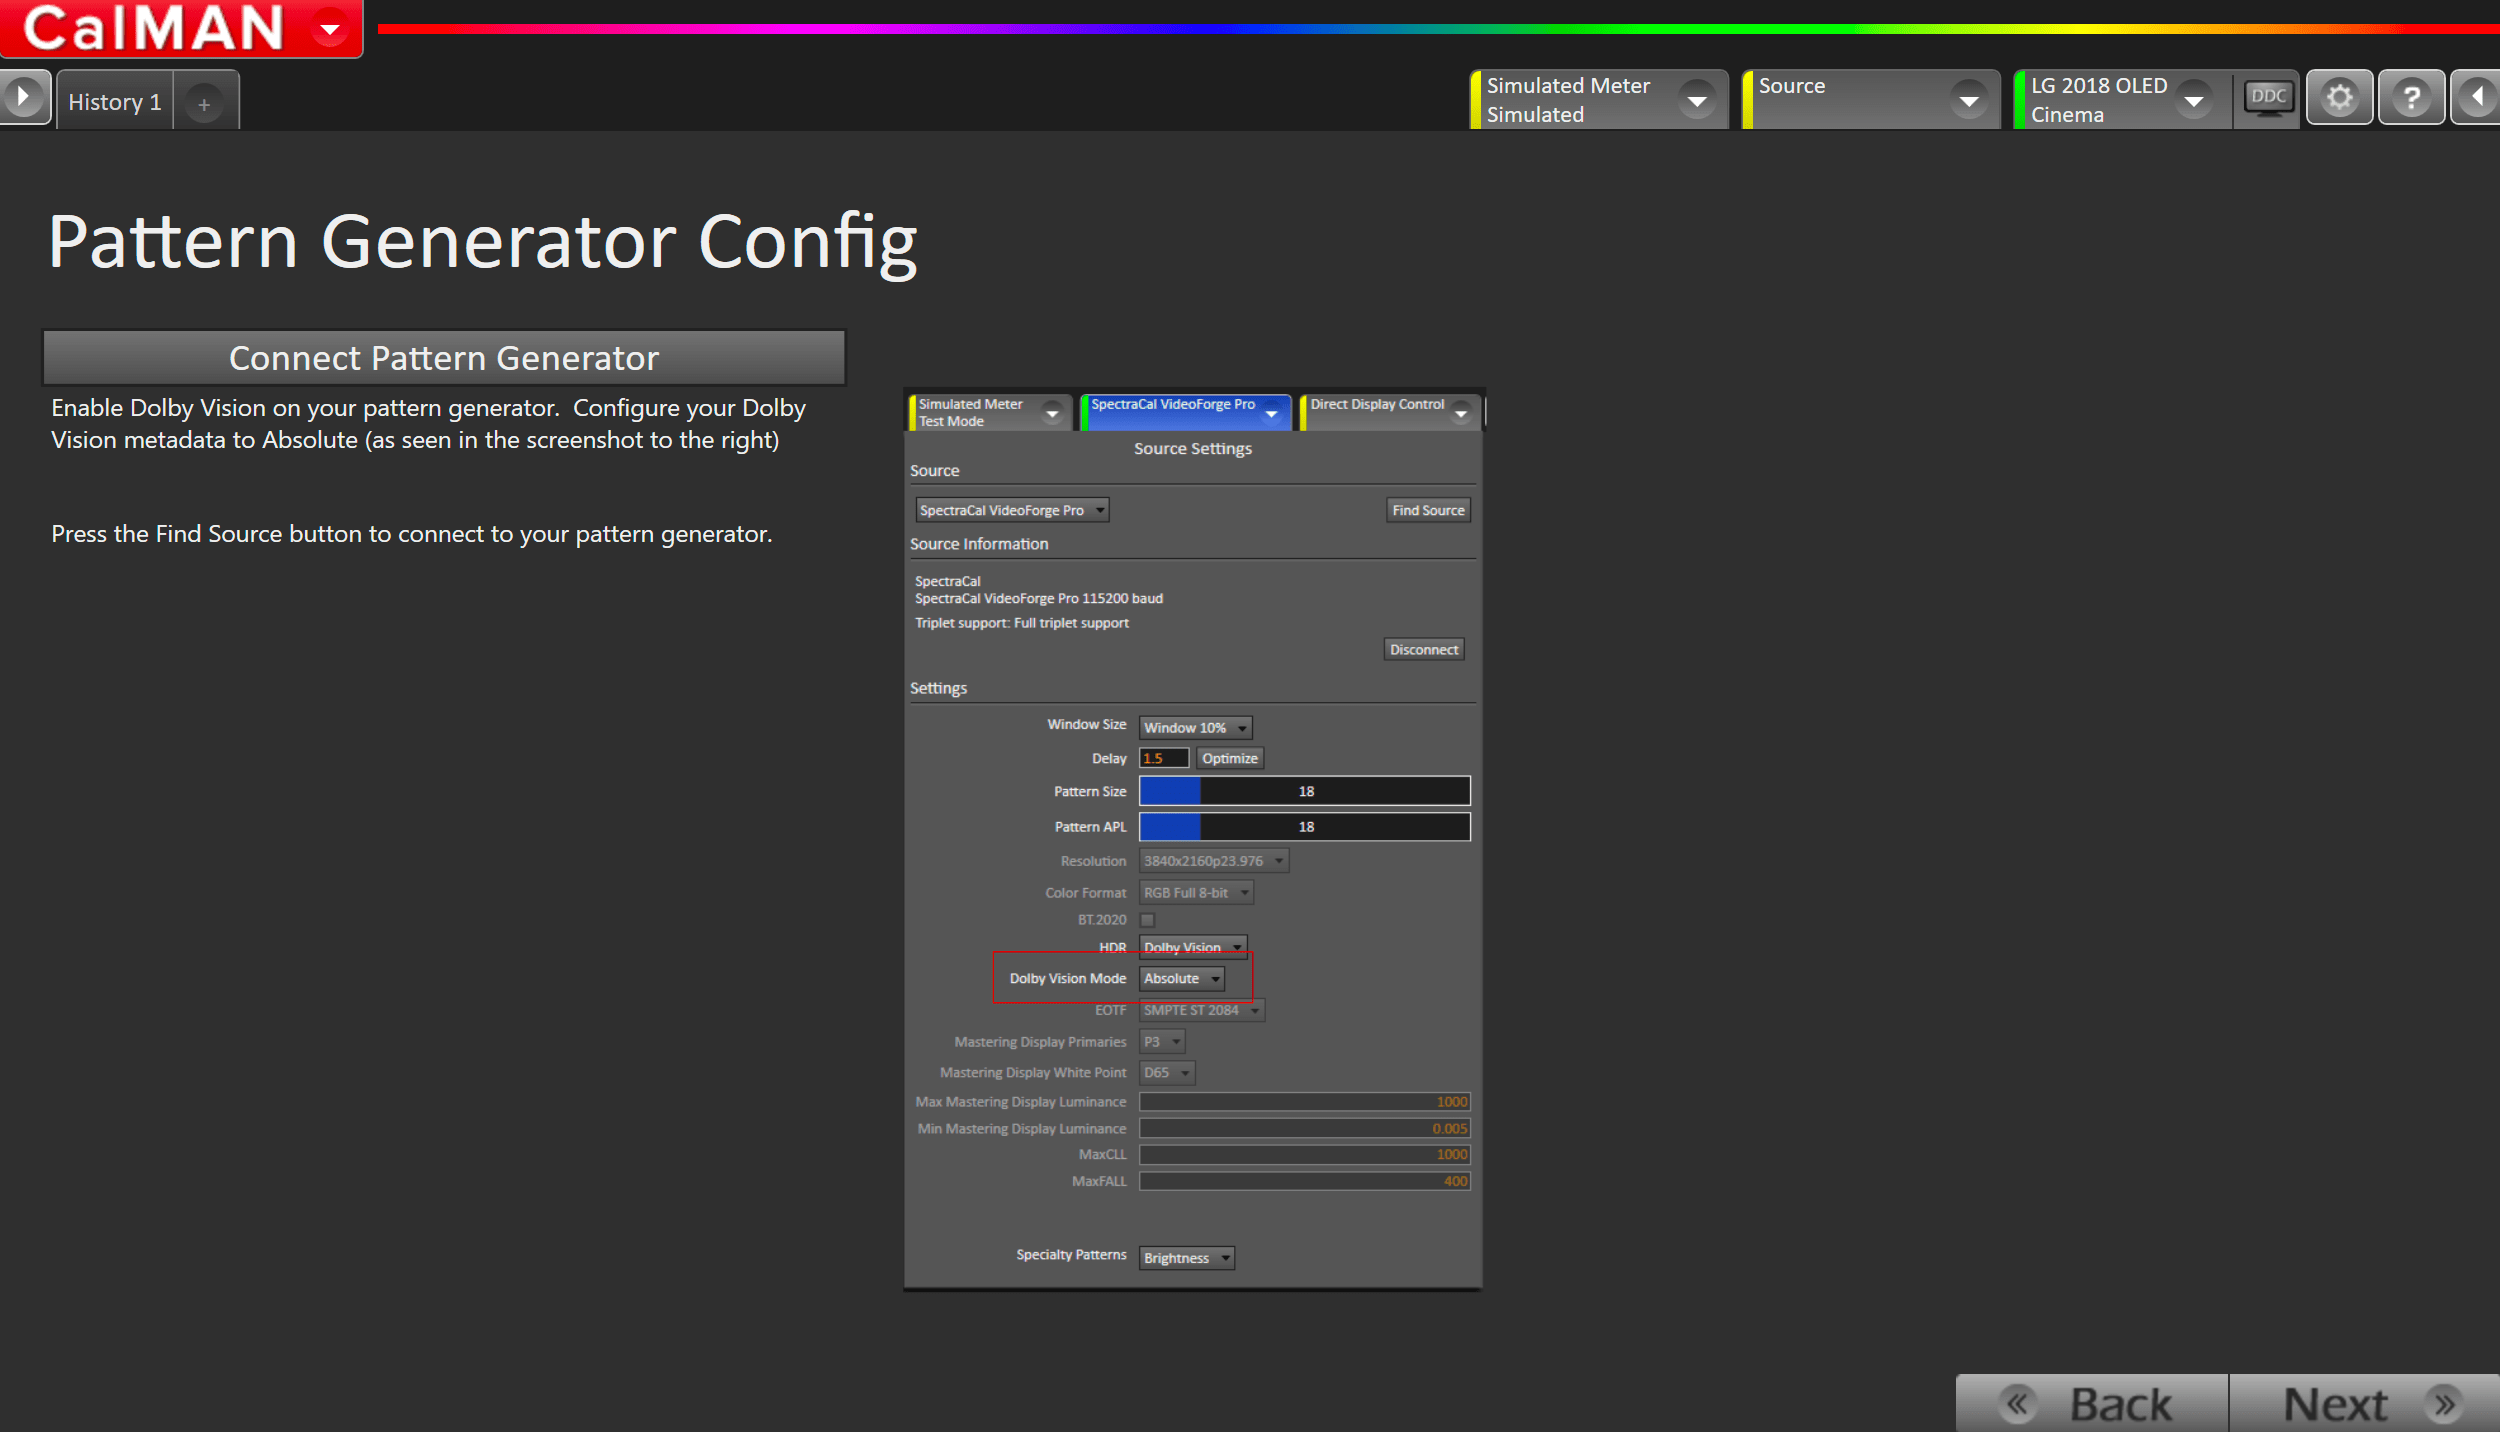
- Enable Dolby Vision on your pattern generator. Configure your Dolby Vision metadata to Absolute (as seen in the screenshot to the right)
- Click Next
- A Dolby Vision verification screen will appear to verify that the Dolby Vision signal is being interpreted properly
Step 2
For best results, please configure your Calman settings to match the configuration recommended below.
- The AutoCal Targets need to be set to dE ICtCp 240 or de ITP for both OLED and Super UHD LCD models (de ITP will take longer, but will provide improved accuracy.)
- To prevent an LG OLED display from entering its auto dimming mode during extended measurements, the Calman Pattern Insertion feature periodically inserts a different test pattern during extended test pattern measurements, to reset the display’s auto-dimming timer.
- Under Calman Settings > Application Measurement Options set the following Full Field Pattern Insertion options:
- Frequency: 5
- Duration: 5
- Pattern Level: 25
- Under Calman Settings > Application Measurement Options set the following Full Field Pattern Insertion options:
Step 3
Confirm your calibration targets and prepare TV
- For Dolby Vision, calibration targets have been preconfigured
- Hardware Options
- Pattern Size:
- OLED: Window 10%
- 2018 SuperUHD LCD: Constant APL 10
- 2019 NanoCell: Constant APL 25
- Pattern Size:
Step 4
In this step, you’ll take readings of your display before the calibration. These will be used to compare your calibration results
- To take Pre-Calibration Measurements click the Read Series […] button to measure the display’s grayscale and ColorChecker response
- This will provide a point of reference to compare your calibration results
Step 5
Using the Picture Mode dropdown menu to the right, select which Dolby Vision picture mode you would like to calibrate
- Select Picture Mode to Calibrate.
- Each Picture Mode is a separate memory slot for calibration data. Calibrations to one mode and colorspace do not affect the other picture modes.
- Using the picture mode dropdown menu on the right, select which picture mode you would like to calibrate.
- Dolby Vision Picture Modes:
- Dolby Vision Cinema
- Dolby Vision Cinema Home
- Dolby Vision Game
- Dolby Vision Picture Modes:
- After selecting your picture mode, click the Full DDC Reset button. This resets and prepares the picture mode for calibration.
- Click Next after the DDC reset is complete
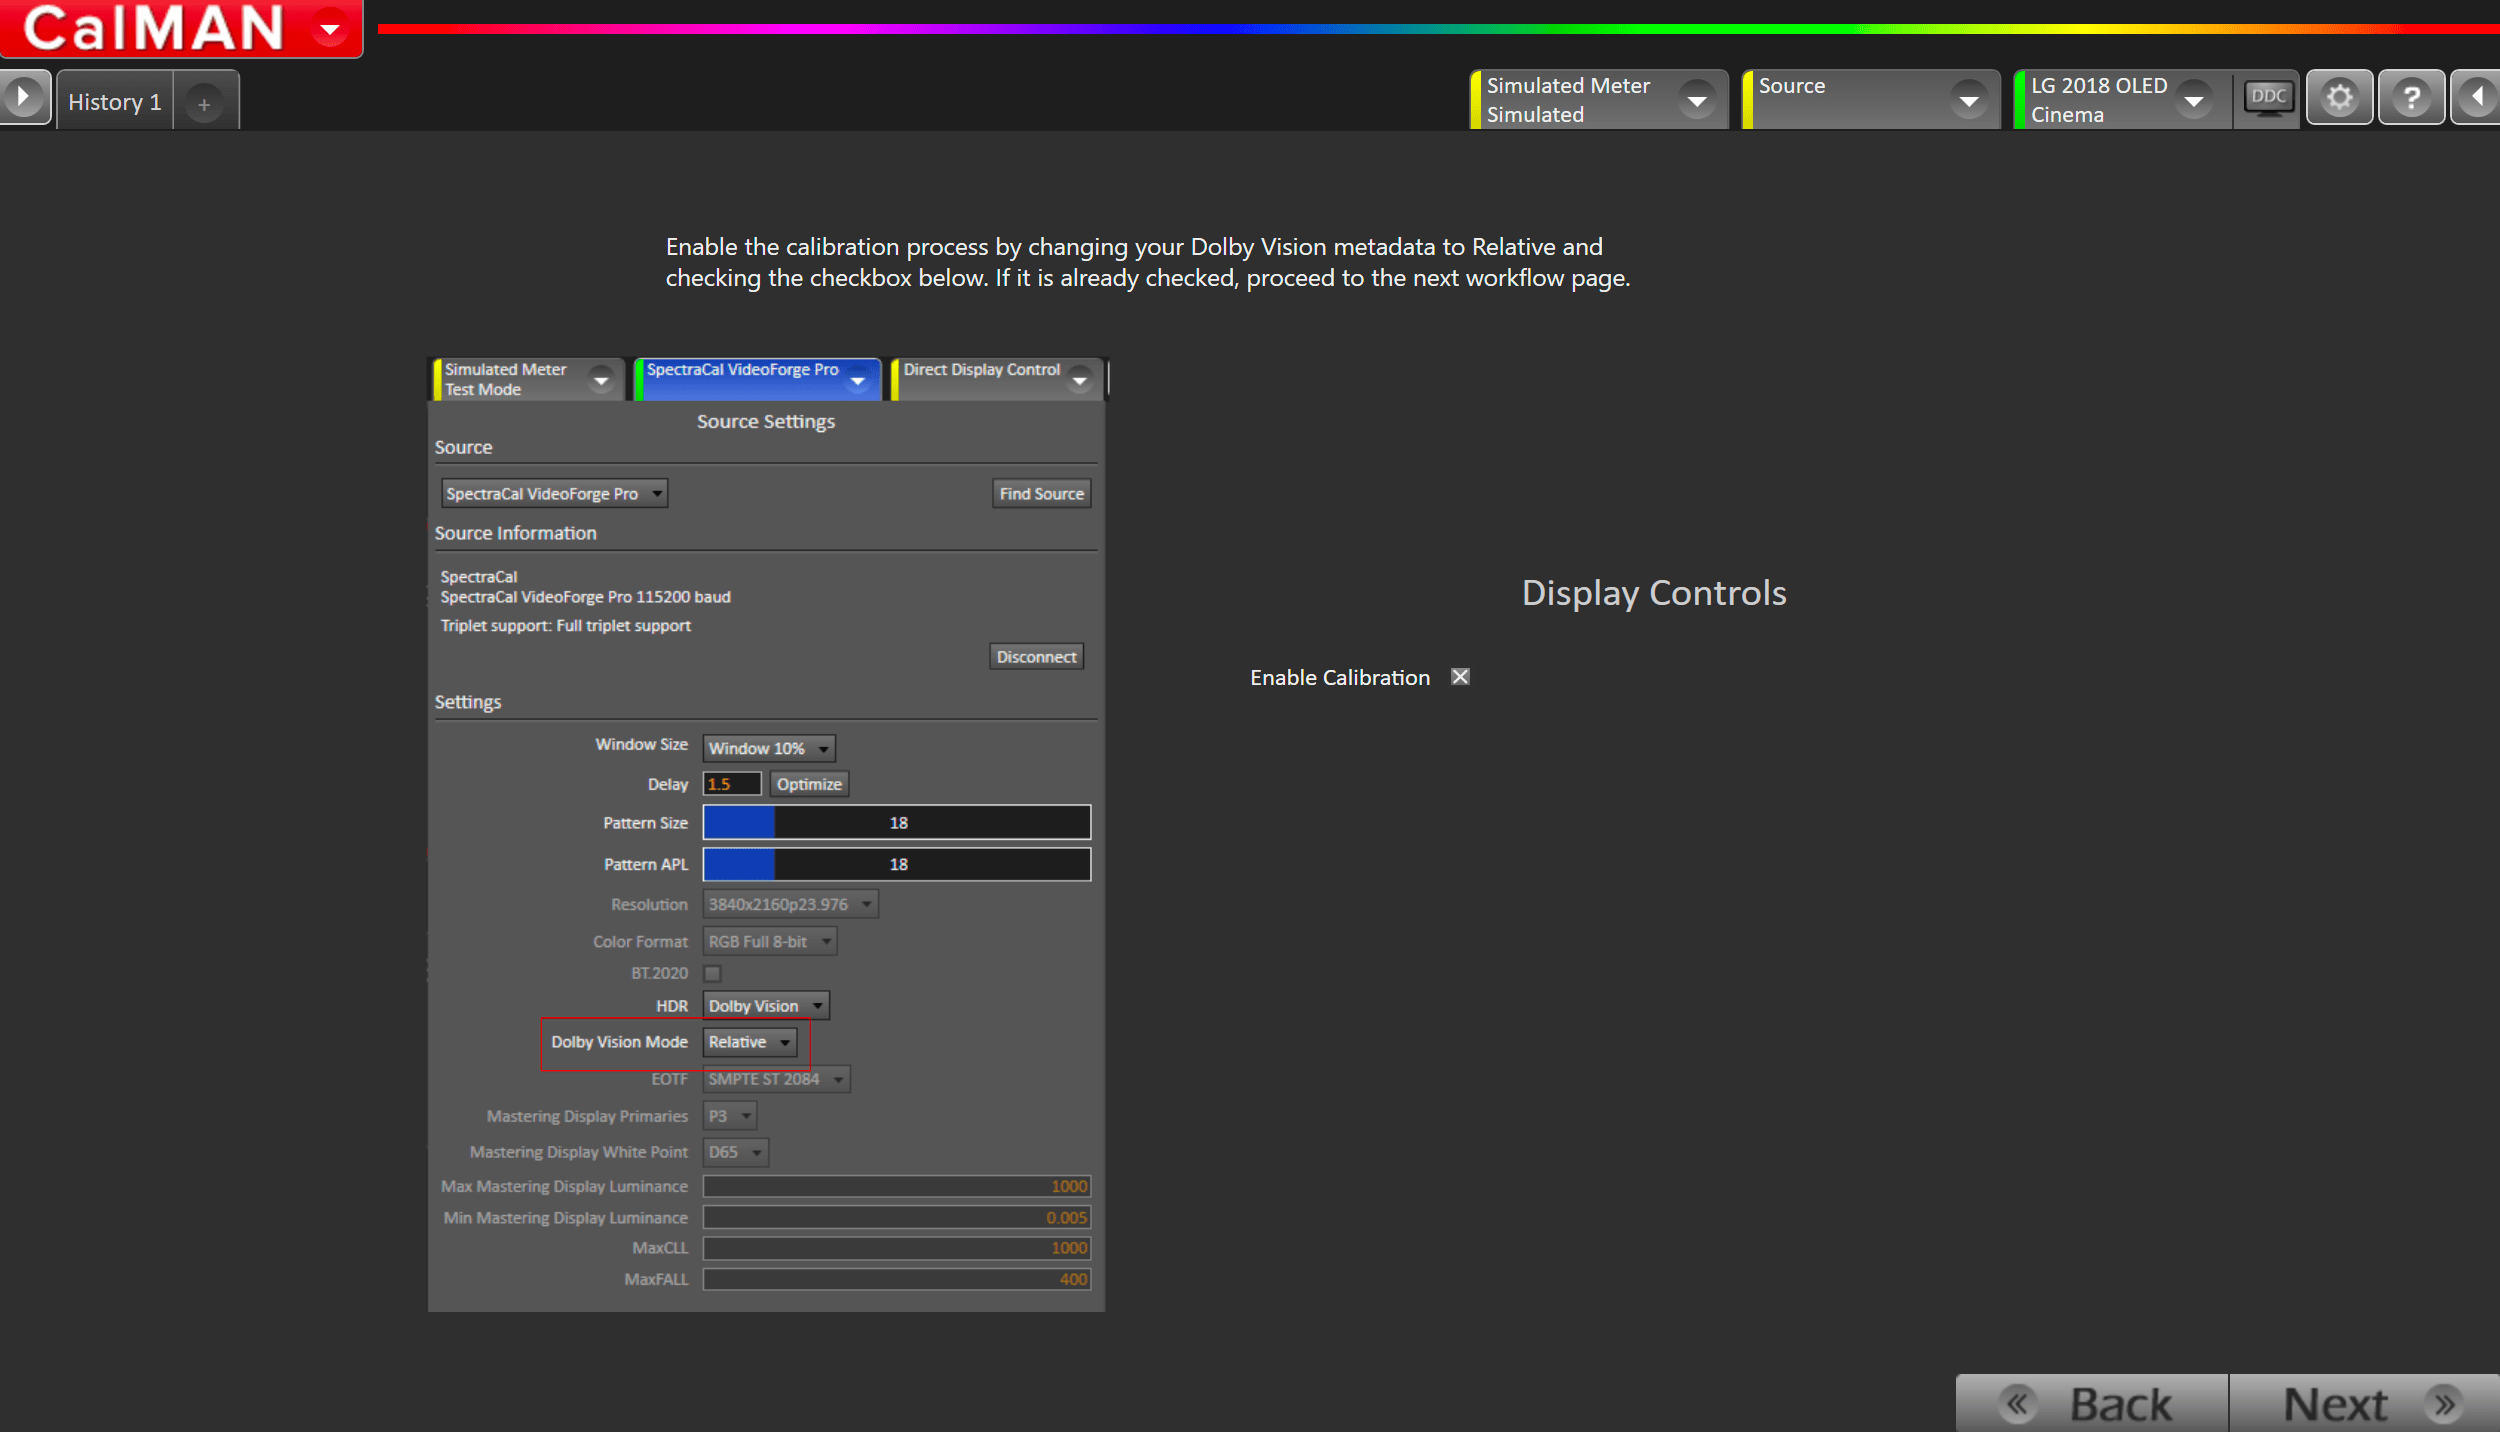
- Enable the calibration process by checking the checkbox on this page. If it is already checked, proceed to the next workflow page.
- Change your Dolby Vision metadata to Relative
Step 6
Here Calman will adjust the Multipoint Greyscale of your display using a 1D LUT
- Press the AutoCal button and select the correct data points in the AutoCal Dialog to auto-calibrate the Grayscale/Luminance response on your display.
- Select LG 20 Points HDR
- The brightness and contrast controls need to be set to default for the 1D LUT AutoCal to work correctly. (B: 50 C: 85)
- Click OK to begin greyscale AutoCal
Step 7
Here you will create a configuration file specifically for Dolby Vision. This will calibrate the CMS in Dolby Vision Mode
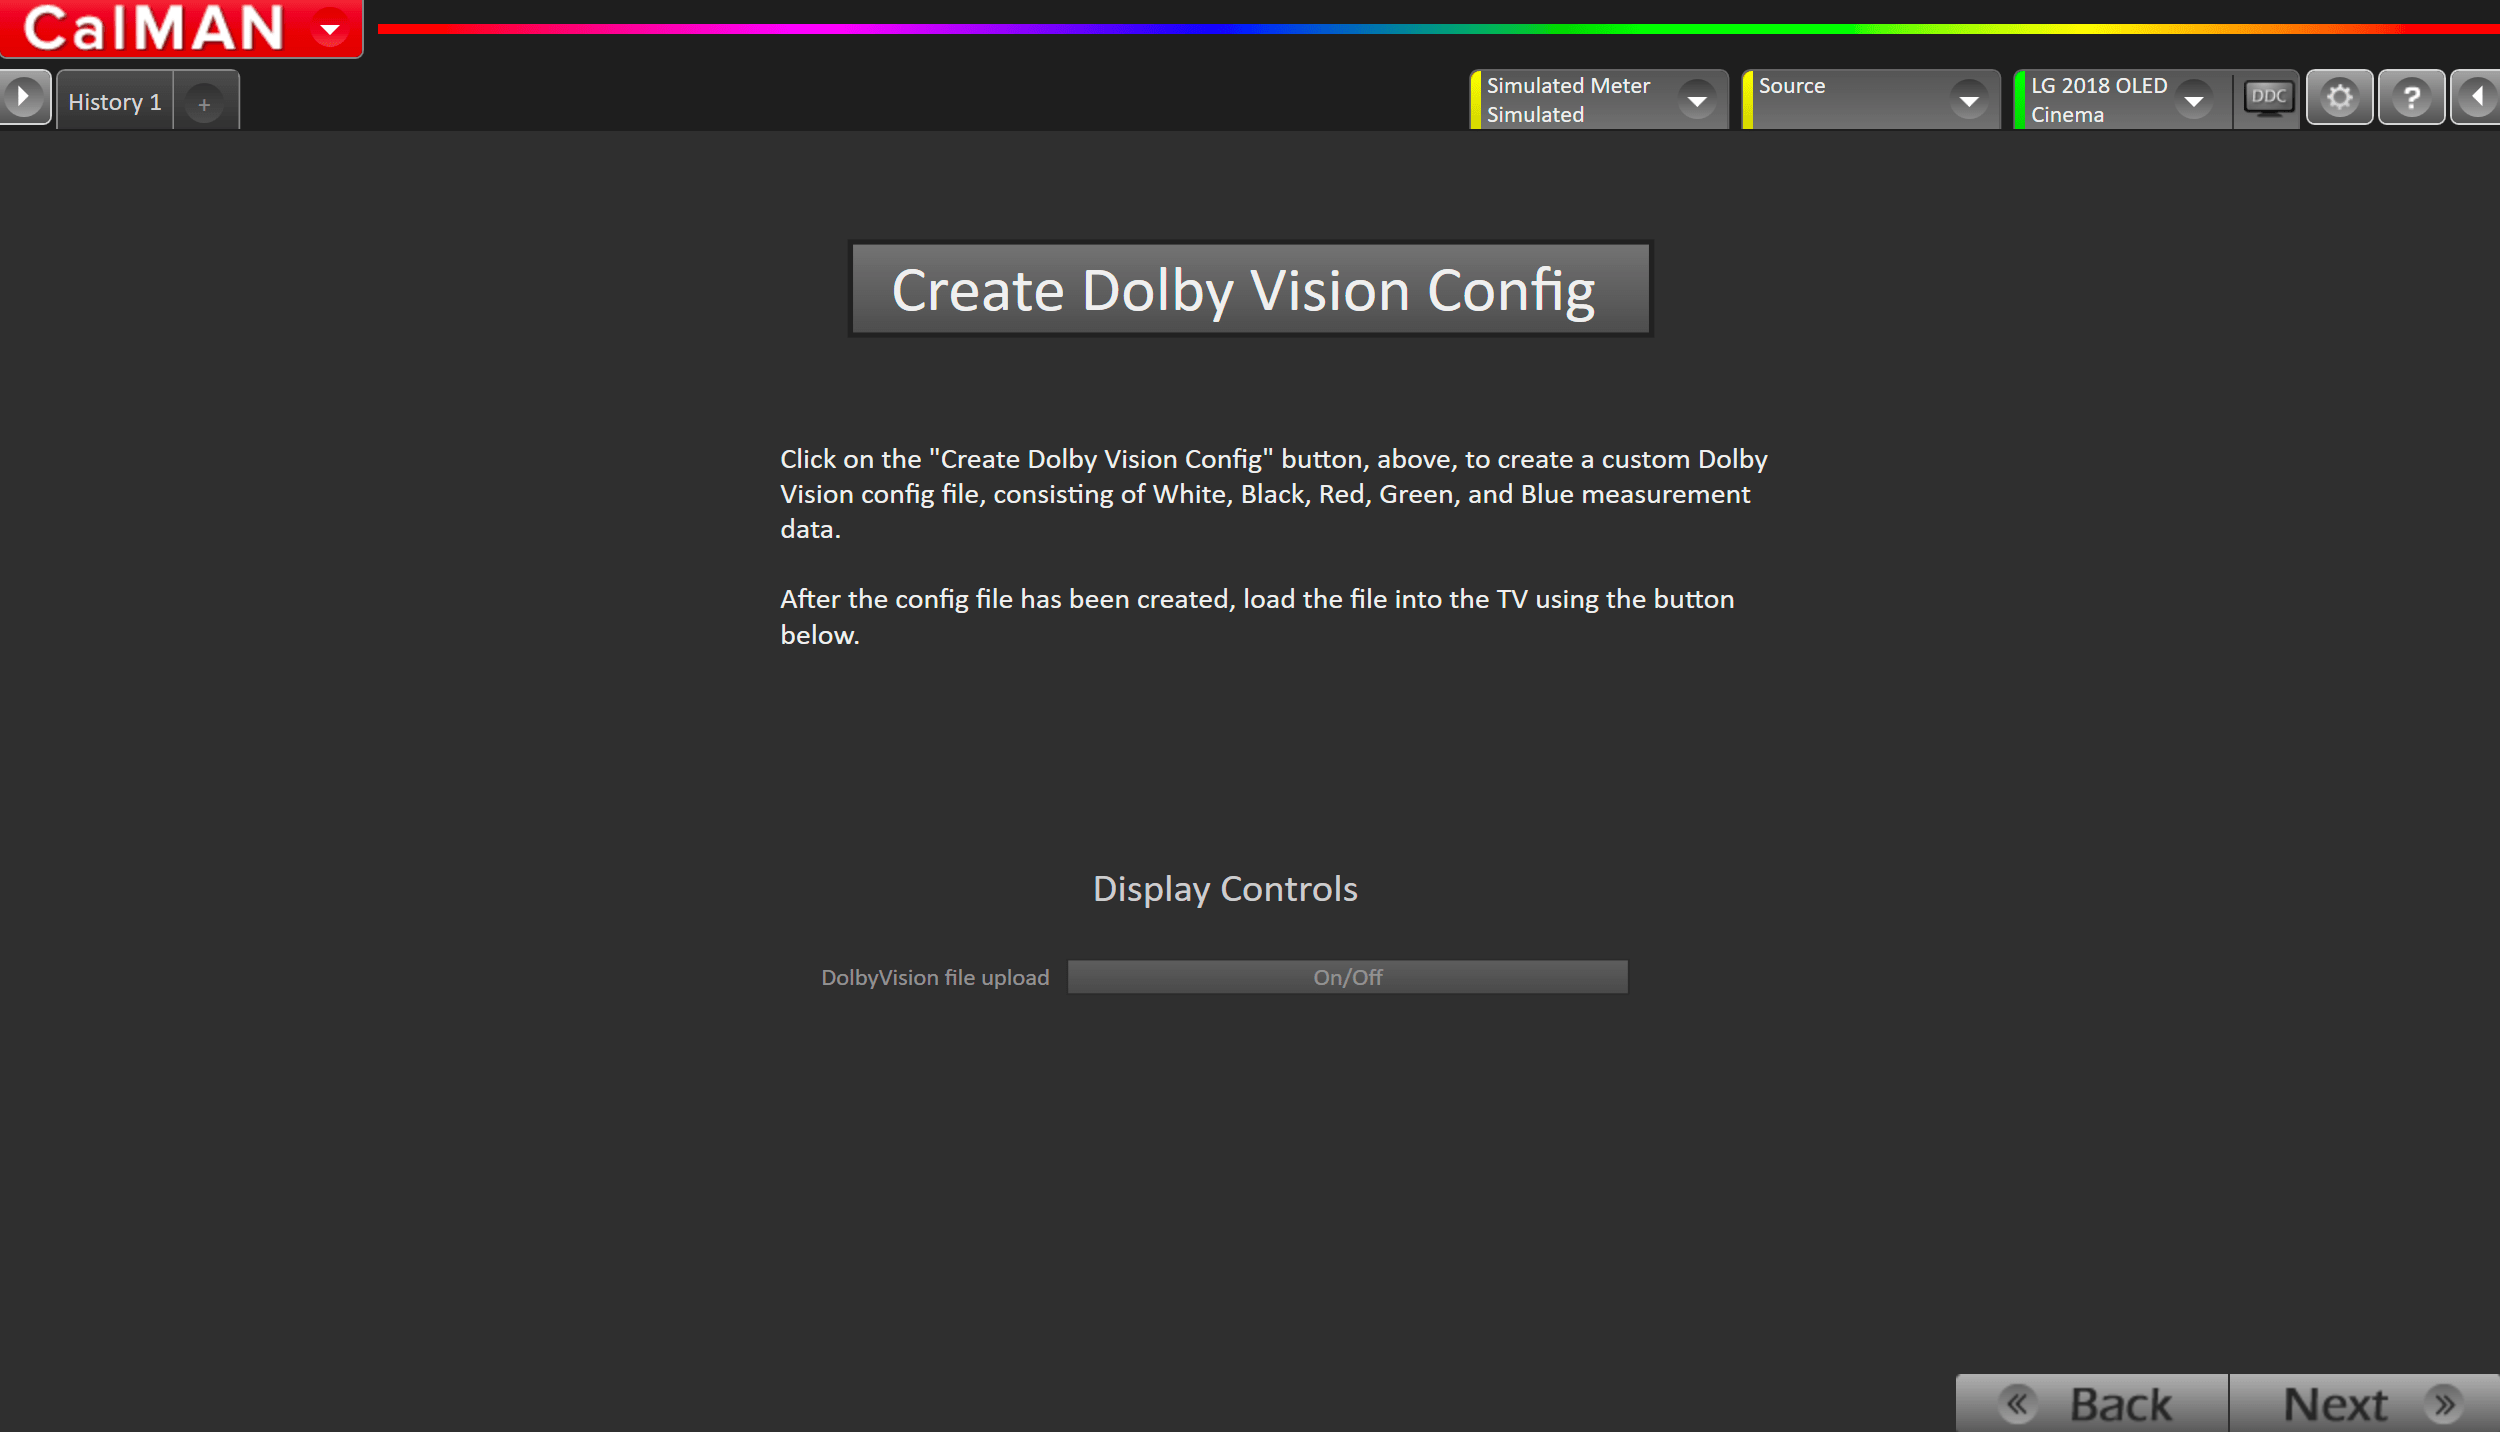
- Click on the Create Dolby Vision Config button, to create a custom Dolby Vision config file, consisting of White, Black, Red, Green, and Blue measurement data.
- After the config file has been created, load the file into the TV using the button at the bottom.
Step 8
In this step, you’ll take readings of your display after the calibration using a Greyscale Ramp
- Click the Read Series […] button to take readings
- The RGB Charts display they greyscale error with only chromaticity taken into account (top) or with chroma and luminance taken into account (bottom)
- Click Next to review calibration.
Step 9
In this step, you’ll take readings of your display after the calibration using the Pantone ColorChecker patterns
- Measure the display with Pantone ColorChecker patterns. This provides an accurate assessment of the display following calibration and will be represented along with the pre-calibration readings on the next page
- Click the Read Series […] button to measure the display’s grayscale and ColorChecker® response.
- Click Next.
Step 10
In this step, you’ll take readings of your display after the calibration using Saturation Sweeps
- Click the Read Series […] button
- Click Next to review calibration
Step 11
Post-calibration readings to document the post-calibration condition of the display.
- Click the Read Series […] button