
![]()
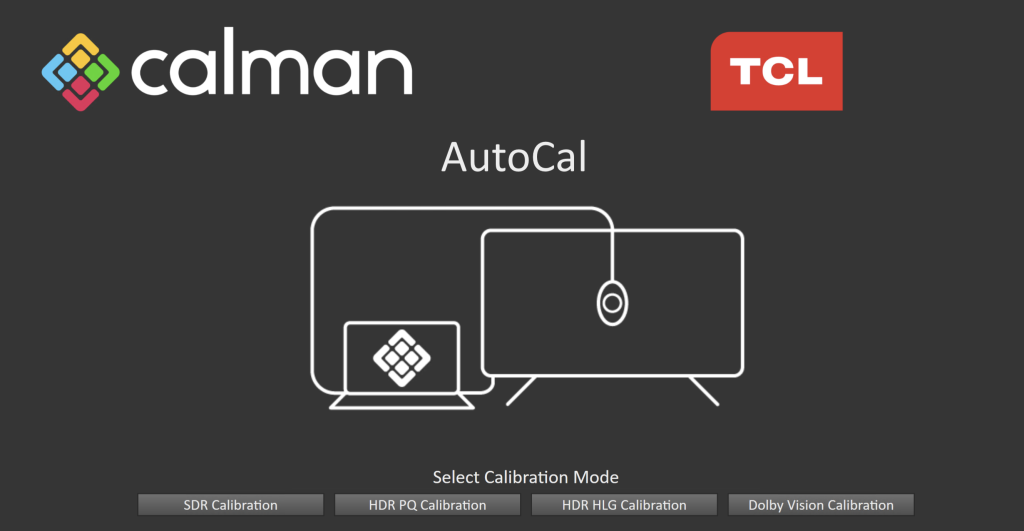
Calibration options for TCL displays include SDR, HDR PQ, HDR HLG, and Dolby Vision, utilizing the Autocal workflow. While most settings are automatically configured, the calibration of HDR, HLG, and Dolby Vision necessitates a manual adjustment of specific settings, as outlined in the workflow.
Requirements
Calman Required Version
- Calman Studio, Video Pro, or Ultimate
- Calman 2024 v5.15.6 or newer
Calman Required Workflows
- TCL AutoCal Workflow
Required Hardware
- Calman Compatible TCL TV (EU region models only)
- 2022
- C73x Series
- C83x Series
- C93x Series
- 2023
- C74xX1 Series
- C84xX1 Series
- C74xX2 Series
- C84xX2 Series
- C80x Series
- 2024
- T8x Series
- C65x Series
- C76x Series
- C85x Series
- C95x Series
- X95x Series
- 2022
- HDR Compatible Pattern Generator
- HDR Compatible Meter
- For information see Calman Compatible Meters
TV setup:
- Complete the TV network setup and ensure the TV is connected to the same local area network as the computer running Calman.
- Connect the Calman-supported pattern generator to the TV’s HDMI port 1 with a certified HDMI 2.0 (or greater) cable.
Getting Started
- From the Calman Menu in the top-left, choose Open Workflow Template -> Display Specific and then AutoCal – TCL
- Select calibration colorspace to begin the session
SDR Calibration
Show/Hide SDR Calibration Steps
Step 1
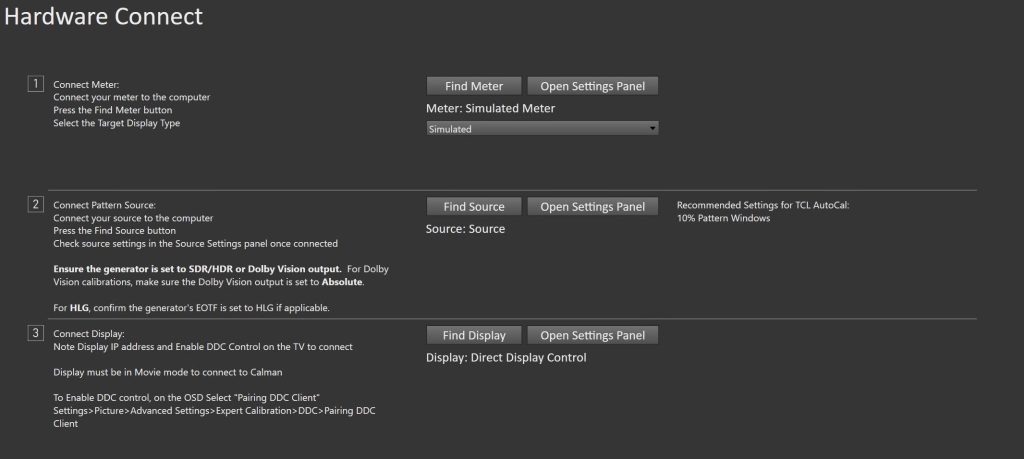
- Connect the meter: Plug your meter into a USB port on the computer and click the Find Meter button on the workflow.
- When your meter is connected, select your display type from the dropdown (this will vary by meter)
- TCL Mini-LED (Quantum Dot) for Portrait Displays C6 meters
- When your meter is connected, select your display type from the dropdown (this will vary by meter)
- Connect Pattern Source to your computer.
- Click the Find Source button then select your source
- Select the pattern window size (Window 10%)
- Connect to the TCL TV display (IP address is required)
- On TCL TV:
- Display must be in Picture Mode: Movie
- Select Settings → Picture → Advanced Settings → Expert Calibration → DDC → Pairing DDC Client
- Enter the IP address in the popup window
- Display must be in Picture Mode: Movie
- In Calman
- Click the Find Display Button
- Choose the compatible TCL model that you are calibrating
- Enter your TV’s IP Address into the connection dialog box, and click Connect
- On TCL TV:
Step 2
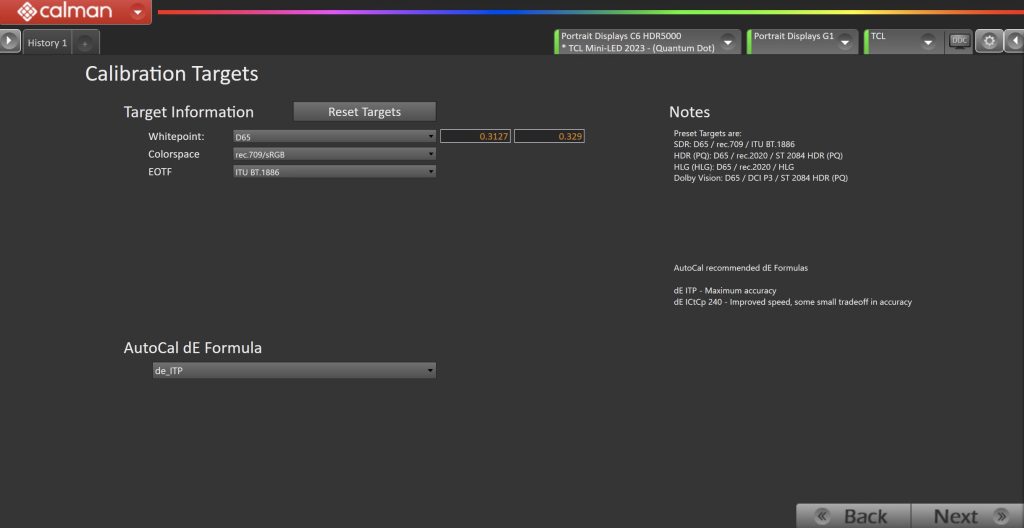
Confirm your calibration targets and prepare the TV. Settings will be automatically set as part of the workflow.
- For best SDR calibration, configure Calman settings to match the configuration recommendation provided in the workflow.
- Whitepoint: D65
- Corlorspace: Rec709
- EOFT: BT.1886
Click Next to move to the next page
Step 3
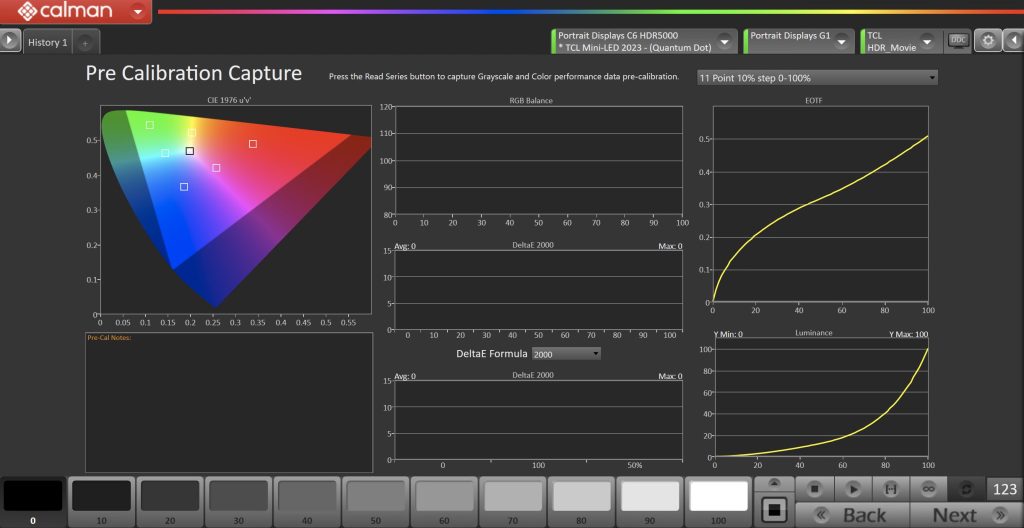
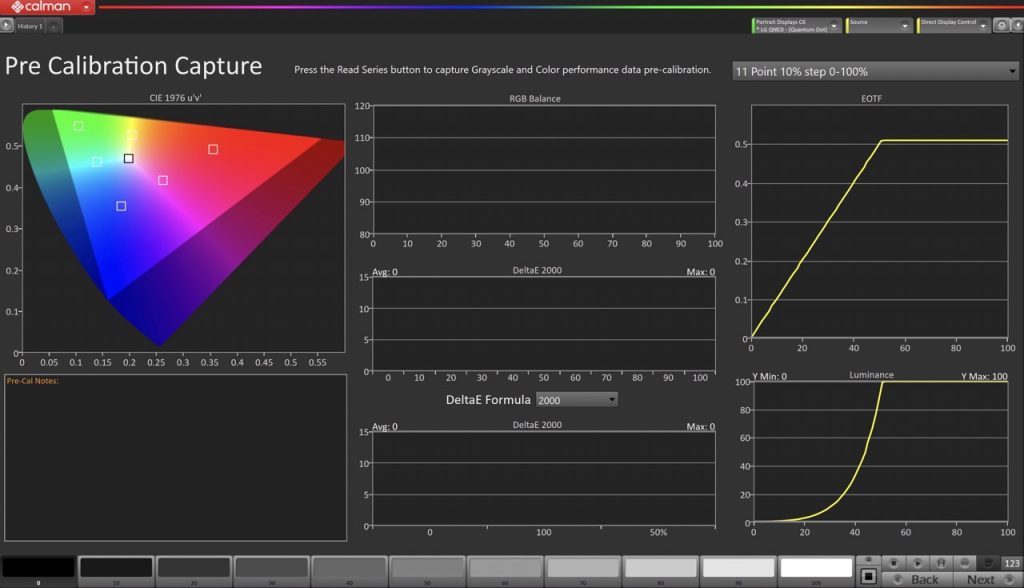
In this step, you’ll take readings of your display before the calibration. These will be used to compare your calibration results
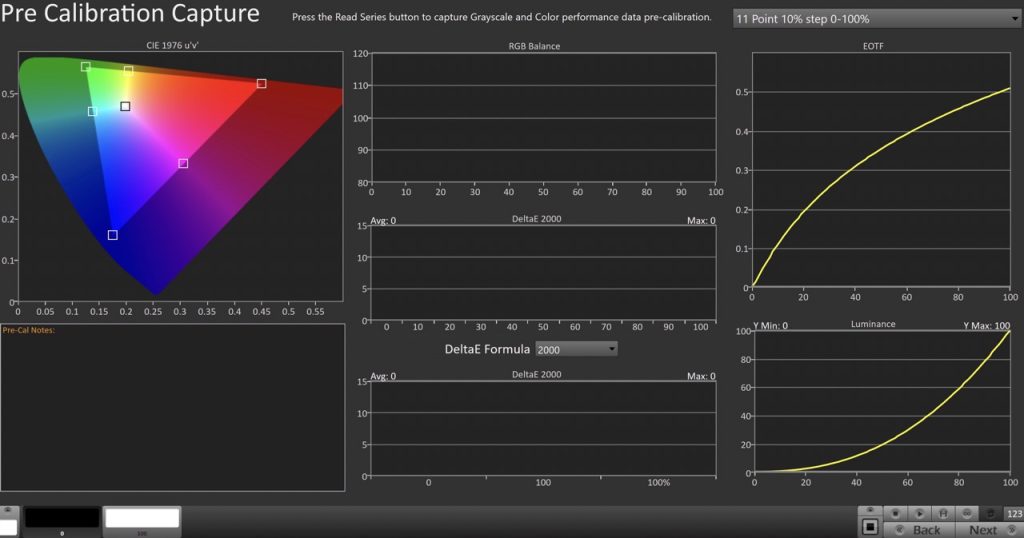
To take Pre-Calibration Measurements click the Read Series […] button to measure the display’s grayscale and ColorChecker response
- This will provide a point of reference to compare your calibration results
Once Pre-Calibration Capture is complete, click Next
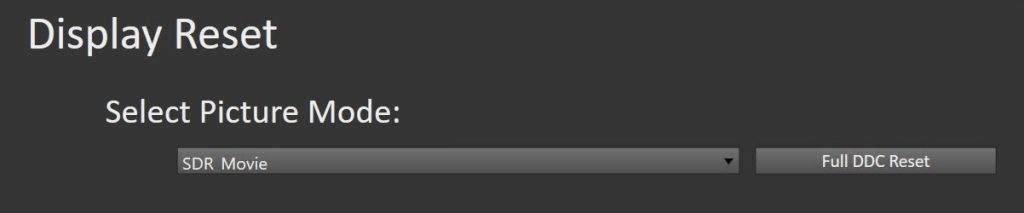
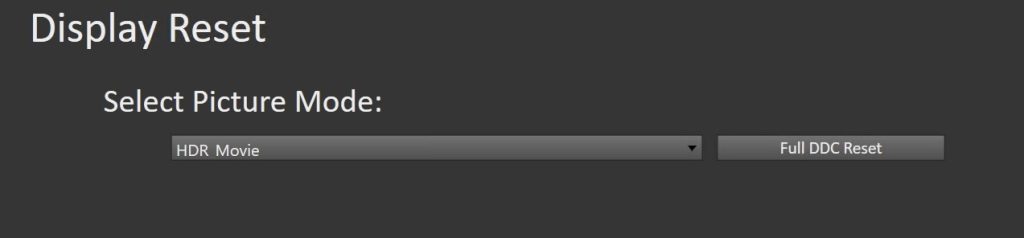
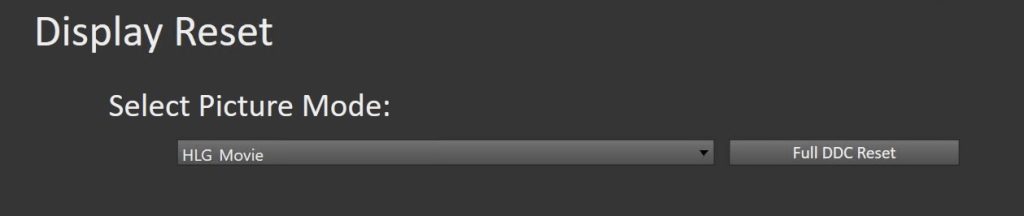
- On the Display Reset verify SDR Movie mode is selected
- Click the Full DDC Reset button. This resets and prepares the picture mode for calibration.
- Click Next after the DDC reset is complete
Step 4
In this step, you will be able to adjust the Luminance of your display to match your desired target. Luminance is a subjective target. SDR reference luminance is 100cd/m2, but you may need to target higher to account for the ambient light in your environment.
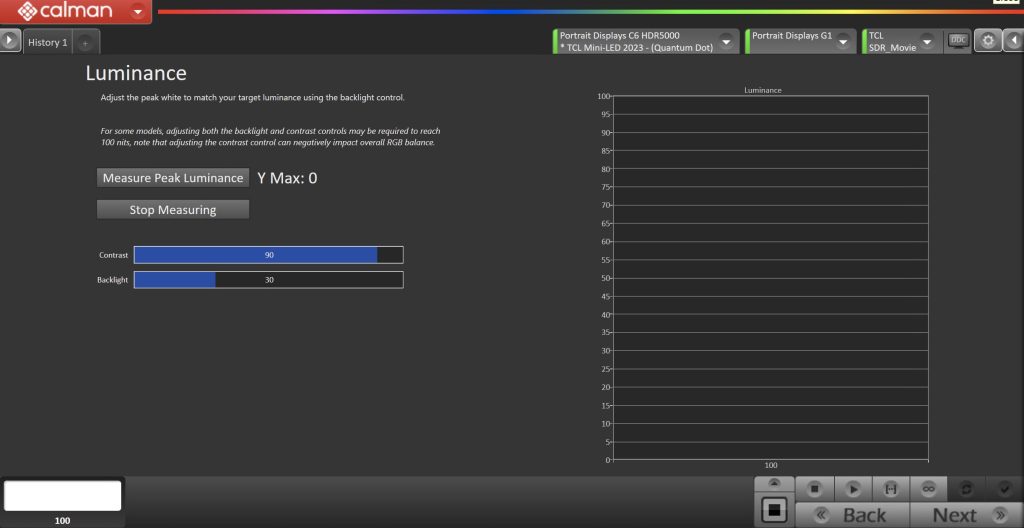
- Click the Measure Peak Luminace button to measure your TV’s light output at 100% white and adjust the display’s peak white to the desired luminance.
- Luminance is a subjective target. SDR reference luminance is 100nits, but you may need to target higher to account for the ambient light in your environment.
- Use the Contrast and Blacklight slider to adjust for the desired results.
- click Stop Measuring when luminance adjustment is complete
Click Next to move to the next page
Step 5
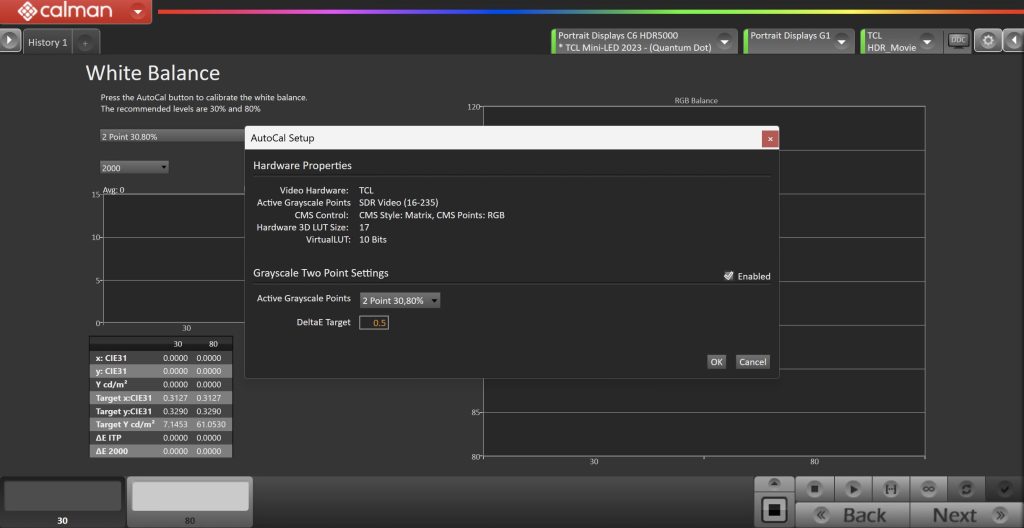
On this page, Calman will adjust your display’s White Balance
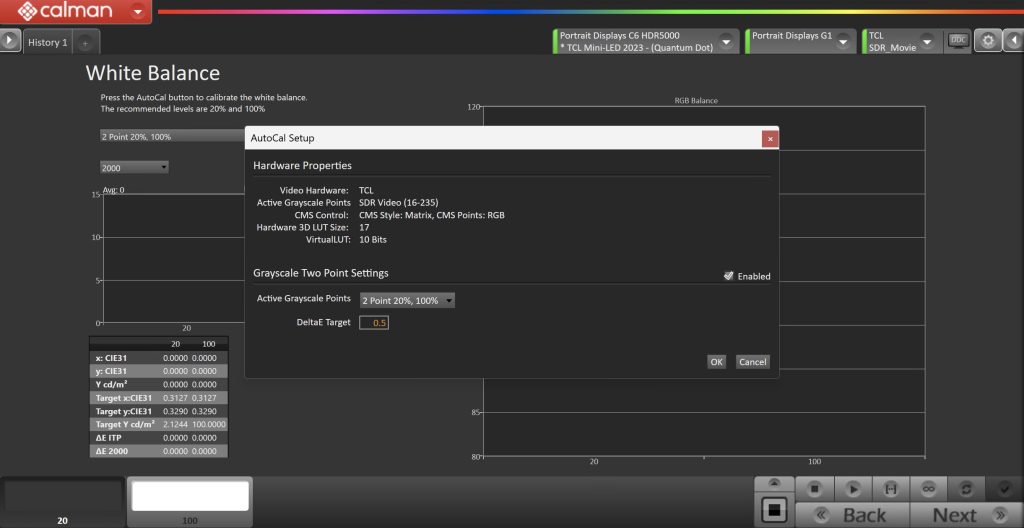
- Click the AutoCal button to perform the 2pt greyscale AutoCal
- Select Active Greyscale Points: 2 point 20%, 100%
- Click OK to begin white balance calibration
Click Next when complete to move to the next page
Step 6
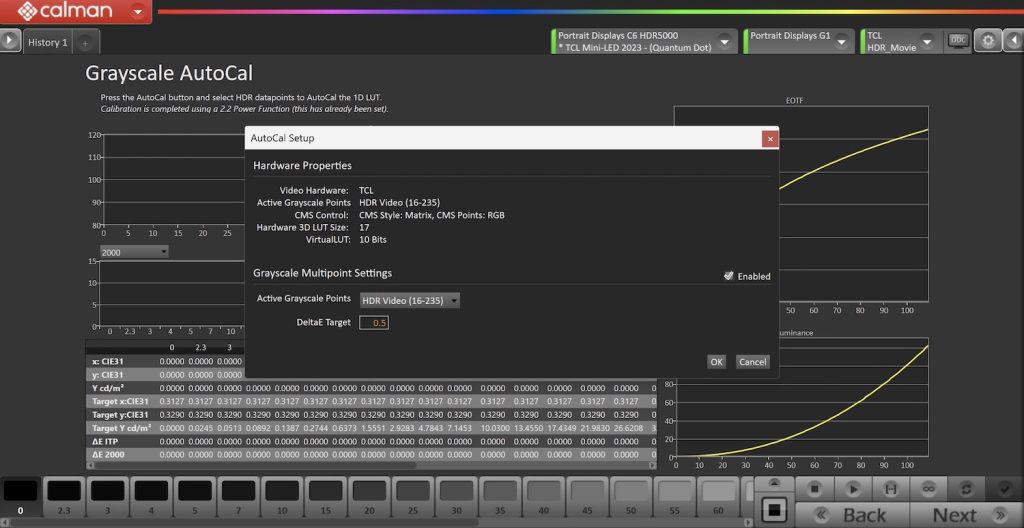
Here Calman will adjust the Multipoint Greyscale of your display
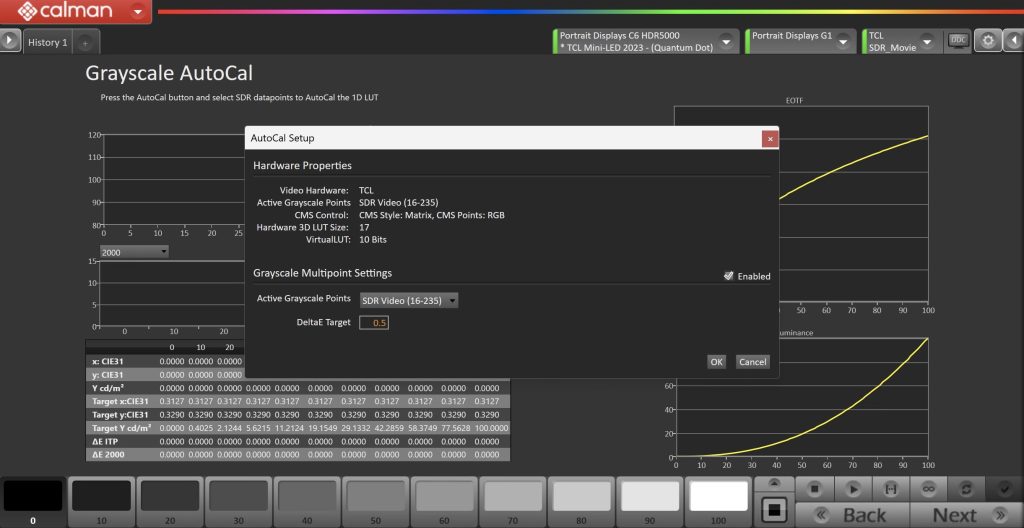
- Click the AutoCal button and verify that the SDR Video point set is selected
- Click OK to begin greyscale AutoCal
Click Next when complete to move to the next page
Step 7
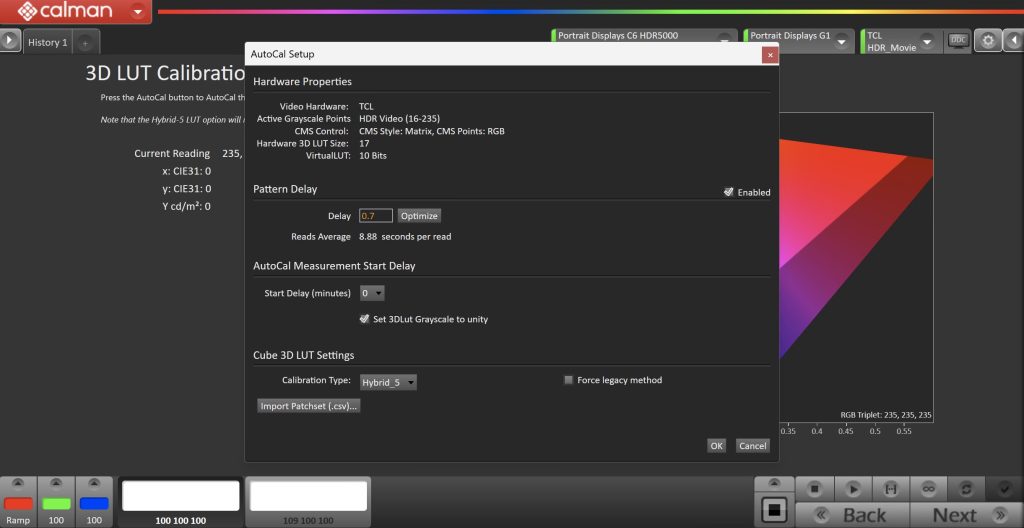
On this page, Calman will calibrate the Color Management using a 3D LUT
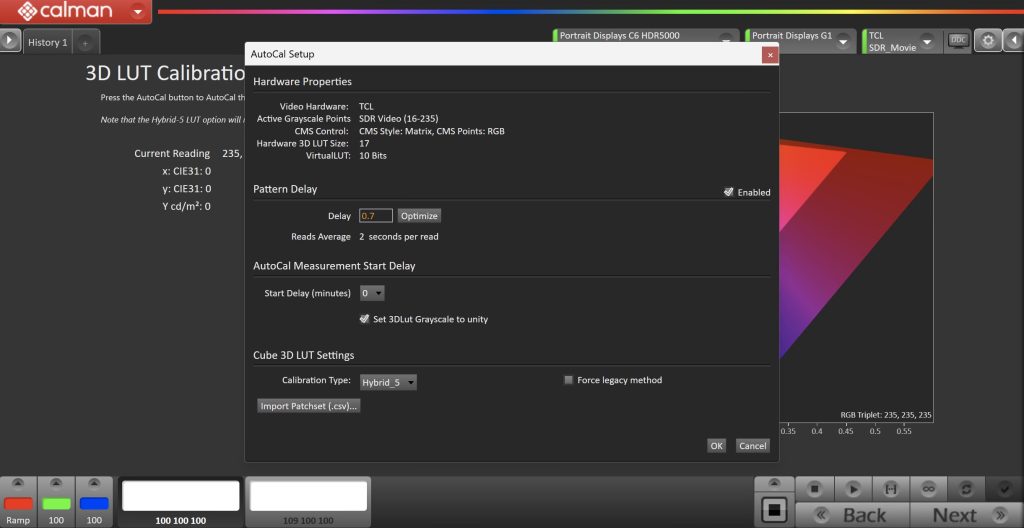
- Click the AutoCal button to open the AutoCal dialog
- Calman has multiple methods for creating a 3D LUT. For information about these LUTs see THIS ARTICLE
- The Hybrid-5 LUT option will return the best calibration/time results.
- Click OK to begin the colorspace AutoCal process
When AutoCal is complete, click the Next button to proceed
Step 8
It’s common to lose some overall luminance after the 1D LUT calibration. Use step this to adjust back to your luminance target if it has changed
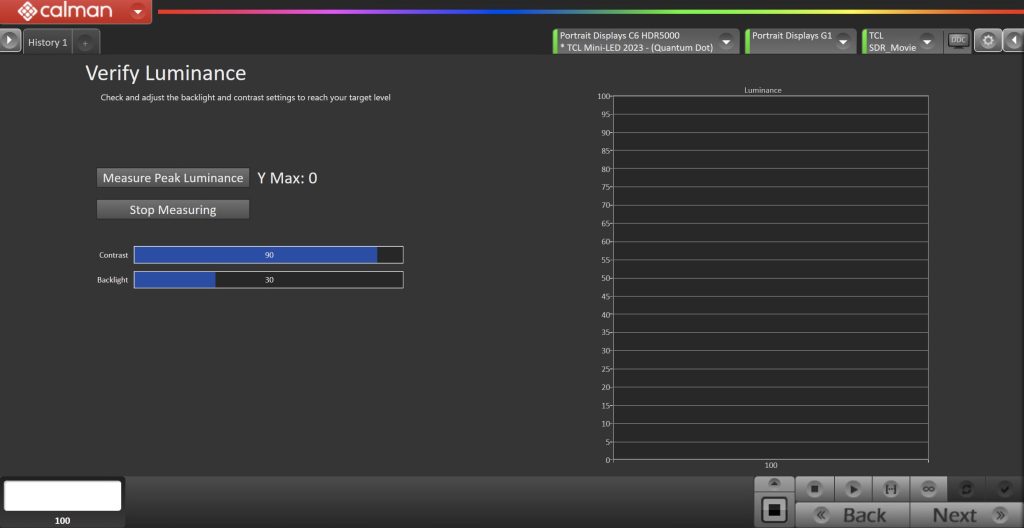
- Click the Measure Peak Luminance button to measure your TV’s light output at 100% white and adjust the display’s peak white to the desired luminance.
- Use the Contrast and Blacklight slider to adjust for the desired results.
- Click Stop Measuring when luminance adjustment is complete
Click Next to move to the next page
Step 9
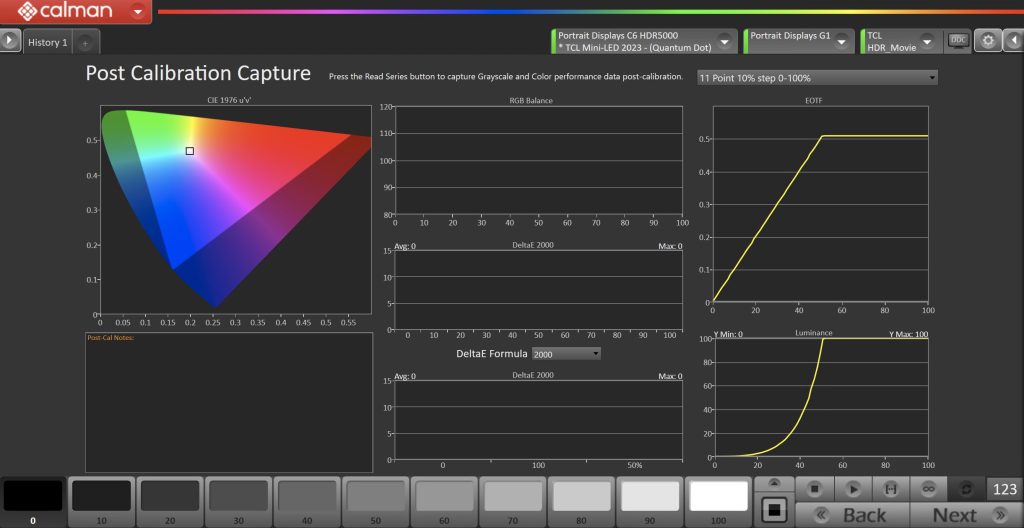
Post-calibration readings are used to document the condition of the display following calibration.
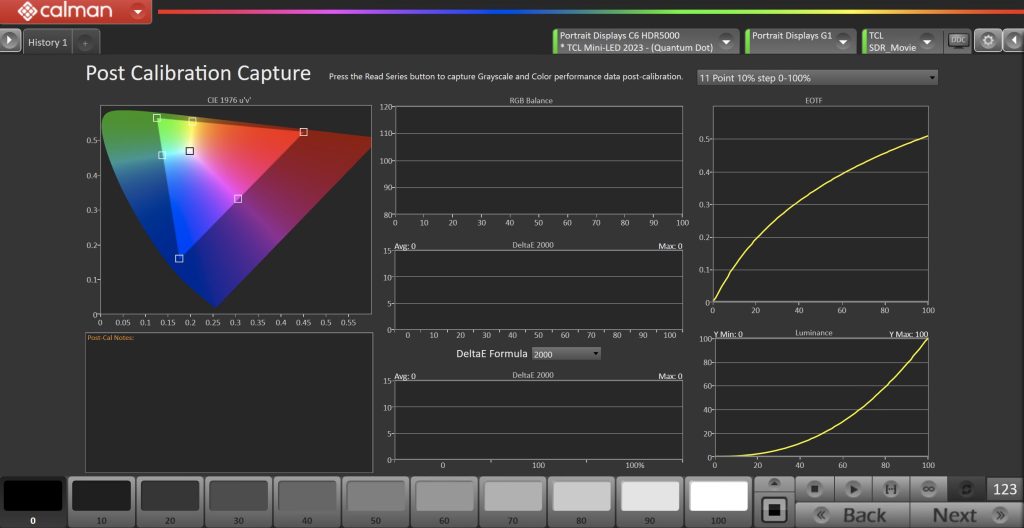
- Click the Read Series […] button
SDR calibration is complete
HDR PQ Calibration
Show/Hide HDR PQ Calibration Steps
Step 1
- Connect the meter: Plug your meter into a USB port on the computer and click the Find Meter button on the workflow.
- When your meter is connected, select your display type from the dropdown (this will vary by meter)
- TCL Mini-LED (Quantum Dot) for Portrait Displays C6 meters
- When your meter is connected, select your display type from the dropdown (this will vary by meter)
- Connect Pattern Source to your computer.
- Click the Find Source button then select your source
- Select the pattern window size (Window 10%)
- Enable HDR on your pattern generator
- Connect to the TCL TV display (IP address is required)
- On TCL TV:
- Display must be in Picture Mode: Movie
- Select Settings → Picture → Advanced Settings → Expert Calibration → DDC → Pairing DDC Client
- Enter the IP address in the popup window
- Display must be in Picture Mode: Movie
- In Calman
- Click the Find Display Button
- Choose the compatible TCL model that you are calibrating
- Enter your TV’s IP Address into the connection dialog box, and click Connect
- On TCL TV:
Step 2

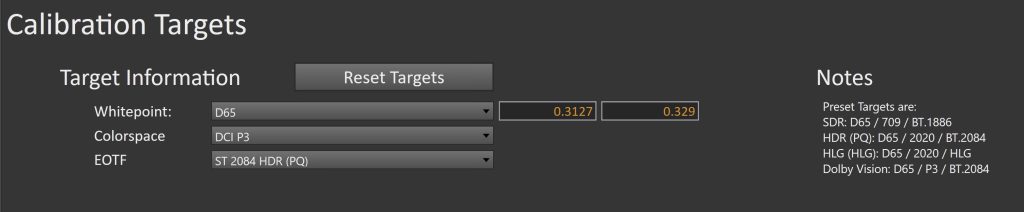
Confirm your calibration targets and prepare the TV. Settings will be automatically set as part of the workflow.
- For best HDR PQ calibration, configure Calman settings to match the configuration recommendation provided in the workflow.
- Whitepoint: D65
- Corlorspace: Rec2020
- EOFT: BT.2084
Click Next to move to the next page
Step 3
In this step, you’ll take readings of your display before the calibration. These will be used to compare your calibration results

To take Pre-Calibration Measurements click the Read Series […] button to measure the display’s grayscale and ColorChecker response
- This will provide a point of reference to compare your calibration results
Once Pre-Calibration Capture is complete, click Next
- On the Display Reset verify HDR Movie mode is selected
- Click the Full DDC Reset button. This resets and prepares the picture mode for calibration.
Click Next after the DDC reset is complete
Step 4
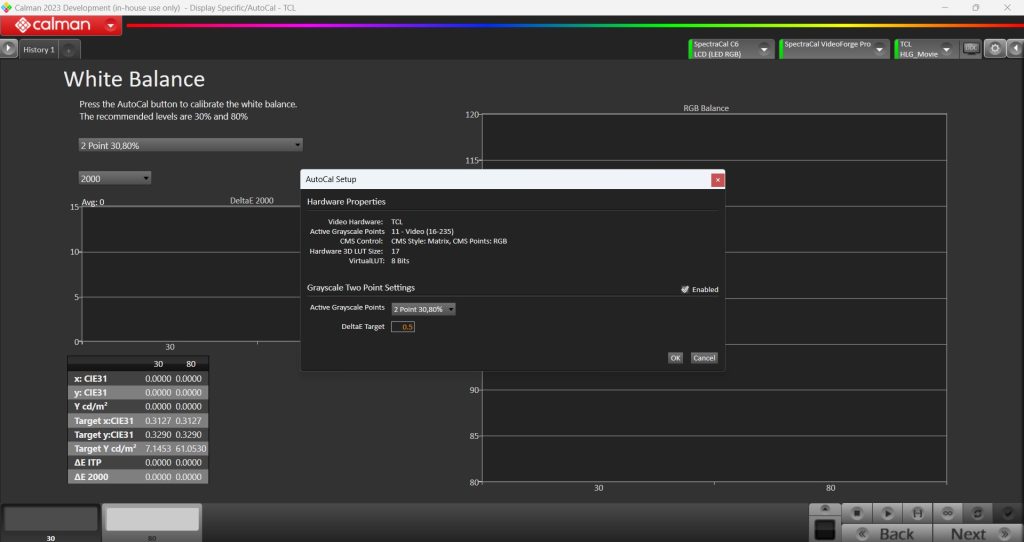
On this page, Calman will adjust your display’s White Balance
- Click the AutoCal button to perform the 2pt greyscale AutoCal
- Select Active Greyscale Points: 2 point 20%, 80%
- Click OK to begin white balance calibration
Click Next to move to the next page
Step 5
Here Calman will adjust the Multipoint Greyscale of your display
- Click the AutoCal button and verify that the HDR Video point set is selected
- Click OK to begin greyscale AutoCal
Click Next to move to the next page
Step 6
On this page, Calman will calibrate the Color Management using a 3D LUT
- Click the AutoCal button to open the AutoCal dialog
- Calman has multiple methods for creating a 3D LUT. For information about these LUTs see THIS ARTICLE
- The Hybrid-5 LUT option will return the best calibration/time results.
- Click OK to begin the colorspace AutoCal process
When AutoCal is complete, click the Next button to proceed
Step 7
In this step, Calman will measure the TV’s peak luminance and apply that to the display settings.
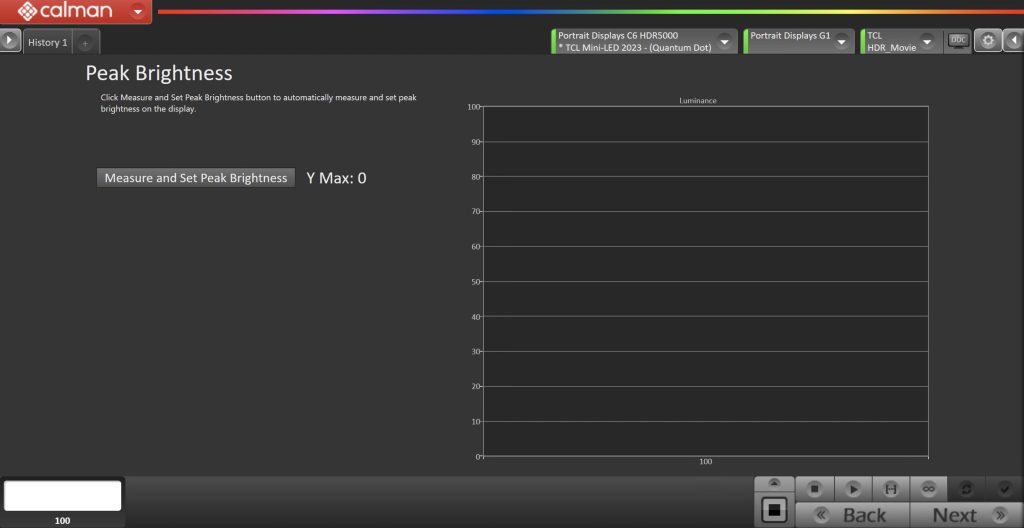
- Click the Measure and Set Peak Brightness button to measure and set peak brightness on the display automatically.
Click Next to move to the next page
Step 8
Post-calibration readings are used to document the condition of the display following calibration.
- Click the Read Series […] button
HDR PQ calibration is complete
HDR HLG Calibration
Show/Hide HDR HLG Calibration Steps
Step 1
- Connect the meter: Plug your meter into a USB port on the computer and click the Find Meter button on the workflow.
- When your meter is connected, select your display type from the dropdown (this will vary by meter)
- TCL Mini-LED (Quantum Dot) for Portrait Displays C6 meters
- When your meter is connected, select your display type from the dropdown (this will vary by meter)
- Connect Pattern Source to your computer.
- Click the Find Source button then select your source
- Select the pattern window size (Window 10%)
- Enable HDR HLG on your generator
- Some hardware will show this alongside HDR PQ options, some you will enable HDR and change the EOTF to HLG
- Connect to the TCL TV display (IP address is required)
- On TCL TV:
- Display must be in Picture Mode: Movie
- Select Settings → Picture → Advanced Settings → Expert Calibration → DDC → Pairing DDC Client
- Enter the IP address in the popup window
- Display must be in Picture Mode: Movie
- In Calman
- Click the Find Display Button
- Choose the compatible TCL model that you are calibrating
- Enter your TV’s IP Address into the connection dialog box, and click Connect
- On TCL TV:
Step 2

Confirm your calibration targets and prepare the TV. Settings will be automatically set as part of the workflow.
- For best HDR HLG calibration, configure Calman settings to match the configuration recommendation provided in the workflow.
- Whitepoint: D65
- Corlorspace: Rec2020
- EOFT: HLG
Click Next to move to the next page
Step 3
In this step, you’ll take readings of your display before the calibration. These will be used to compare your calibration results
To take Pre-Calibration Measurements click the Read Series […] button to measure the display’s grayscale and ColorChecker response
- This will provide a point of reference to compare your calibration results
Once Pre-Calibration Capture is complete, click Next
- On the Display Reset verify HLG Movie mode is selected
- Click the Full DDC Reset button. This resets and prepares the picture mode for calibration.
Click Next after the DDC reset is complete
Step 4
On this page, Calman will adjust your display’s White Balance
- Click the AutoCal button to perform the 2pt greyscale AutoCal
- Select Active Greyscale Points: 2 point 20%, 80%
- Click OK to begin white balance calibration
Click Next to move to the next page
Step 5
Here Calman will adjust the Multipoint Greyscale of your display
- Click the AutoCal button and verify that the HDR Video point set is selected
- Click OK to begin greyscale AutoCal
Click Next to move to the next page
Step 6
On this page, Calman will calibrate the Color Management using a 3D LUT
- Click the AutoCal button to open the AutoCal dialog
- Calman has multiple methods for creating a 3D LUT. For information about these LUTs see THIS ARTICLE
- The Hybrid-5 LUT option will return the best calibration/time results.
- Click OK to begin the colorspace AutoCal process
When AutoCal is complete, click the Next button to proceed
Step 7
In this step, Calman will measure the TV’s peak luminance and apply that to the display settings.

- Click the Measure and Set Peak Brightness button to measure and set peak brightness on the display automatically.
Click Next to move to the next page
Step 8
Post-calibration readings are used to document the condition of the display following calibration.

- Click the Read Series […] button
HDR HLG calibration is complete
Dolby Vision Calibration
Show/Hide Dolby Vision Calibration Steps
Step 1
- Connect the meter: Plug your meter into a USB port on the computer and click the Find Meter button on the workflow.
- When your meter is connected, select your display type from the dropdown (this will vary by meter)
- TCL Mini-LED (Quantum Dot) for Portrait Displays C6 meters
- When your meter is connected, select your display type from the dropdown (this will vary by meter)
- Connect Pattern Source to your computer.
- Click the Find Source button then select your source
- Select the pattern window size (Window 10%)
- Enable Dolby Vision on your generator
- Set Dolby Vision Mode to Absolute
- Connect to the TCL TV display (IP address is required)
- On TCL TV:
- Display must be in Picture Mode: Movie
- Select Settings → Picture → Advanced Settings → Expert Calibration → DDC → Pairing DDC Client
- Enter the IP address in the popup window
- Display must be in Picture Mode: Movie
- In Calman
- Click the Find Display Button
- Choose the compatible TCL model that you are calibrating
- Enter your TV’s IP Address into the connection dialog box, and click Connect
- On TCL TV:
Click Next to move to the next page
Step 2
Confirm your calibration targets and prepare the TV. Settings will be automatically set as part of the workflow.
- For best Dolby Vision calibration, configure Calman settings to match the configuration recommendation provided in the workflow.
- Whitepoint: D65
- Corlorspace: P3
- EOFT: BT.2084
Click Next to move to the next page
Step 3
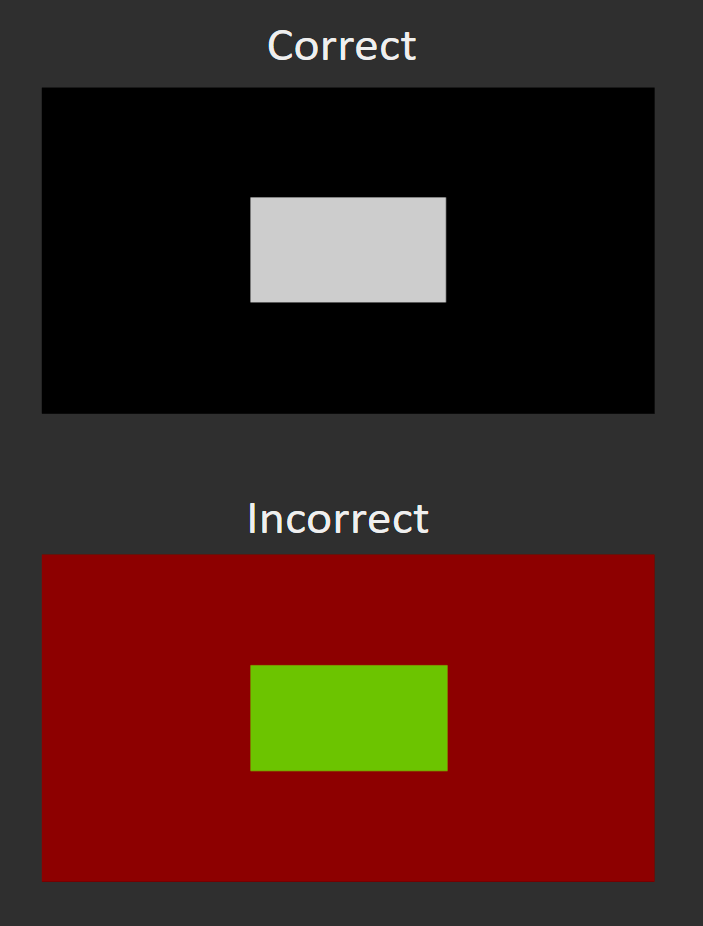
To confirm your generator is properly outputting Dolby Vision, follow the steps below
-
If your source is correctly set up to transmit Dolby Vision metadata you should see a white box on your screen; if it has not been set up correctly you will see a colored box.
-
Check that your generator is set for “Absolute” Dolby Vision Metadata (needed for pre/post measurements). This needs to be changed for calibration steps to “Relative”
Click Next to move to the next page
Step 4
In this step, you’ll take readings of your display before the calibration. These will be used to compare your calibration results
To take Pre-Calibration Measurements click the Read Series […] button to measure the display’s grayscale and ColorChecker response
- This will provide a point of reference to compare your calibration results
Once Pre-Calibration Capture is complete, click Next
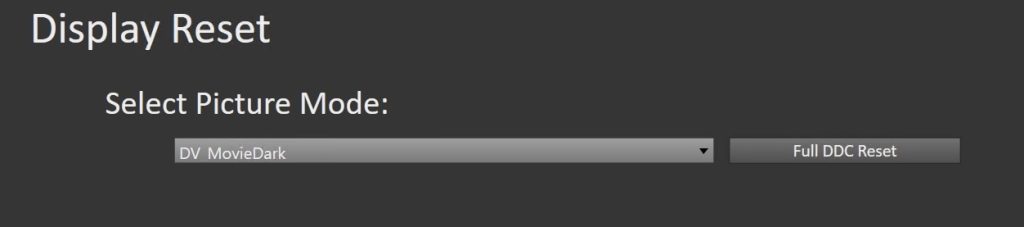
- On the Display Reset verify DV Movie Dark mode is selected
- Click the Full DDC Reset button. This resets and prepares the picture mode for calibration.
Click Next when complete to move to the next page
Step 5
On this page, Calman will adjust your display’s White Balance
- Click the AutoCal button to perform the 2pt greyscale AutoCal
- Select Active Greyscale Points: 2 point 20%, 80%
- Click OK to begin white balance calibration
Click Next when complete to move to the next page
Step 6
Here Calman will adjust the Multipoint Greyscale of your display
- Click the AutoCal button and verify that the HDR Video point set is selected
- Click OK to begin greyscale AutoCal
Click Next when complete to move to the next page
Step 7
Here you will create a configuration file specifically for Dolby Vision. This will calibrate the CMS in Dolby Vision Mode
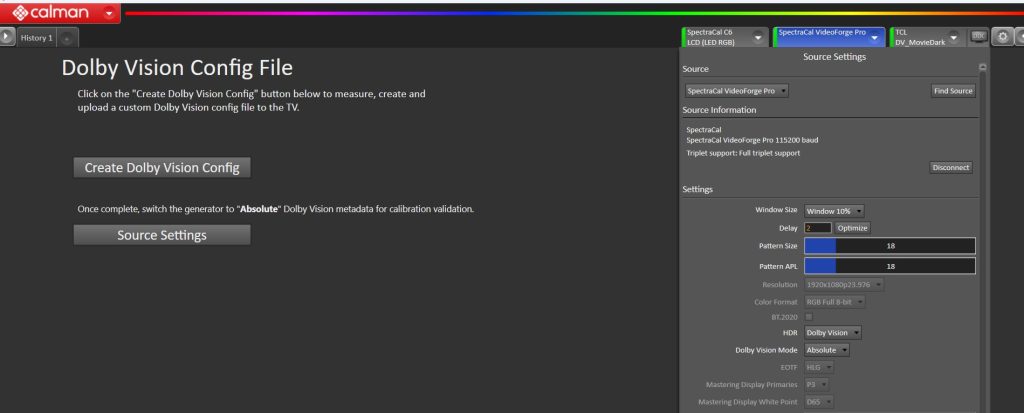
-
Click the Create Dolby Vision Config button below to measure, create and upload a custom Dolby Vision config file to the TV. Confirm the pattern generator is set to “Relative”
- Once complete, switch the generator to “Absolute” Dolby Vision metadata for calibration validation.
Step 8
Post-calibration readings are used to document the condition of the display following calibration.
- Click the Read Series […] button